
Updated on June 30, 2020
McDonald’s McPlay Toys Won’t Scan
You may find yourself at a McDonald’s at some point, against your will and with small children. You may find that you can’t get the new (in my case) Skylander’s Supercharge toys to scan into the < 2 star rated McPlay app. You may find a happy meal has descended into a third circle of hell meal. Such was my plight – googling “how to get McPlay toys to scan” only returned page after page of “I hate this, I can’t fix it” reviews.
Friends, the answer is here:
Clicking the little menu on the top left will show you this is a youtube playlist. A playlist of videos of the toys that McDonalds is handing out in their 3rd Circle meals. Don’t scan the toy, scan the video. It works.
After you’ve saved the day, it may occur to you that you could scan all kinds of other toys that you may or may not have physically received in said meal. I’ll leave it up to you if you want to go from 3rd Circle to 4th Circle.
Updated on January 12, 2021
FreeLoader Child Carrier LEVEL UP
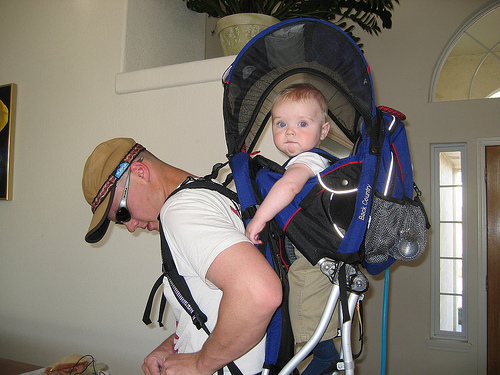
Months ago I started the search for a better way to carry our son on my back. Zeke has cerebral palsy, and can’t walk without some extensive foot/leg hardware and a walker. Even then he’s limited to hard, flat surfaces and his range is measured in yards, not miles. Since he was little, I’ve carried him in a variety of “child” carriers, from the early days in the BabyBjorn (worth the money, people.) up until he reached the weight and size limits of the Kelty Pathfinder Kid Carrier. Sure, most of the time he has a wheelchair, but as a guy who used to actually climb mountains, there are some limitations on wheels. Zeke is also the youngest of four, so there are sometimes some simple things that we can’t do with a wheelchair. Like hiking.
I started the search in earnest about a year after I couldn’t carry him in the Kelty any more. It had been a while since I’d felt really free to take him anywhere. We’d moved back to Colorado to be closer to specialists and doctors, and it was starting to kill me that we couldn’t just go out for a short hike with everyone. There are several “large kid” carrying options, but it took me a while to find one that would let me carry Zeke around like a traditional frame pack. Other (admittedly cheaper) options included the http://piggybackrider.com/ which I think looks like a fantastic idea although it does require your child to support themselves on their own legs.
On a side note, there is some vitriol out there towards parents who won’t make their older kids walk and need to carry them. If you’ve ever taken the time to type this sentiment out and post it to a public forum, don’t worry – you’re a much better parent than the rest of us. No need to feel insecure.
Then I found the guys at FreeLoader. http://www.myfreeloader.com/

The FreeLoader was exactly what I was looking for; a seat for the child to sit on, waist belt and shoulder strap, the child’s weight distributed like a traditional backcountry pack. I was excited to get it – the guys seem to get the problem and have even stumbled on the special-needs niche, at least to some degree. They were great to work with, even resolving a shipping issue quickly and to my complete satisfaction. Yes, the FreeLoader is a little on the expensive side – but there is literally nothing else like it on the market. FreeLoader got its start on Indigogo back in 2013, and they had an appearance on SharkTank, with an offer that they ultimately turned down.
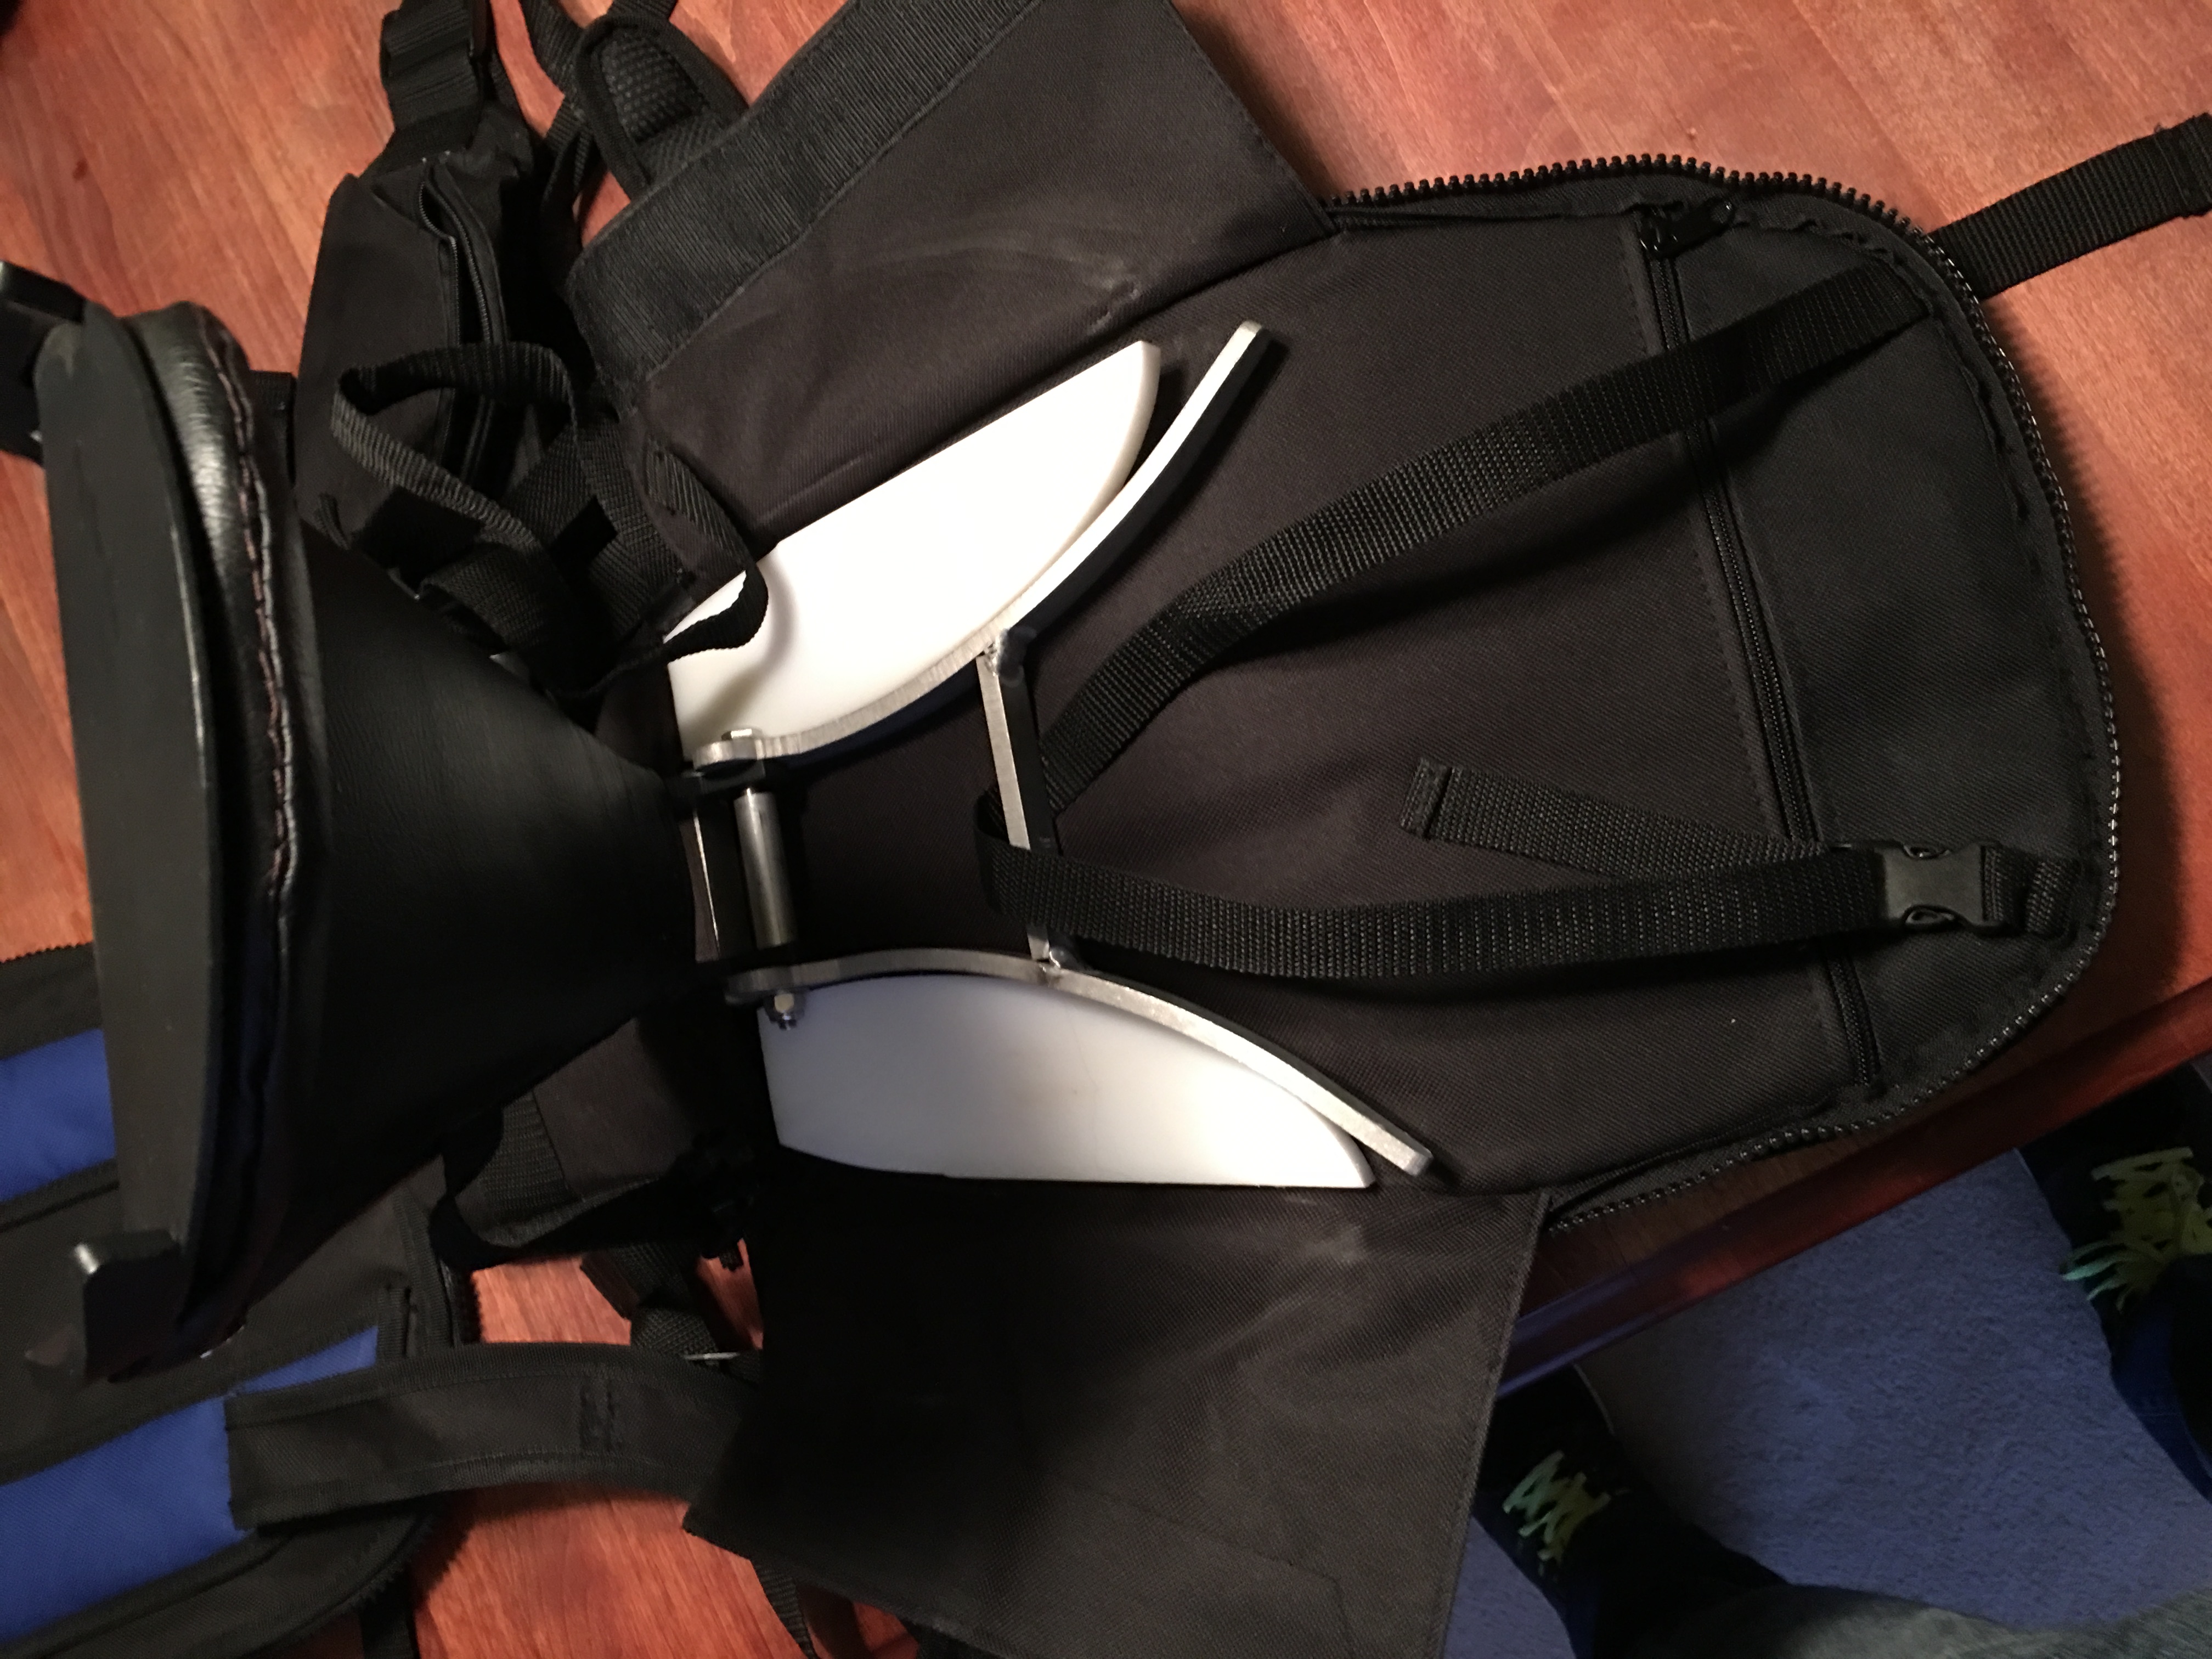
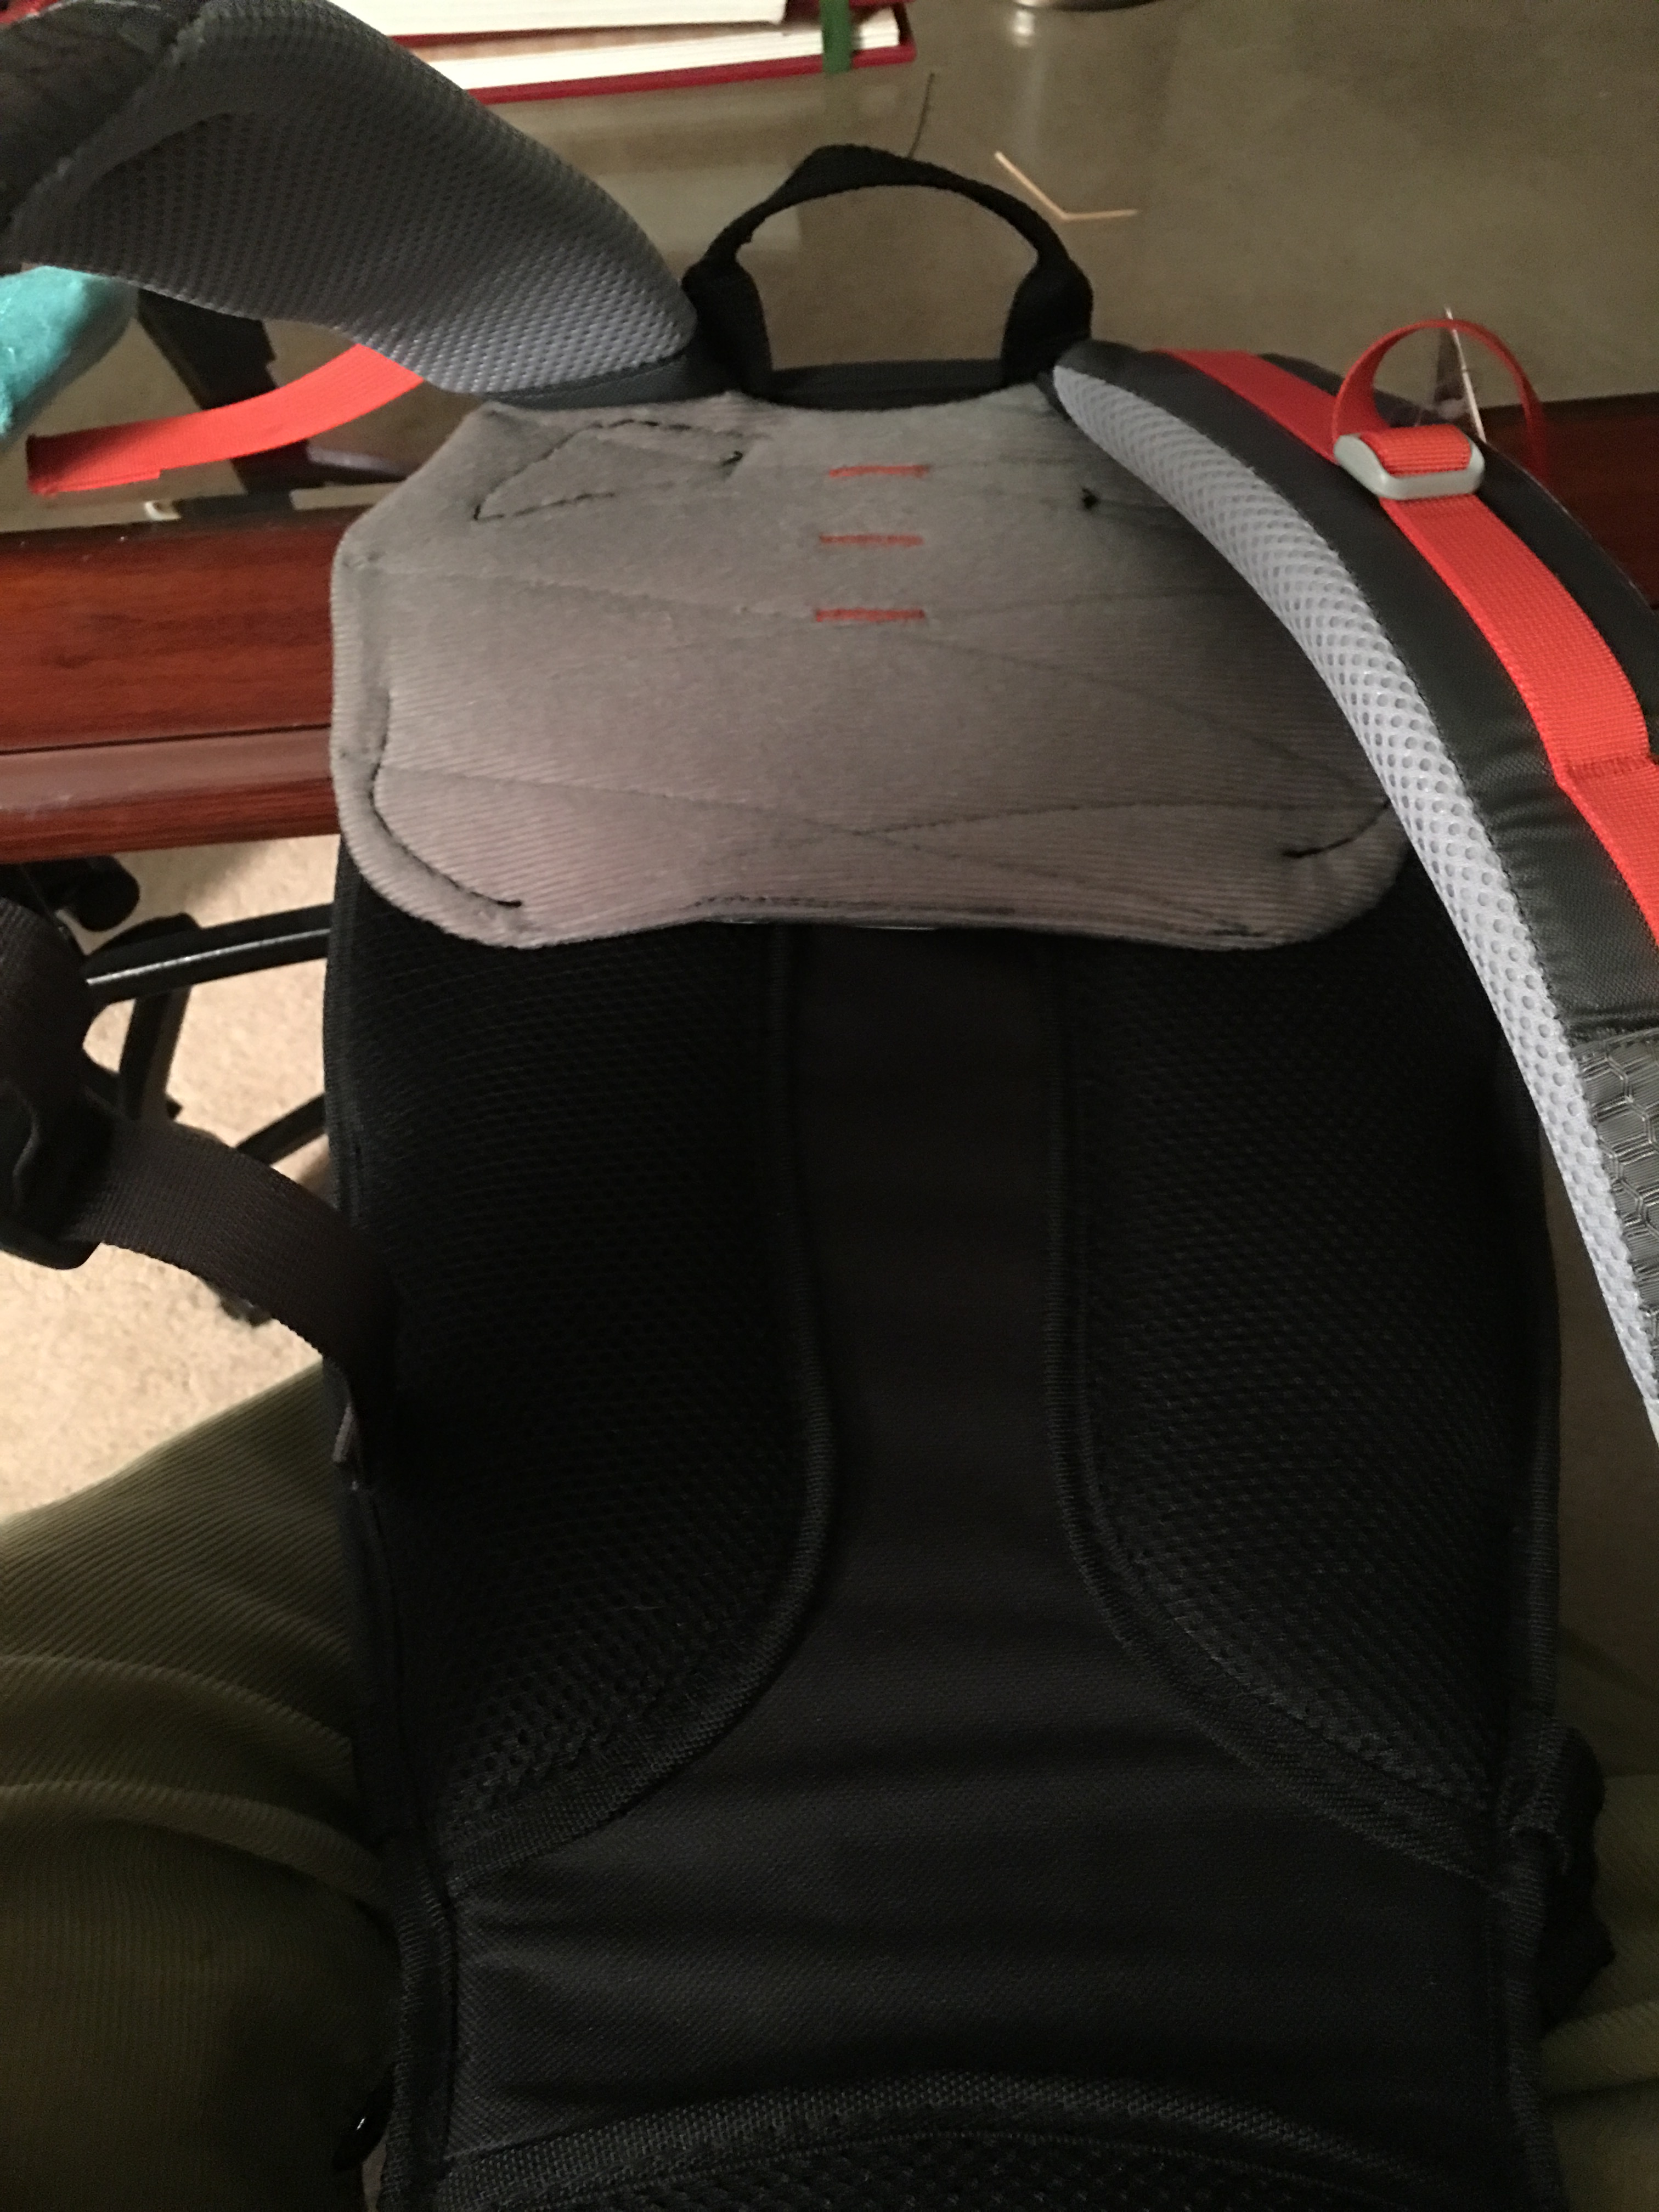
When my (Zeke’s) FreeLoader arrived, I was incredibly pleased. I spent most of my time looking at the very innovative and well designed seat system – it would appear that the majority of the efforts at FreeLoader went towards the seat. Ultimately, I’m glad – this is the part that I have wrestled with in other failed homebrew versions in the past. FreeLoader gets this right – the seat is comfortable, the right balance of strength and weight (supporting up to 80lbs). All told, the parts that interface with Zeke are awesome.
The parts that interfaced with me sucked.
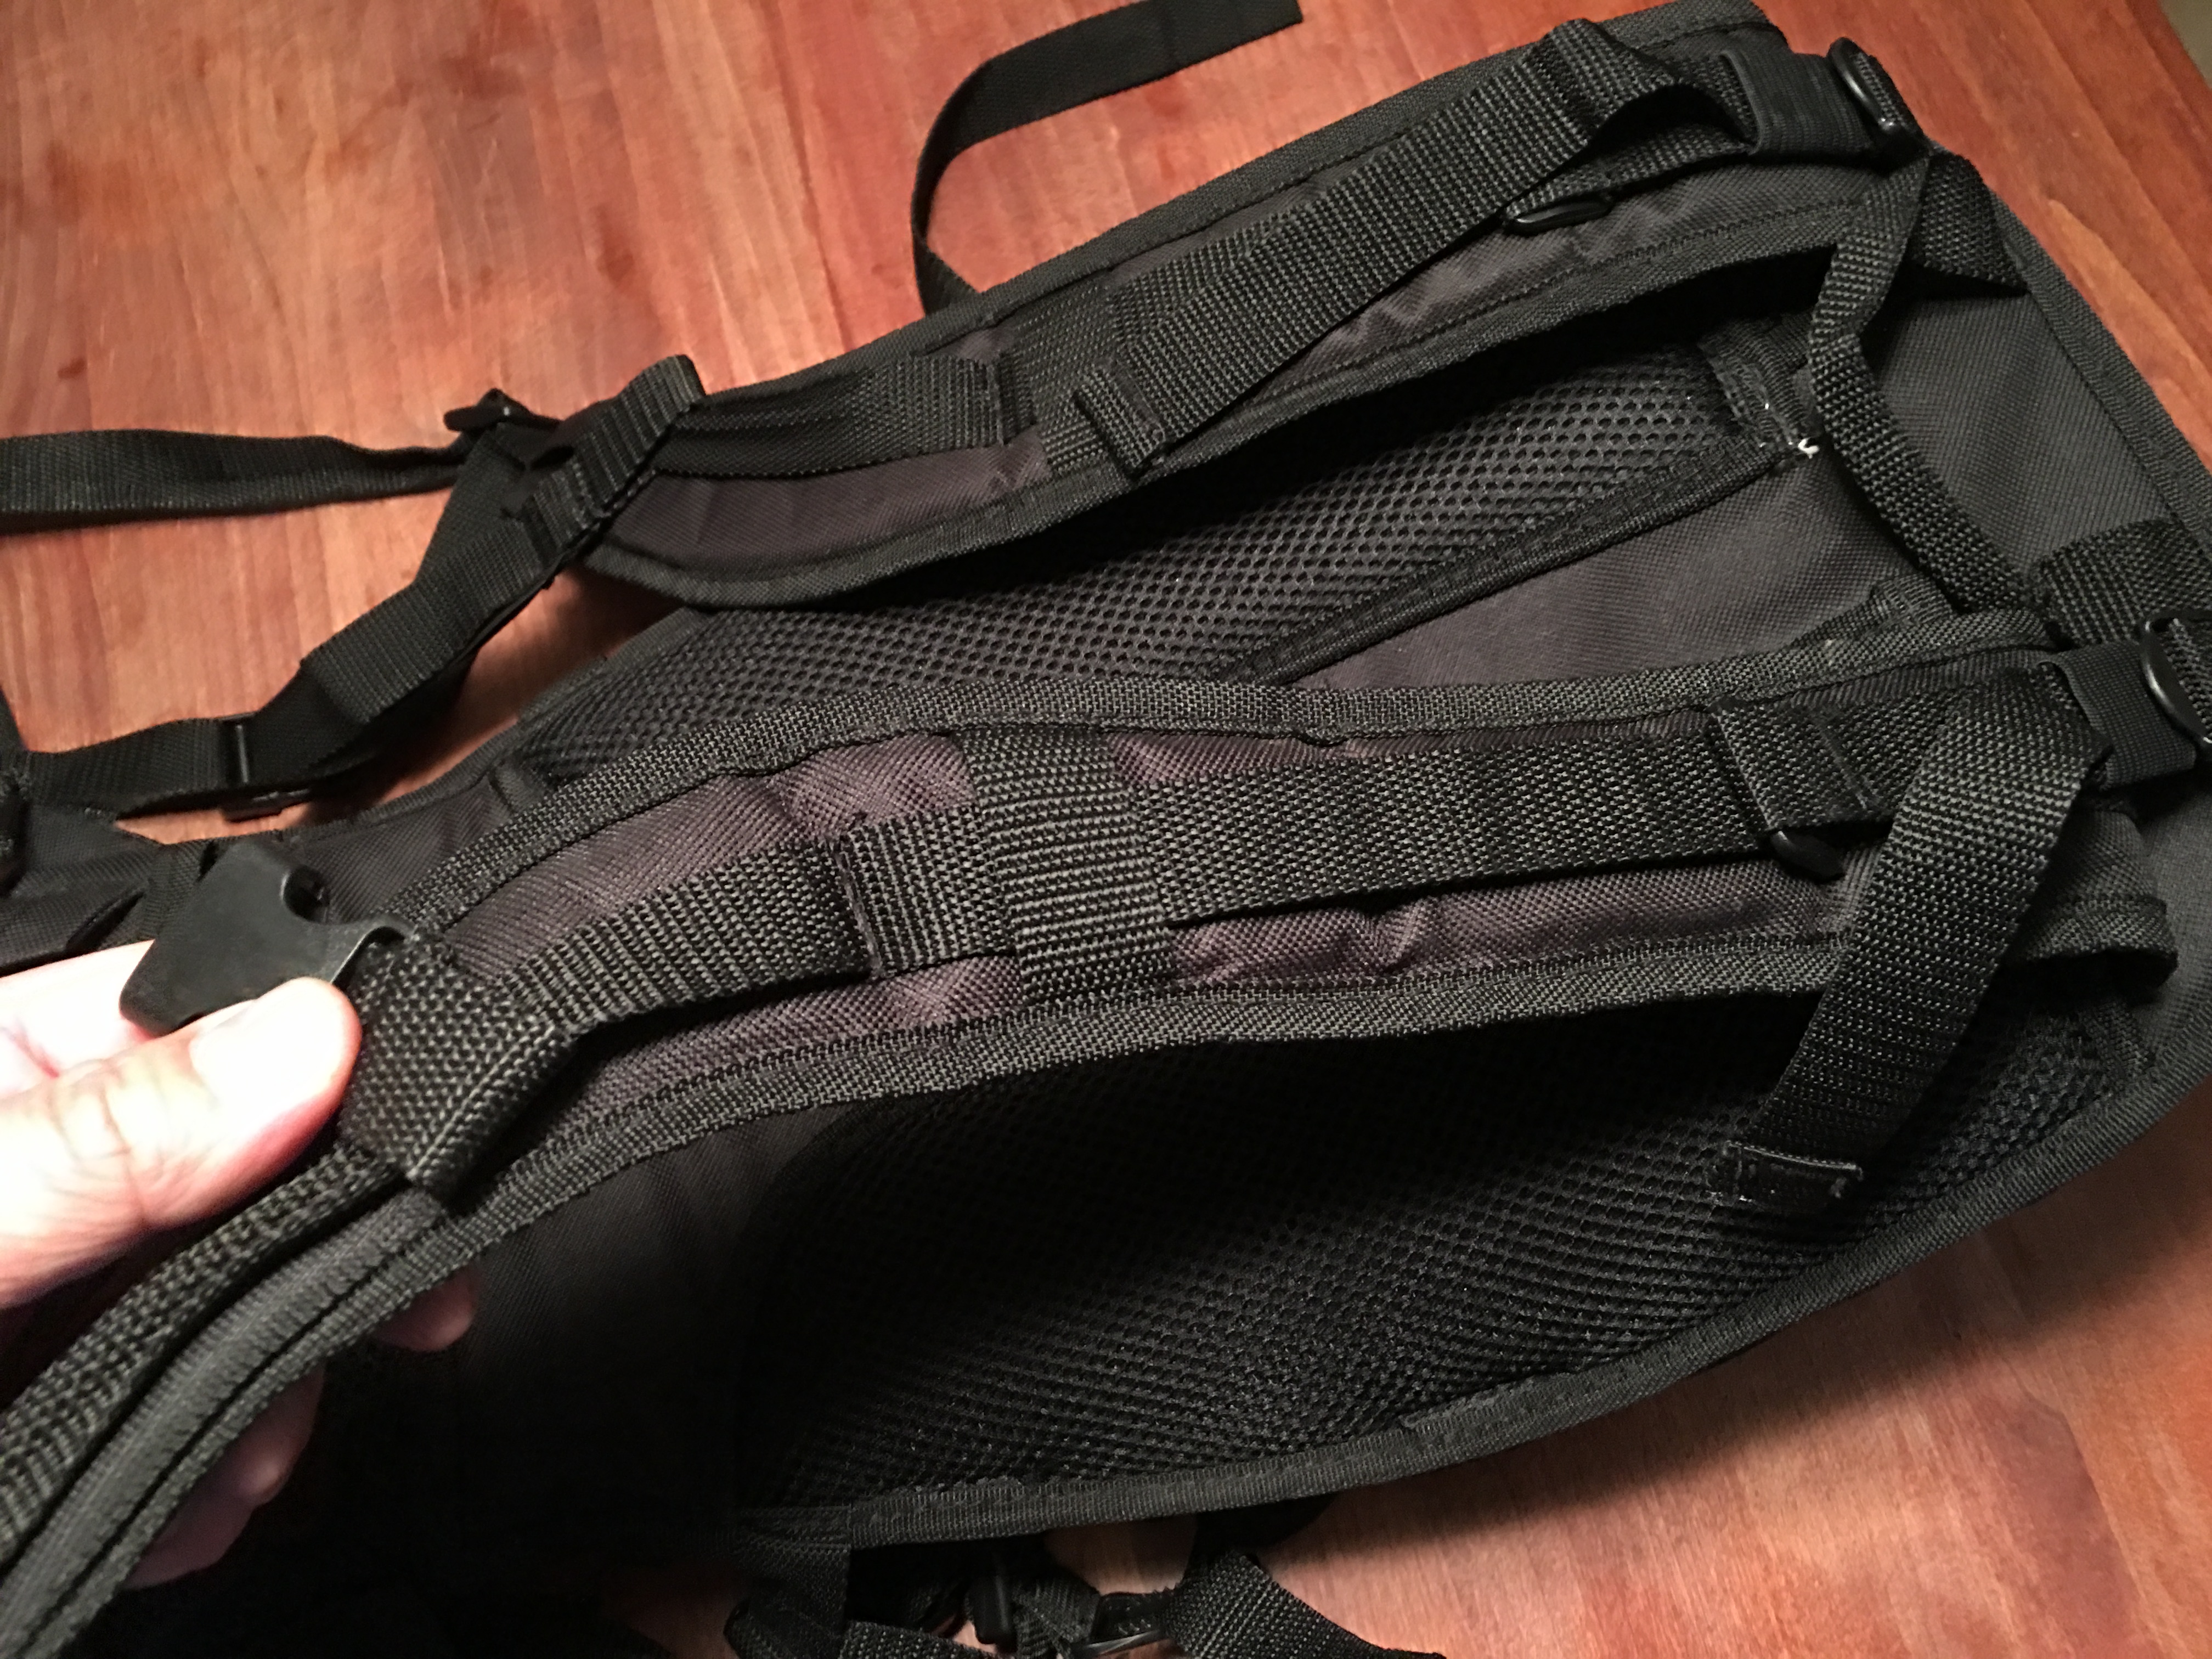
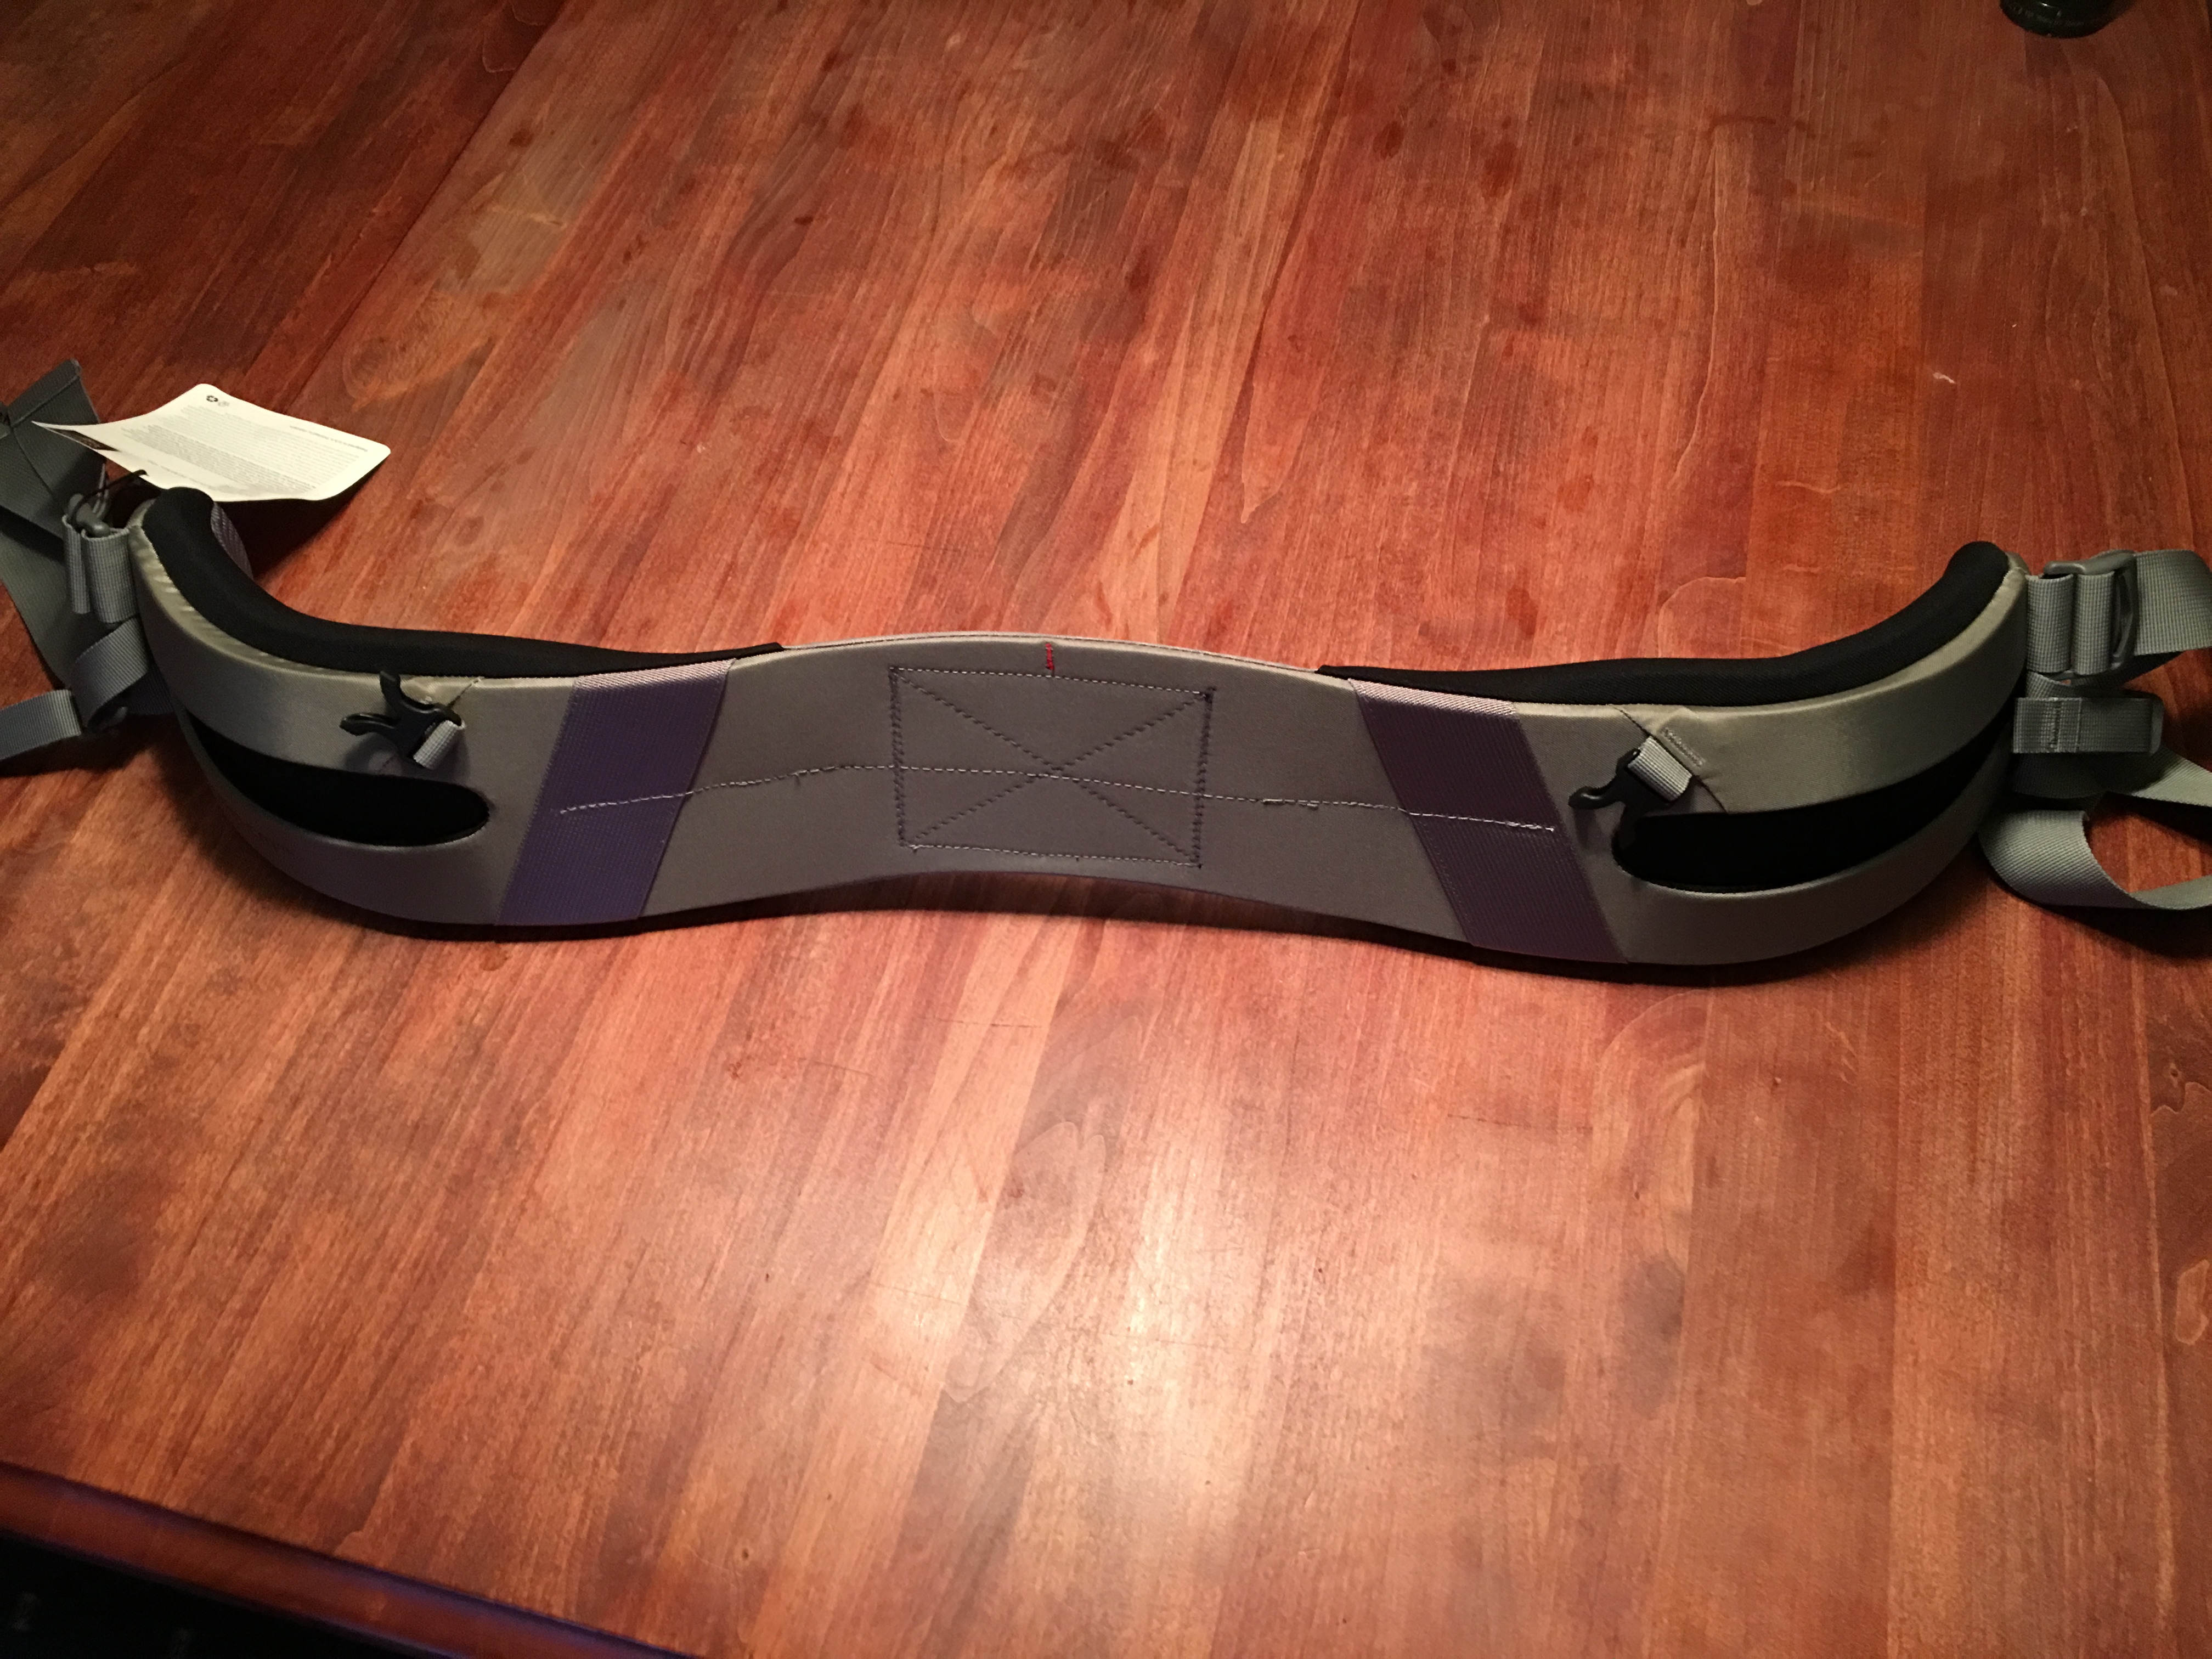
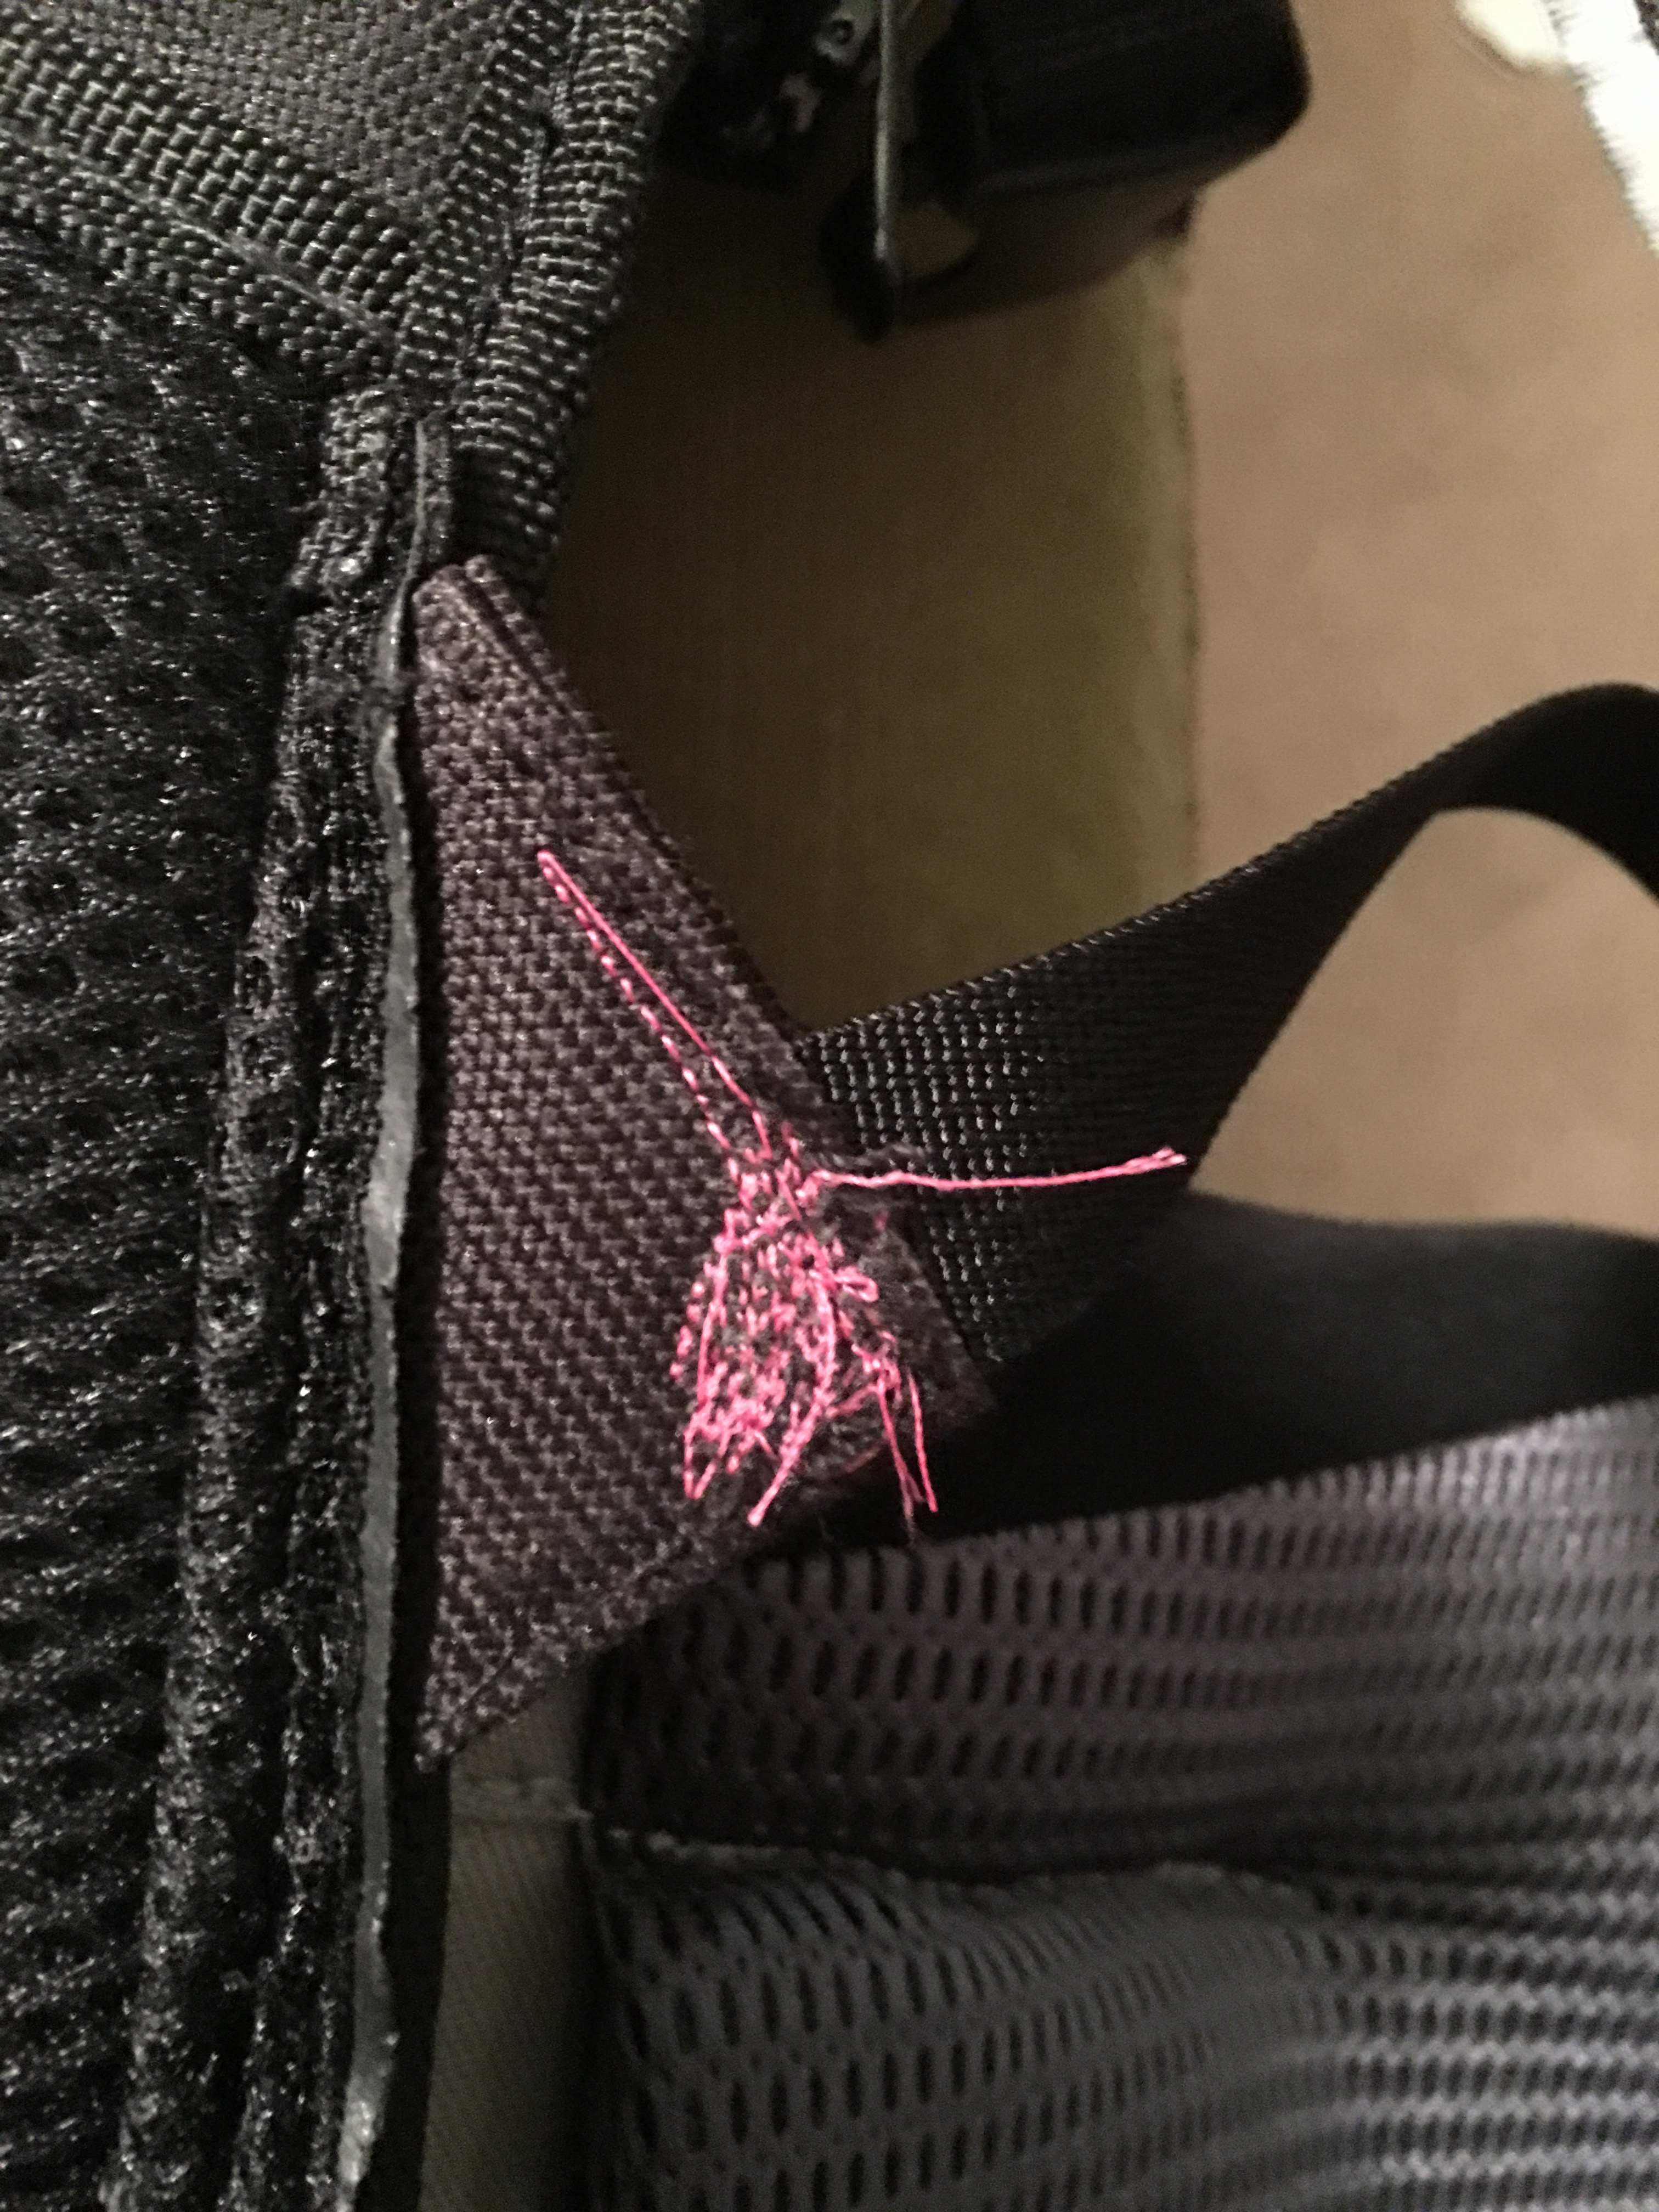
I took Zeke out for a few short walks near the house, and quickly discovered that the pack straps and the waist-belt are bad. Not unusable bad, not by any stretch – Indeed, I’d suspect that in 80% of use cases, they’re completely adequate. It’s possible I’ve been spoiled by week long backpack trips on the Appalachian Trail back when I was a kid, knowing what a high quality fitted backpack should feel like with weight adjustments between the shoulders and hips. On our longer walks, I found that I couldn’t get the waist belt tight enough to move the majority of the weight to my hips – at the same time, I was constantly tightening the shoulder straps as the lower-quality webbing and the lower-quality ladder slider buckles weren’t gripping each other as tightly as they should.
So – balk half of the pack, fantastic. Front half, inadequate for any kind of seriously heavy kid, or seriously long hikes. At the time of this post, Zeke is about 45lbs, for reference – I’m hoping to get a few years out of this thing, but it won’t happen with these straps. At first, I didn’t get it – why so awesome in the really innovative parts of the seat, then fall short on the parts that science has already figured out? But I do get it. Manufacturing and distribution costs are miserable and it was likely the thing that kept this from becoming a $500 product.
Still. I need this thing to be bombproof…. and comfortable. It’s so close, it almost hurts. It just needs…
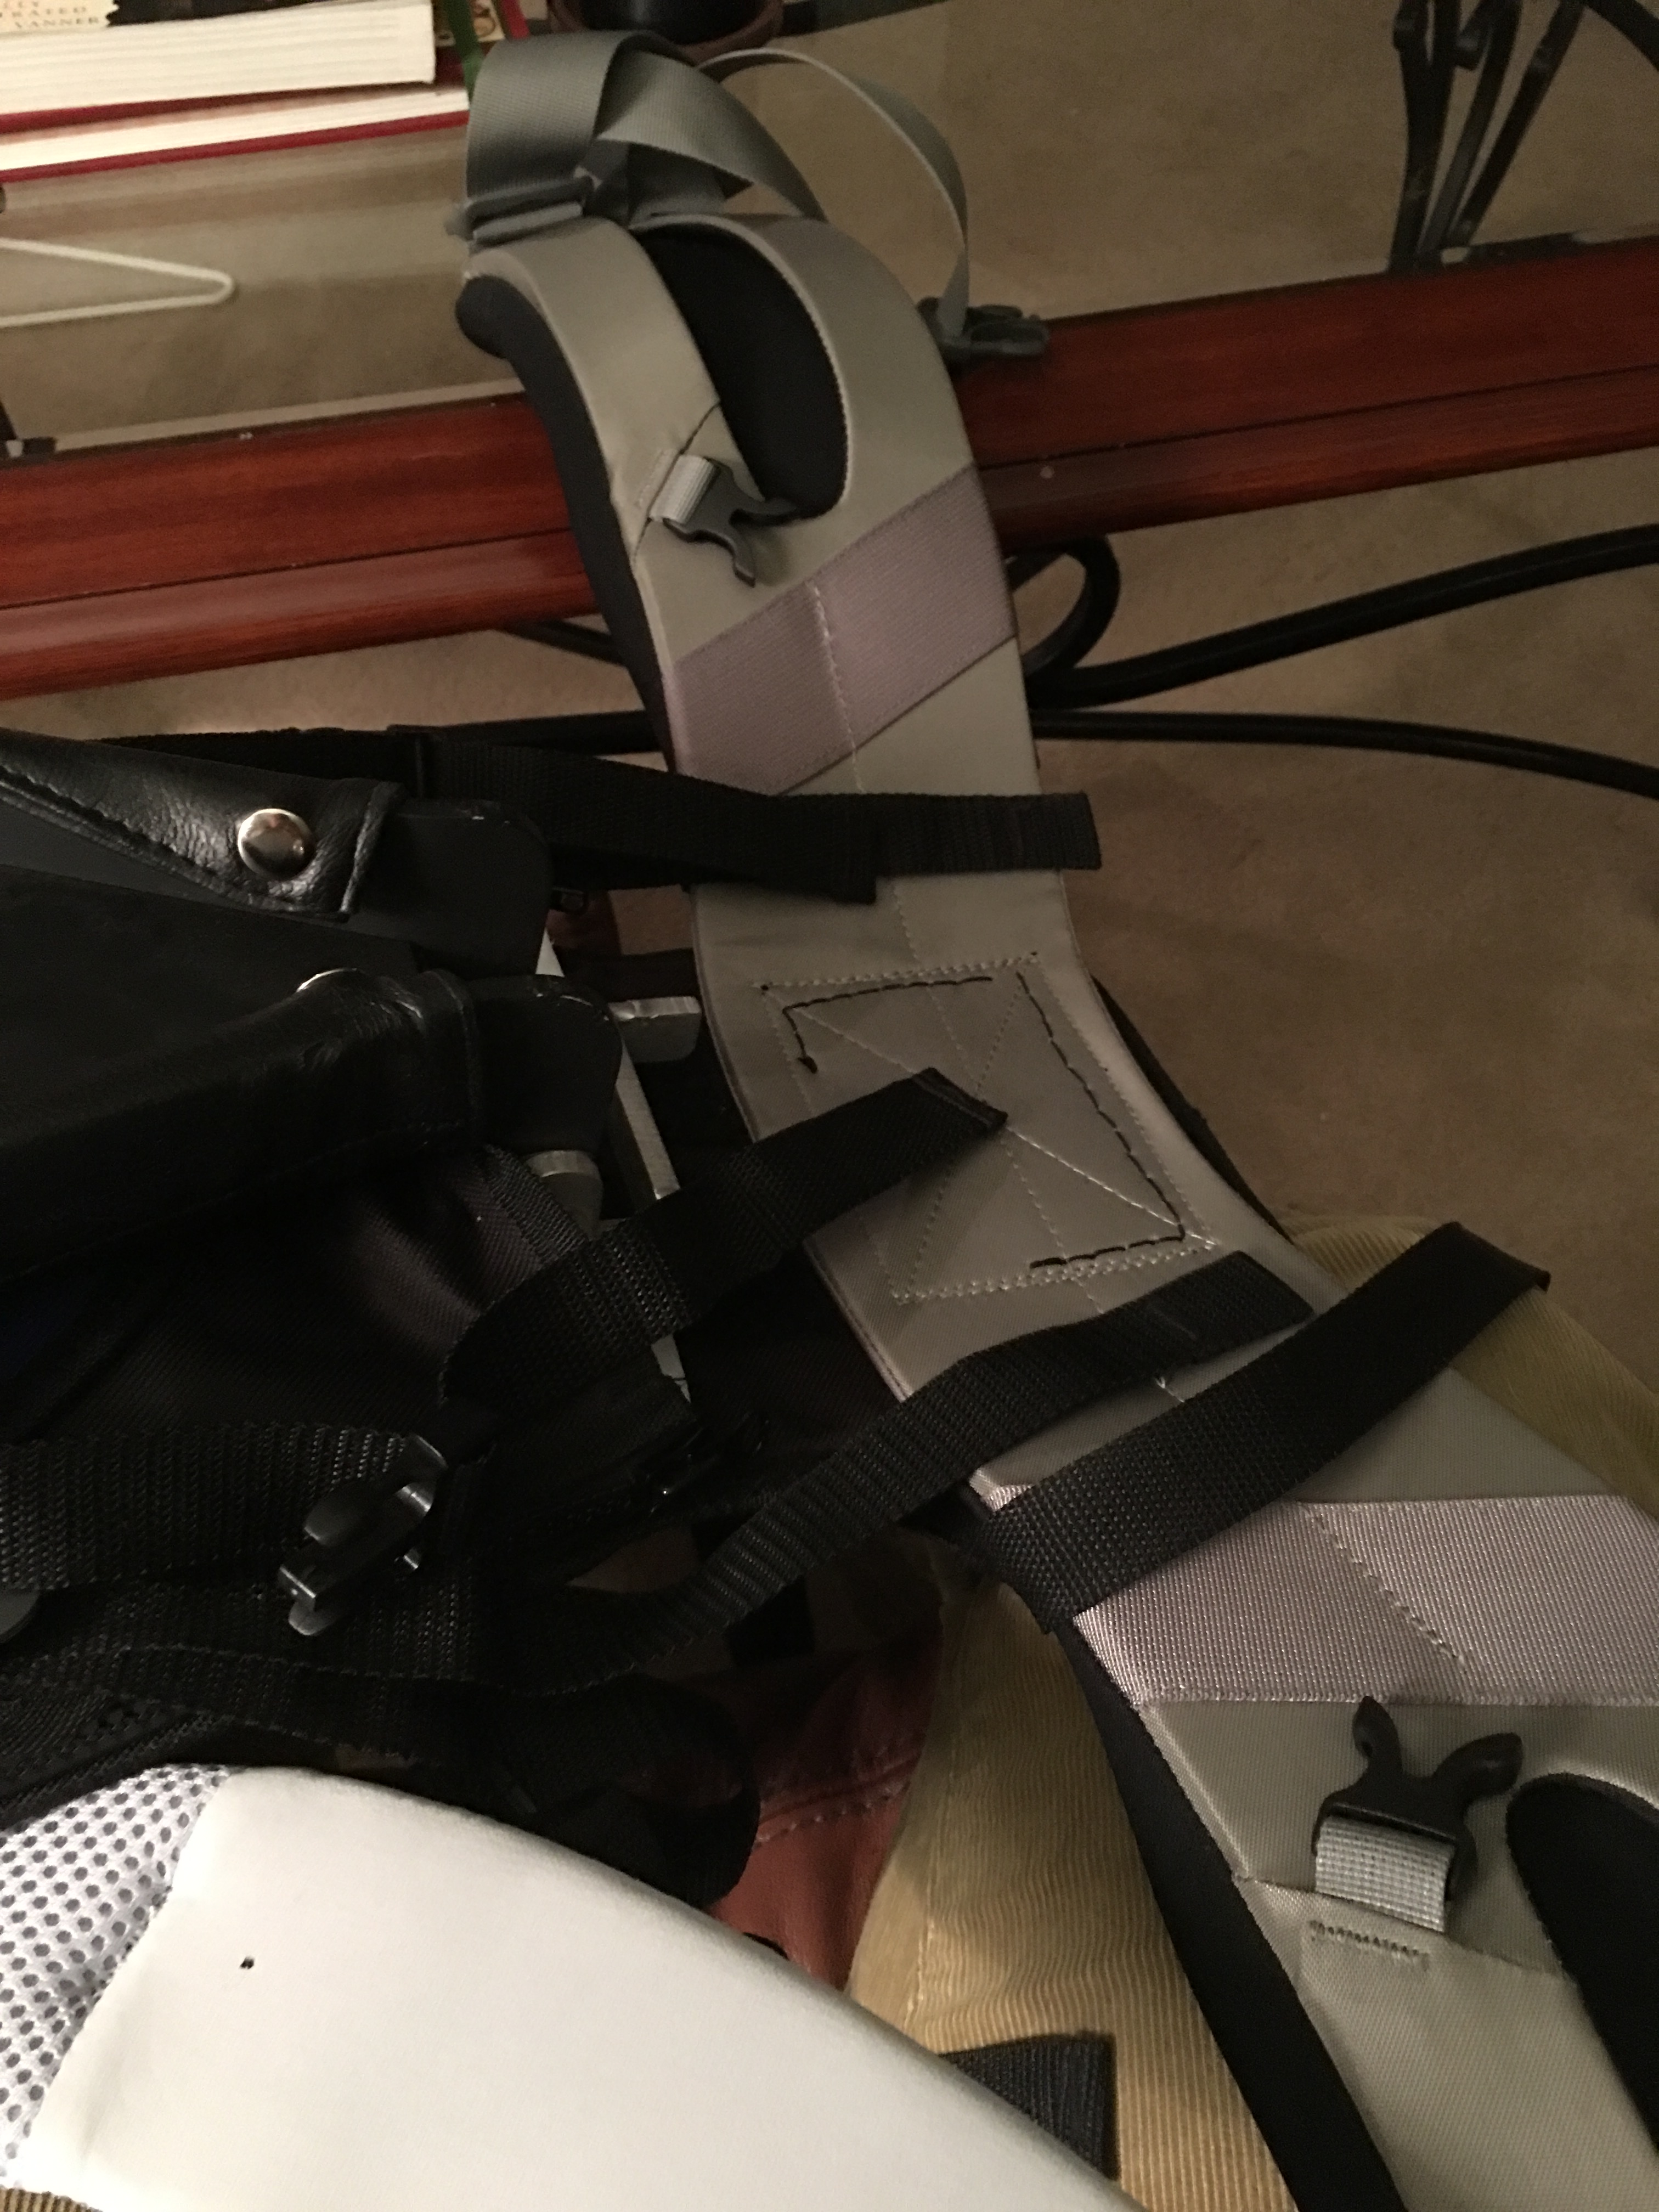
New shoulder straps and a new waist belt. I started looking closely at the construction of the FreeLoader and realized it wouldn’t be that difficult to replace the needed parts. Initially I expected to purchase a full backpack and take it apart and graft it onto the FreeLoader – costly, and it would have broken my heart to gut the seams of a nice pack. Fortunately, I had the sense to search for pack replacement parts, and I hit gold. The waist belt I found on REIoutlet.com on closeout deals – $39 for the belt, and $20 for the straps directly from Mountain Hardware. These are close to the actual ones I used, though you may not find the deals I did. Check around – anything close to these will work fine. At this moment, you can still pick them up from REI and MH:
Belt: http://bit.ly/1ItNsoD
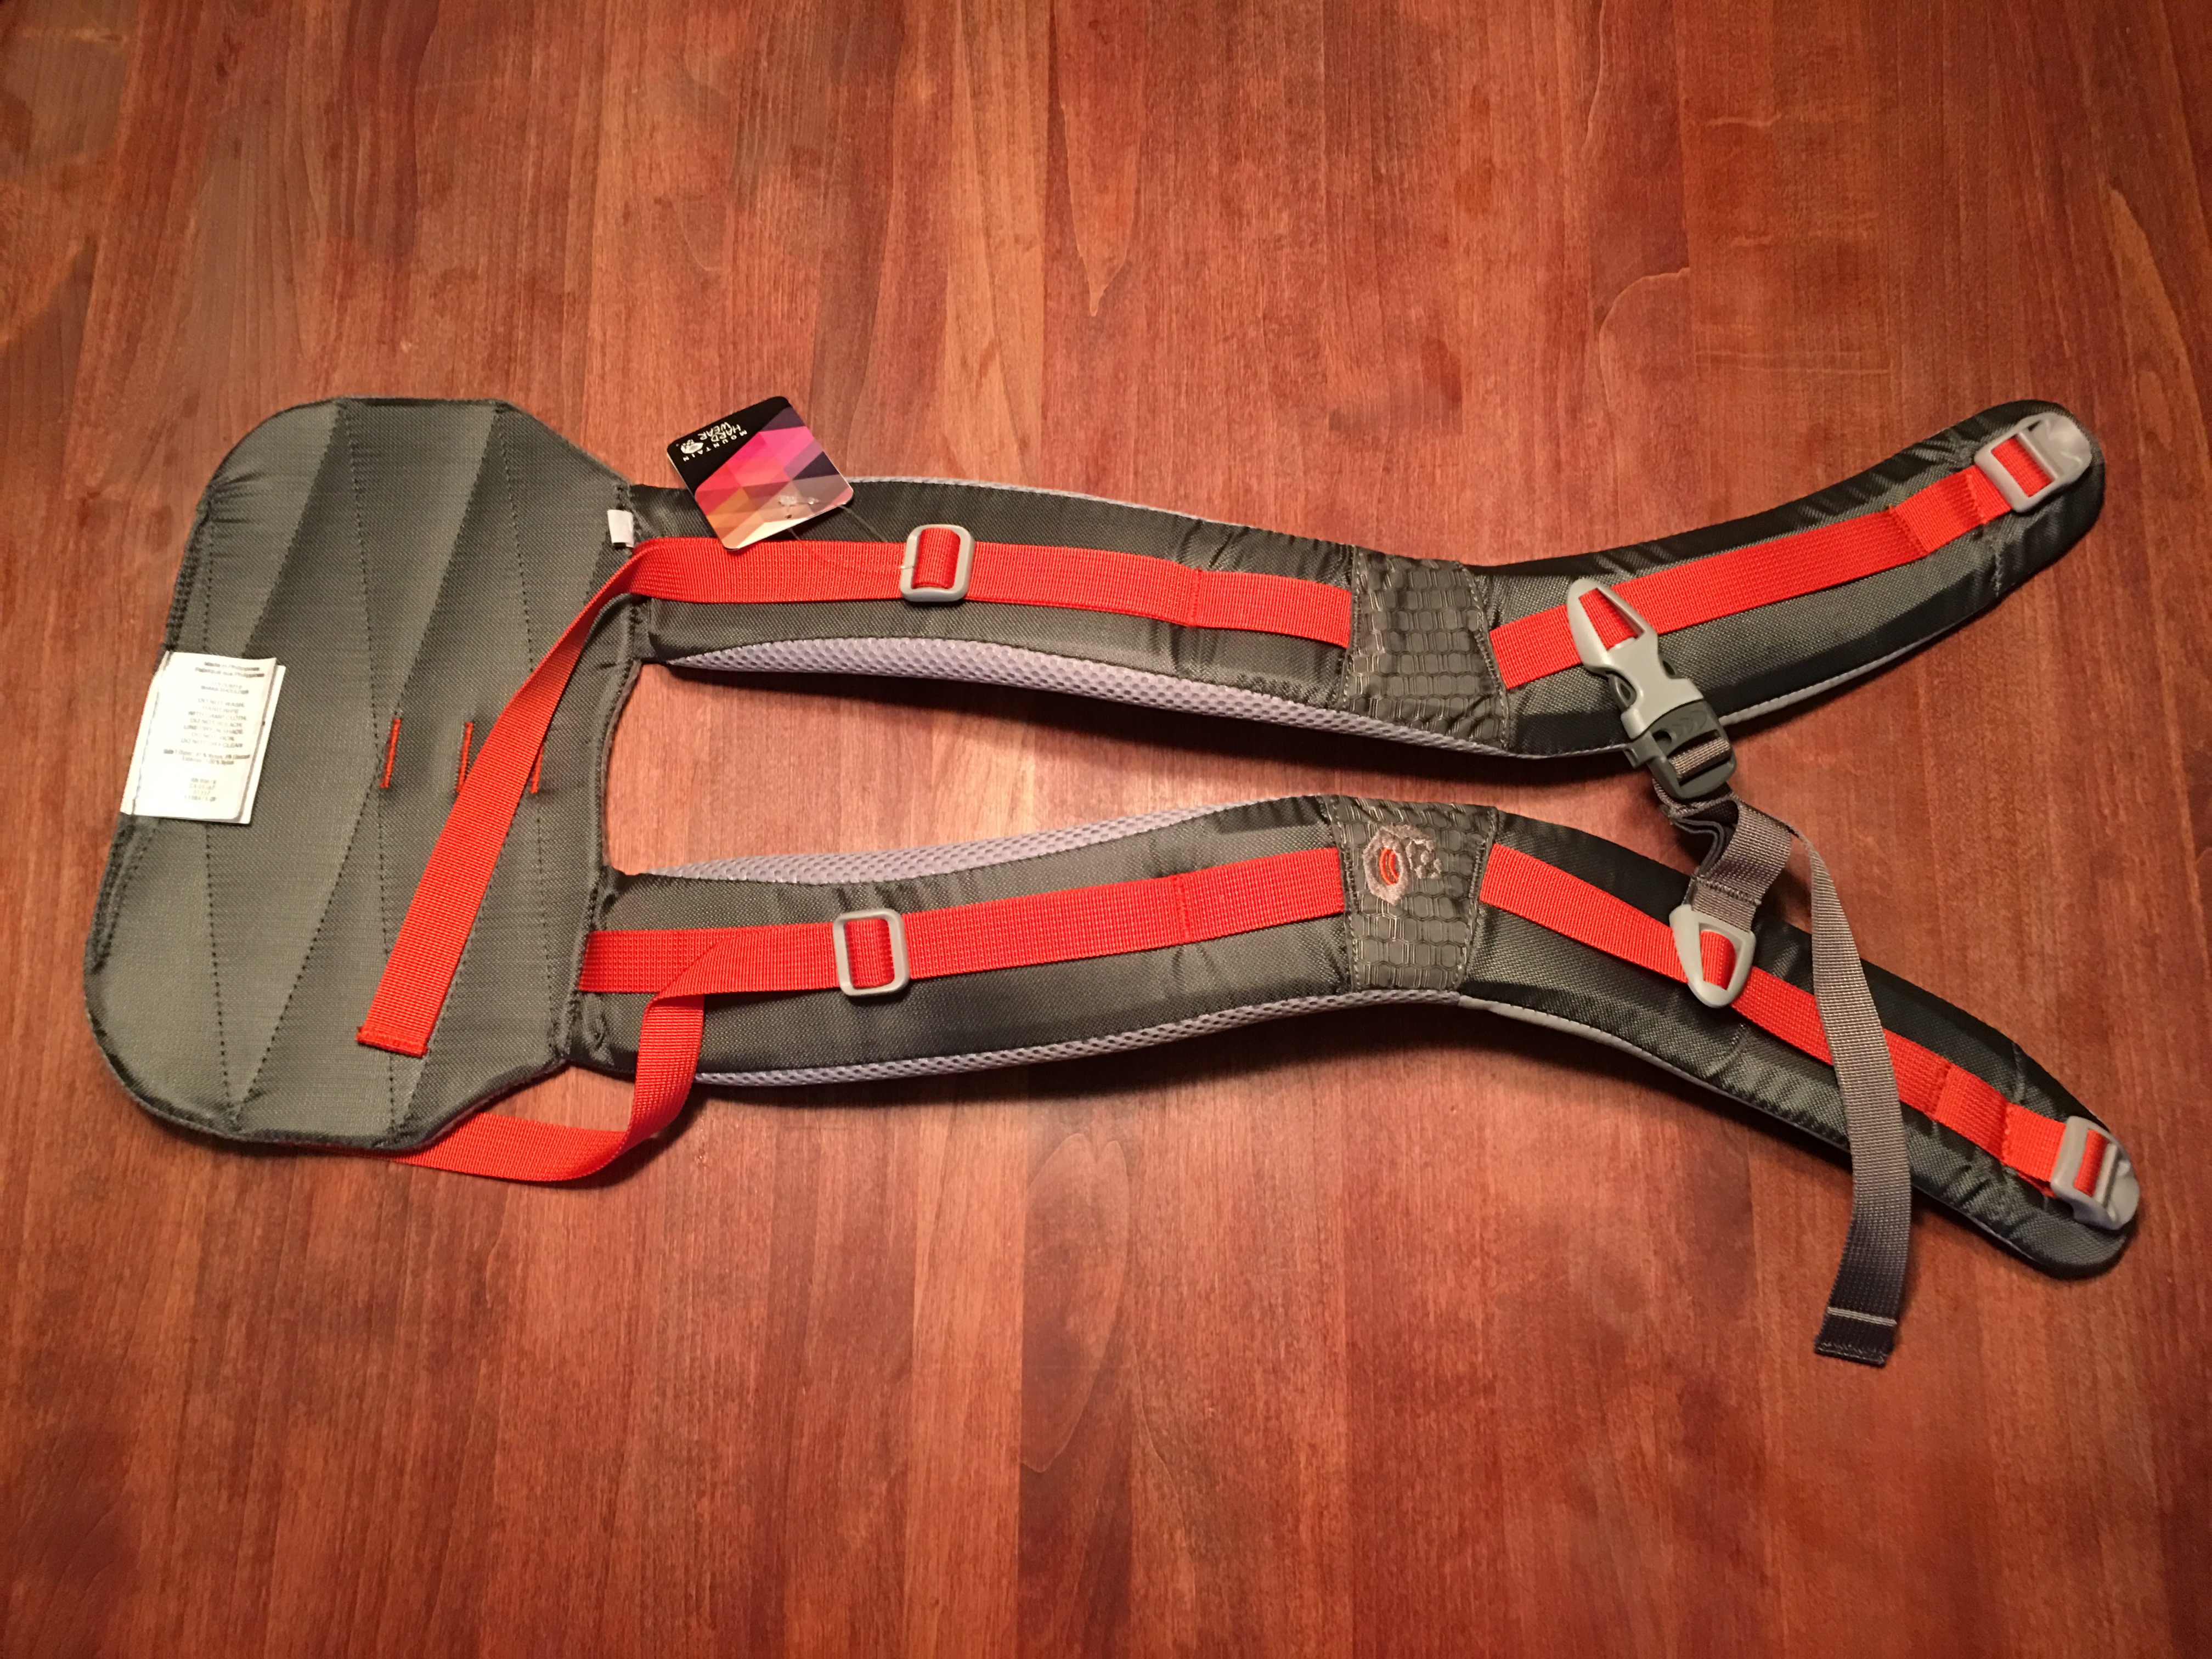
Straps: http://bit.ly/1RfQtjE
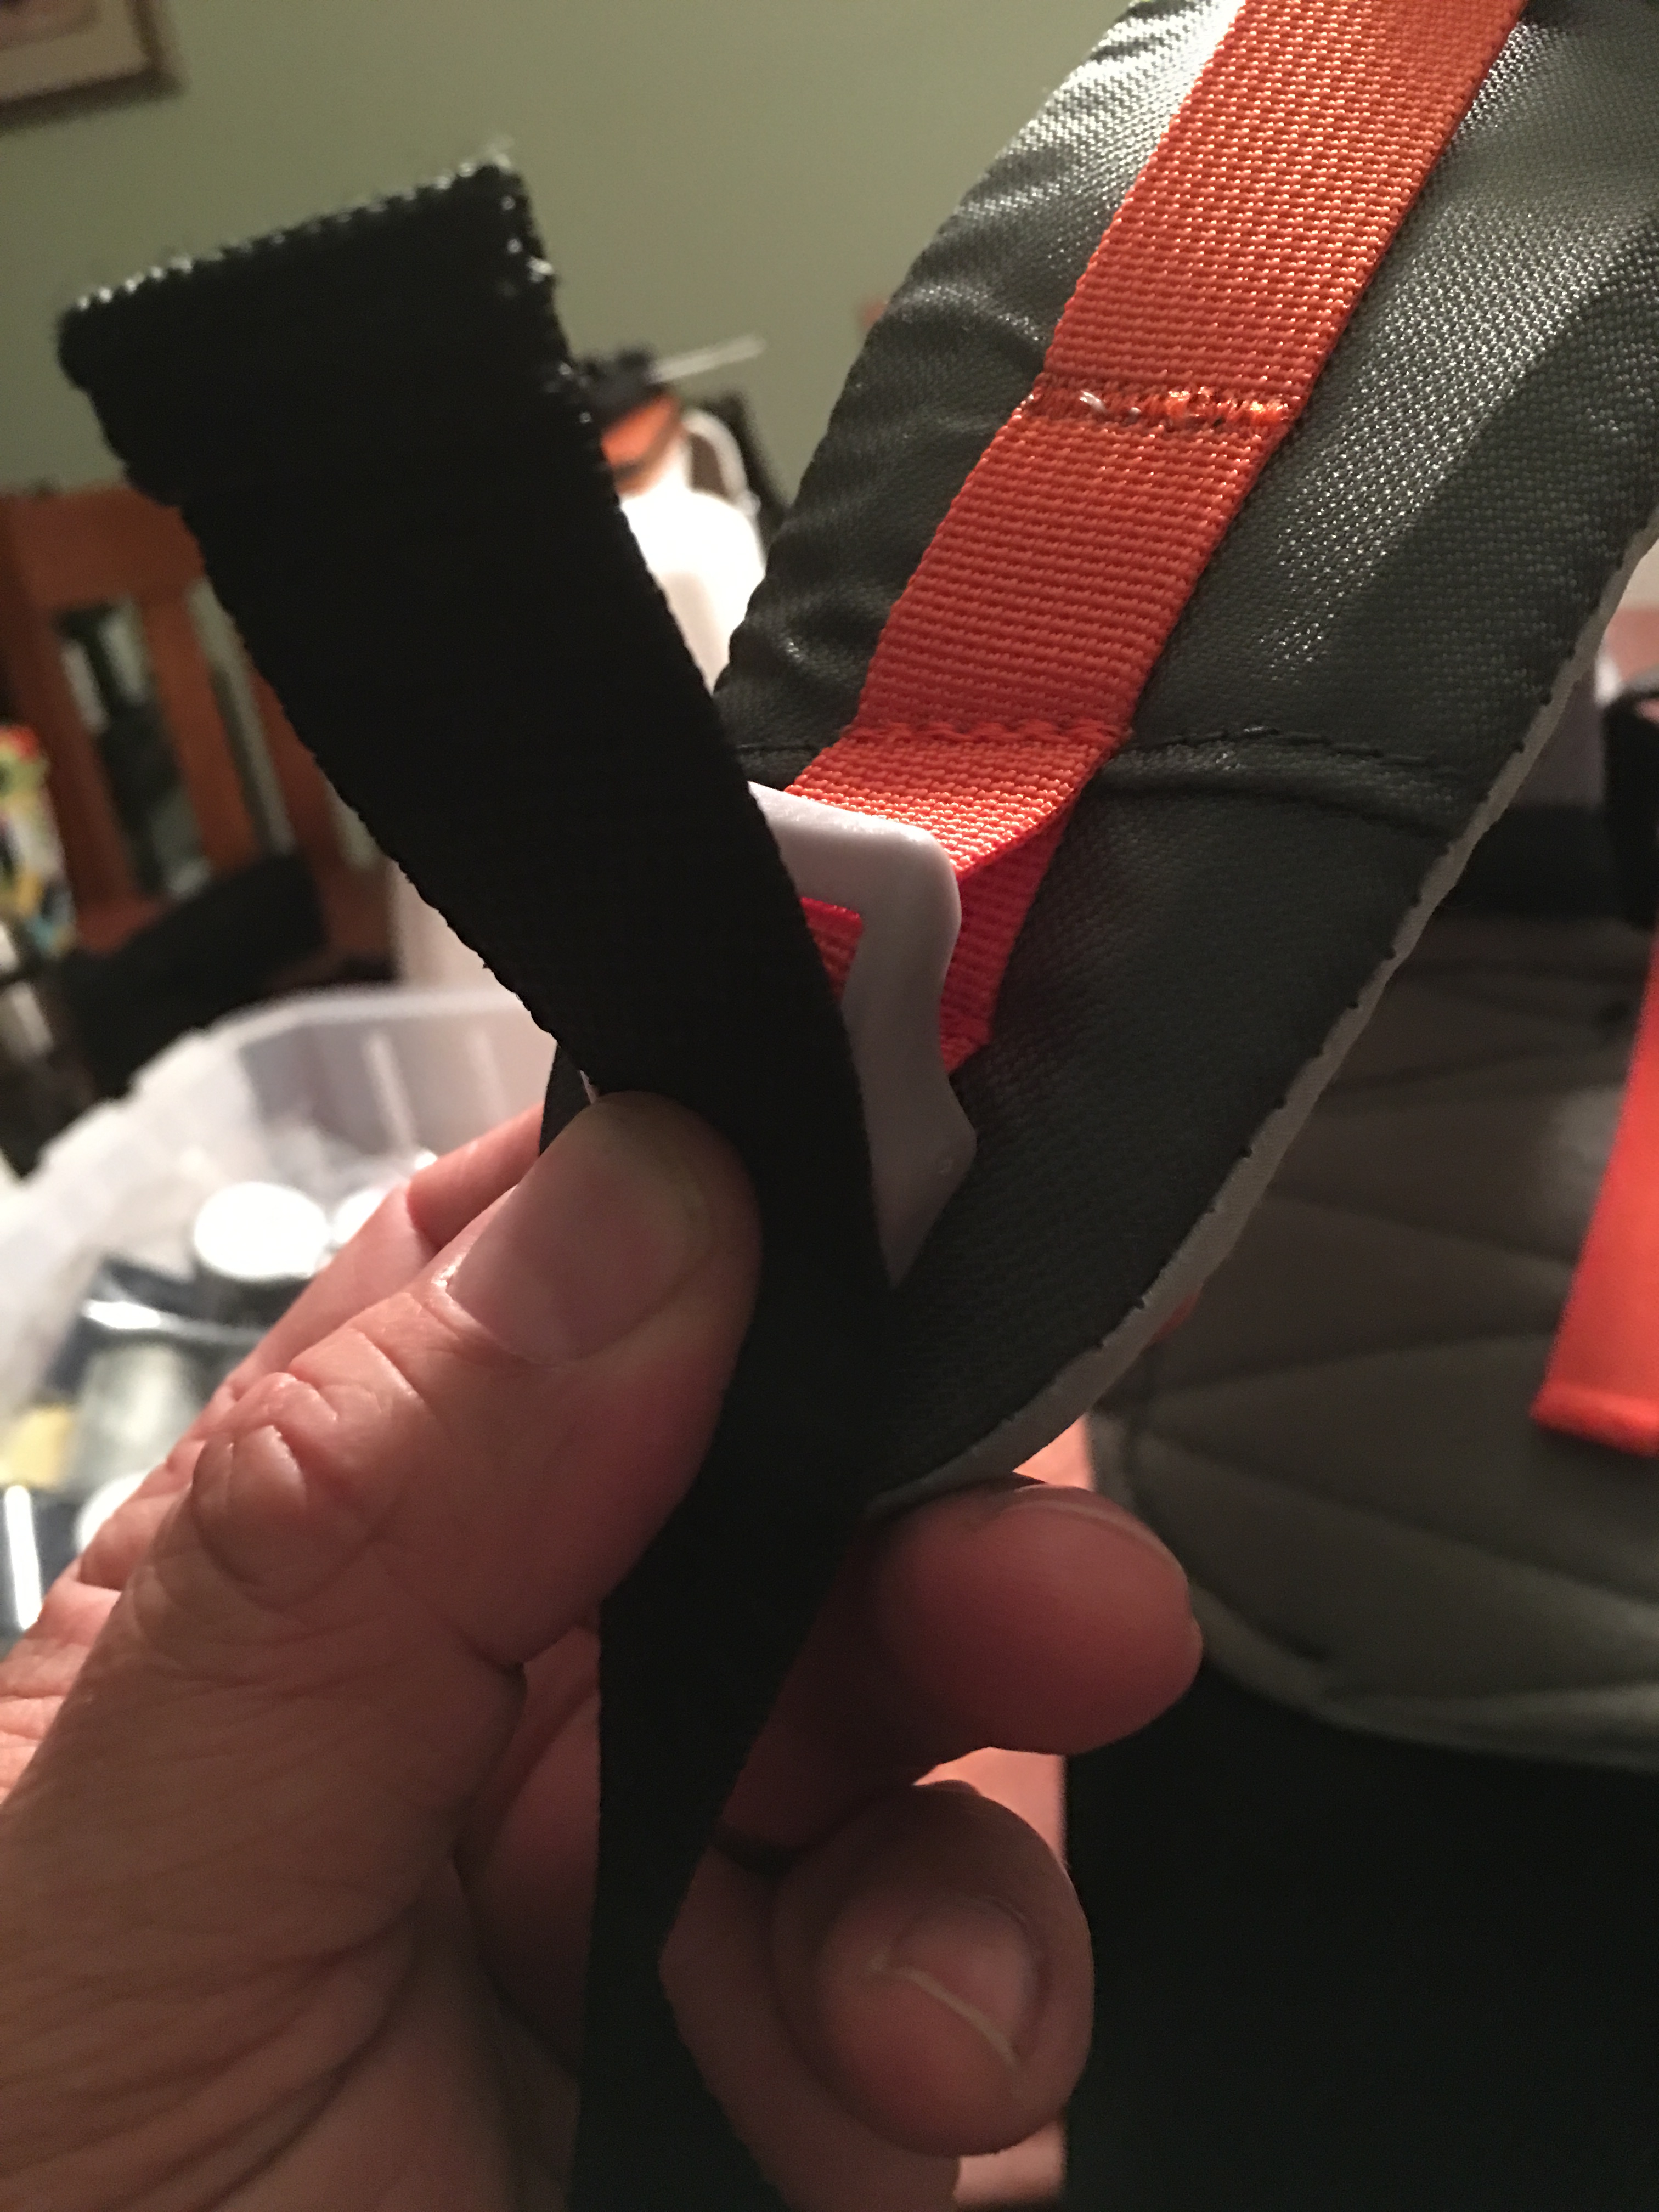
The thing that got me about the Shaka replacement straps was the huge piece that connects the straps; it seemed that it would be easy to stitch that onto the back of the FreeLoader without any crazy modifications. There is a nice wide open patch on the bottom where the new hip-belt should attach. My first thought was that I could actually attach it from the outside with some industrial Velcro – the friction from the Velcro and the tension from the best would hold everything together. I started cutting.
Before you start cutting, here is the disclaimer: You’re on your own. I’m in no way qualified in structural stitching or safety or anything of the kind. You or your progeny could die.
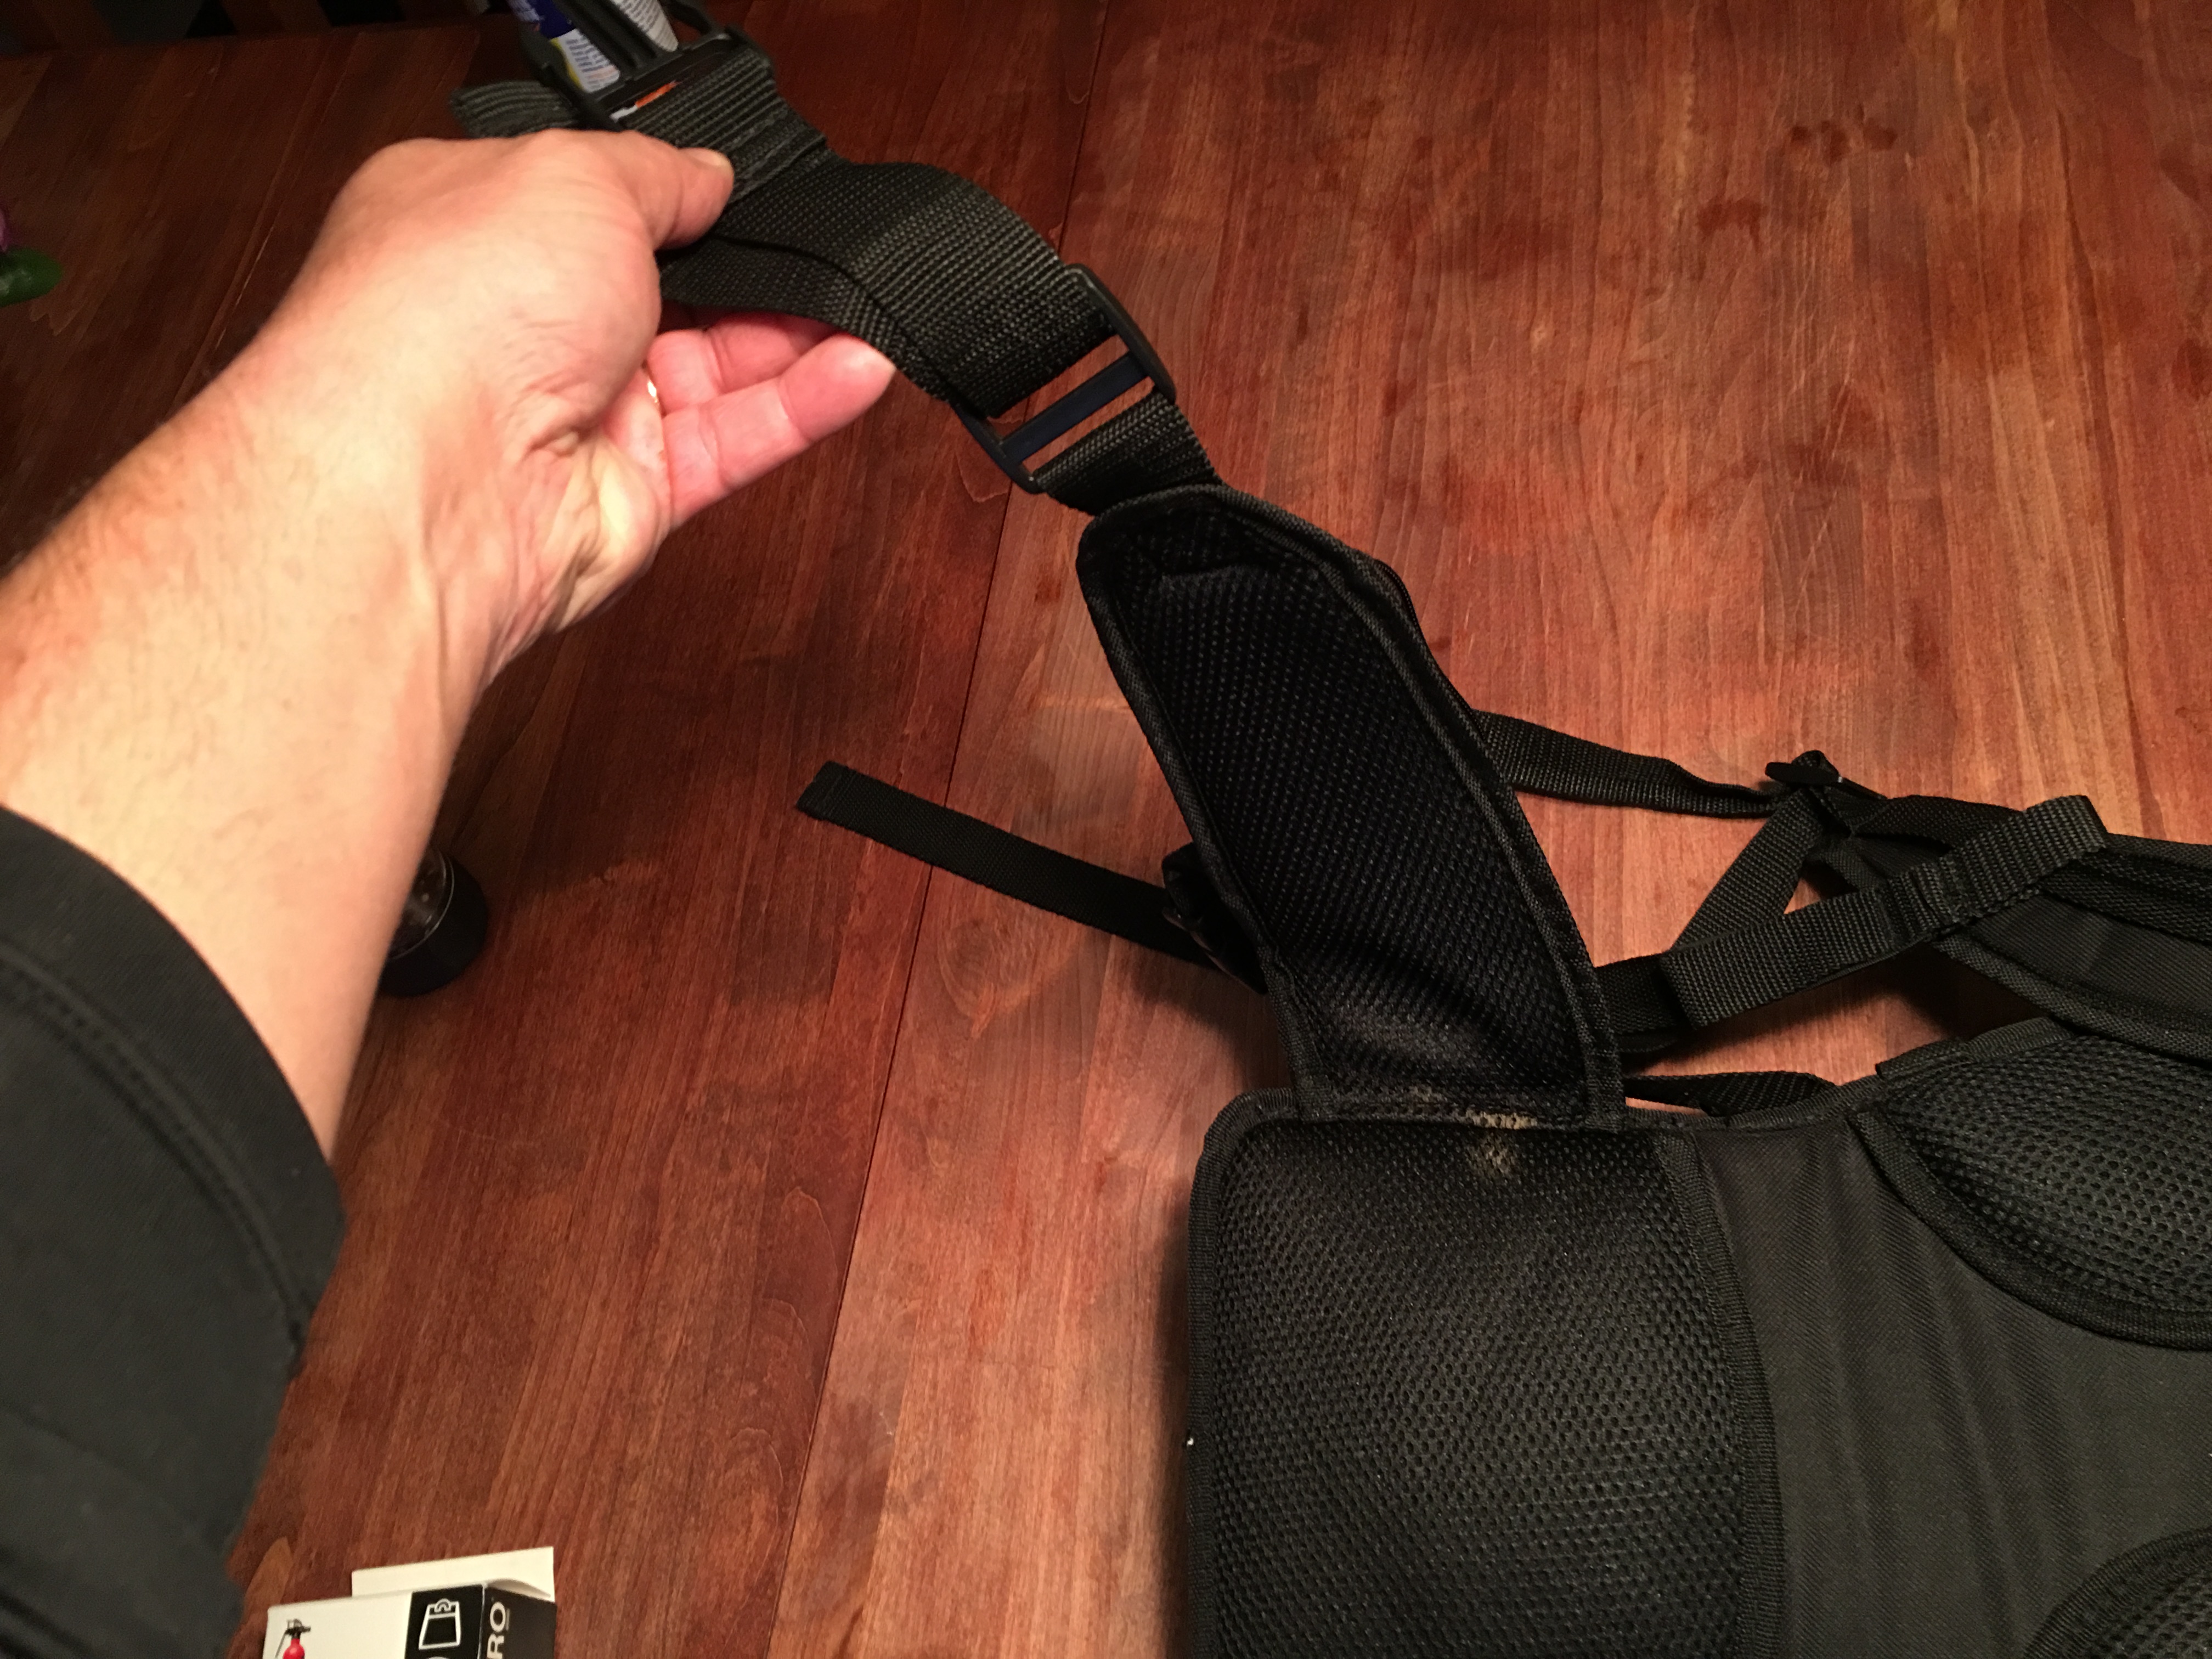
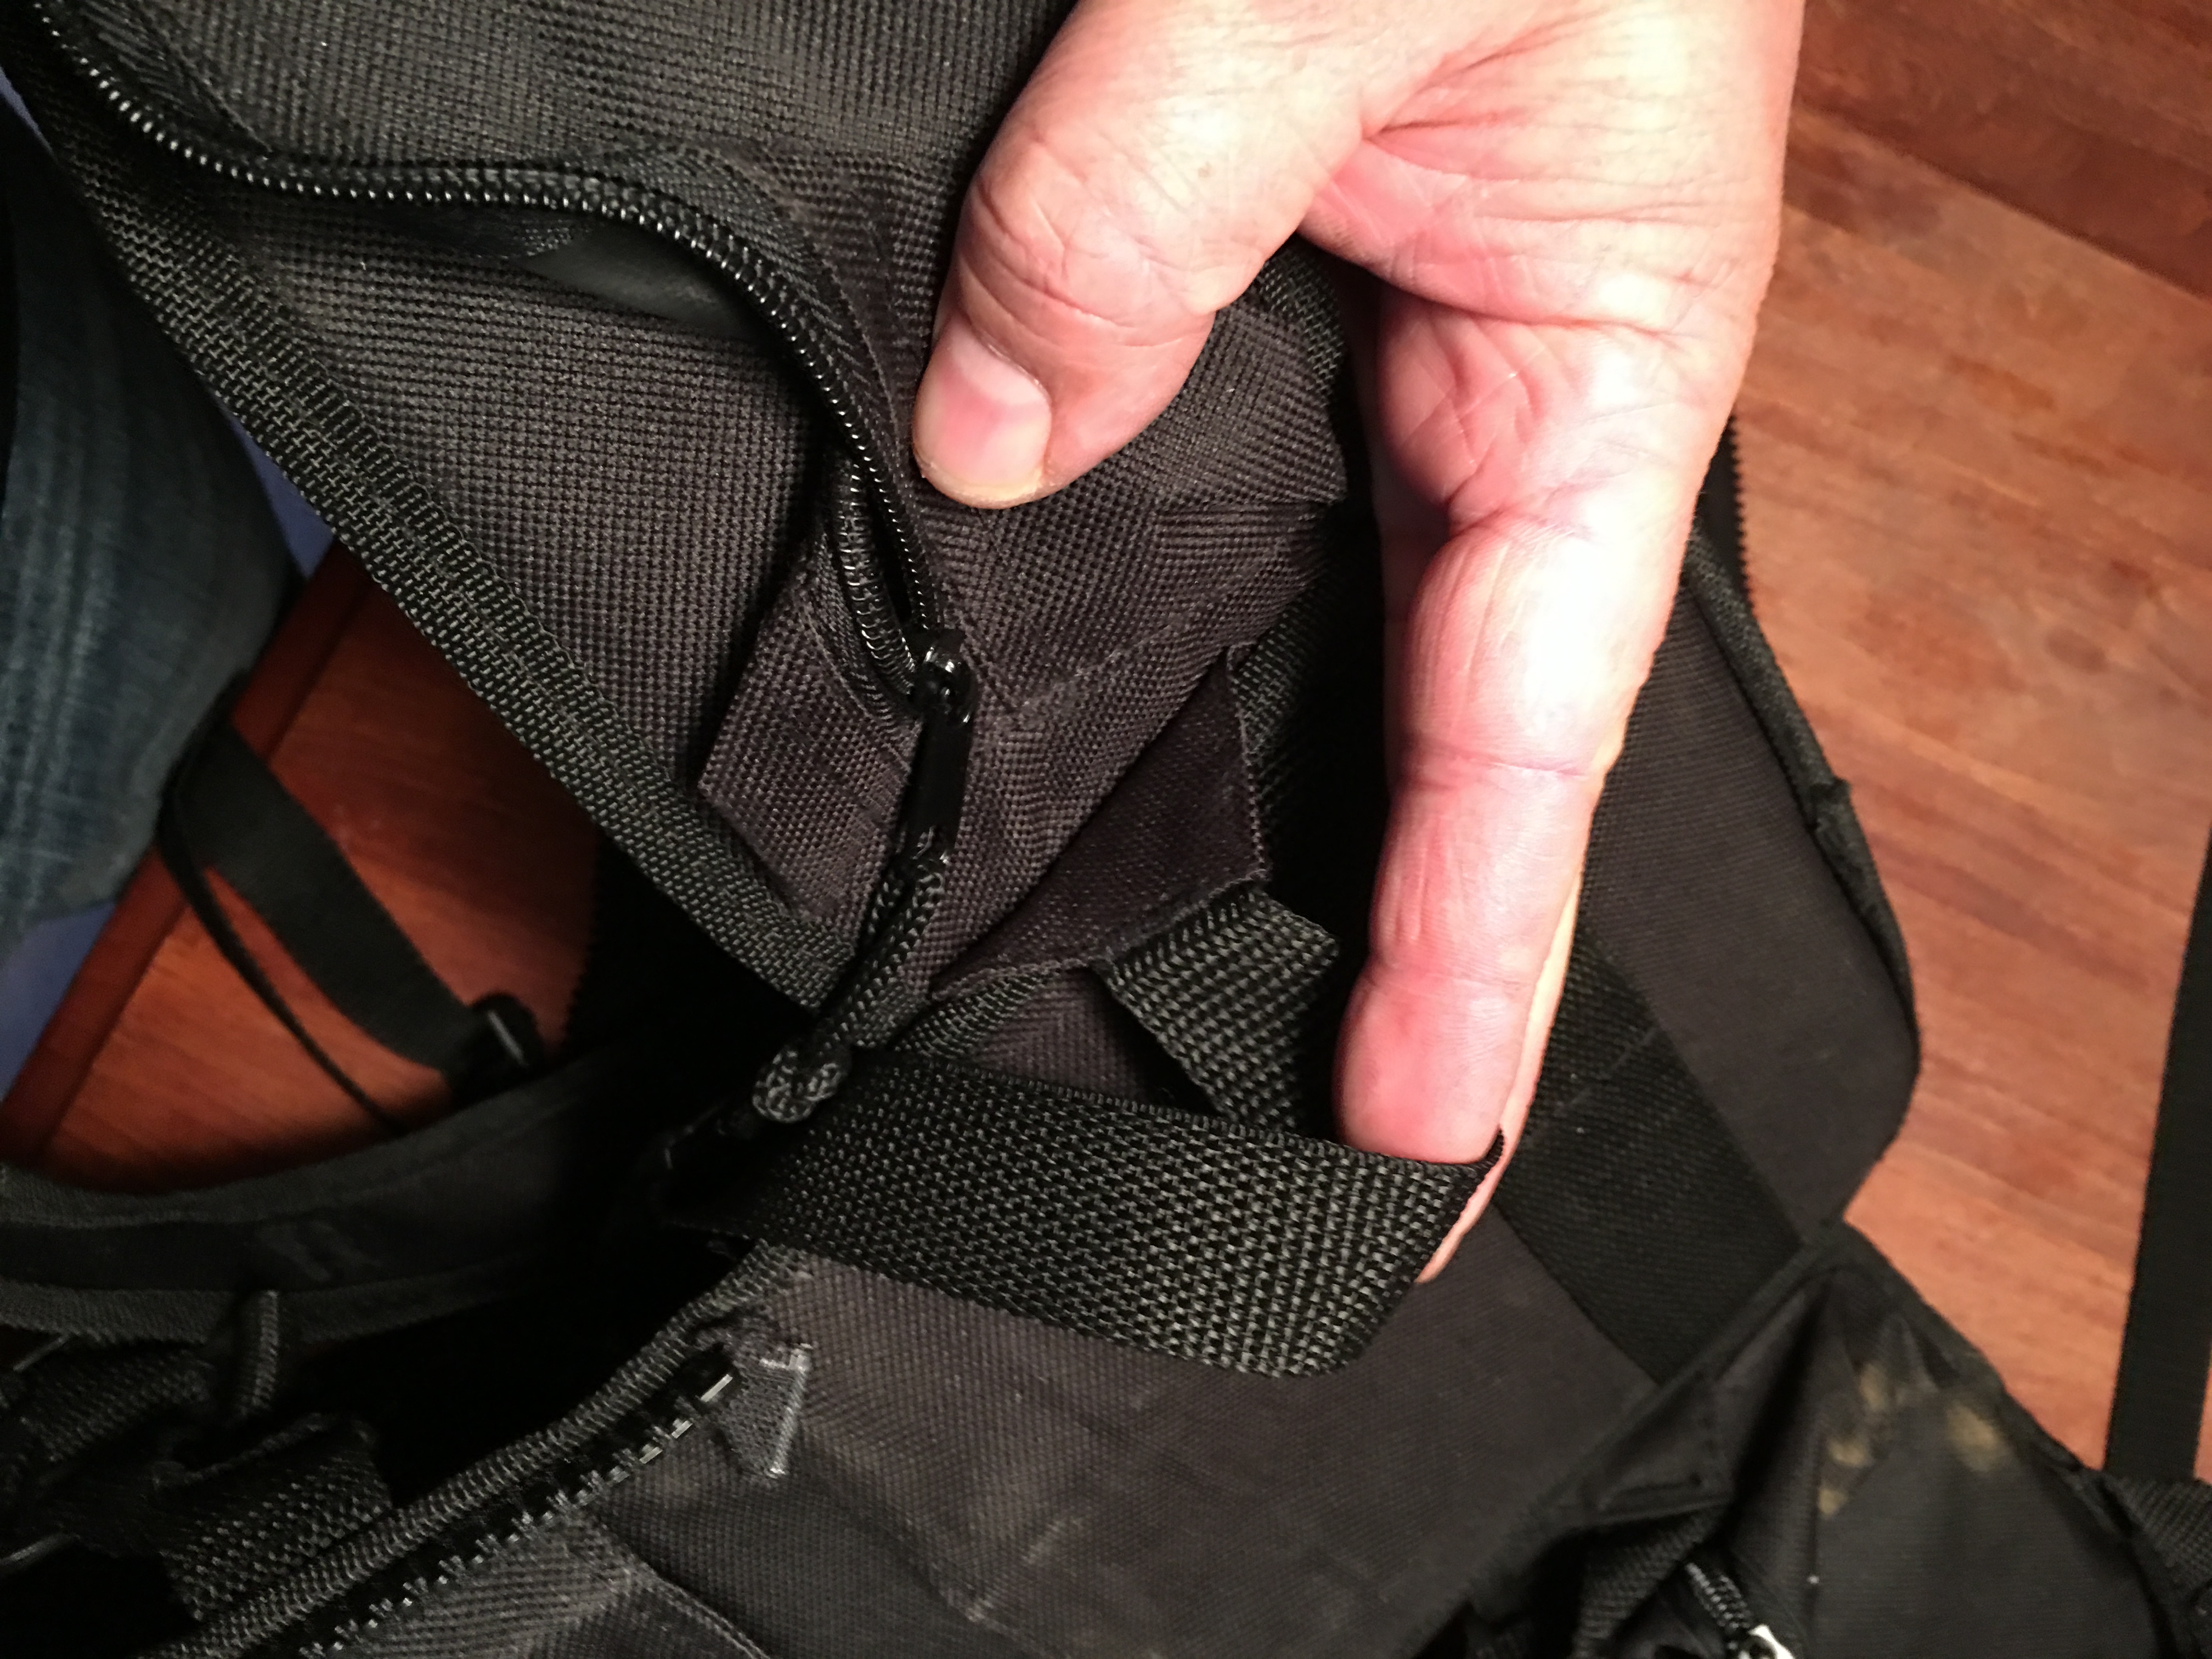

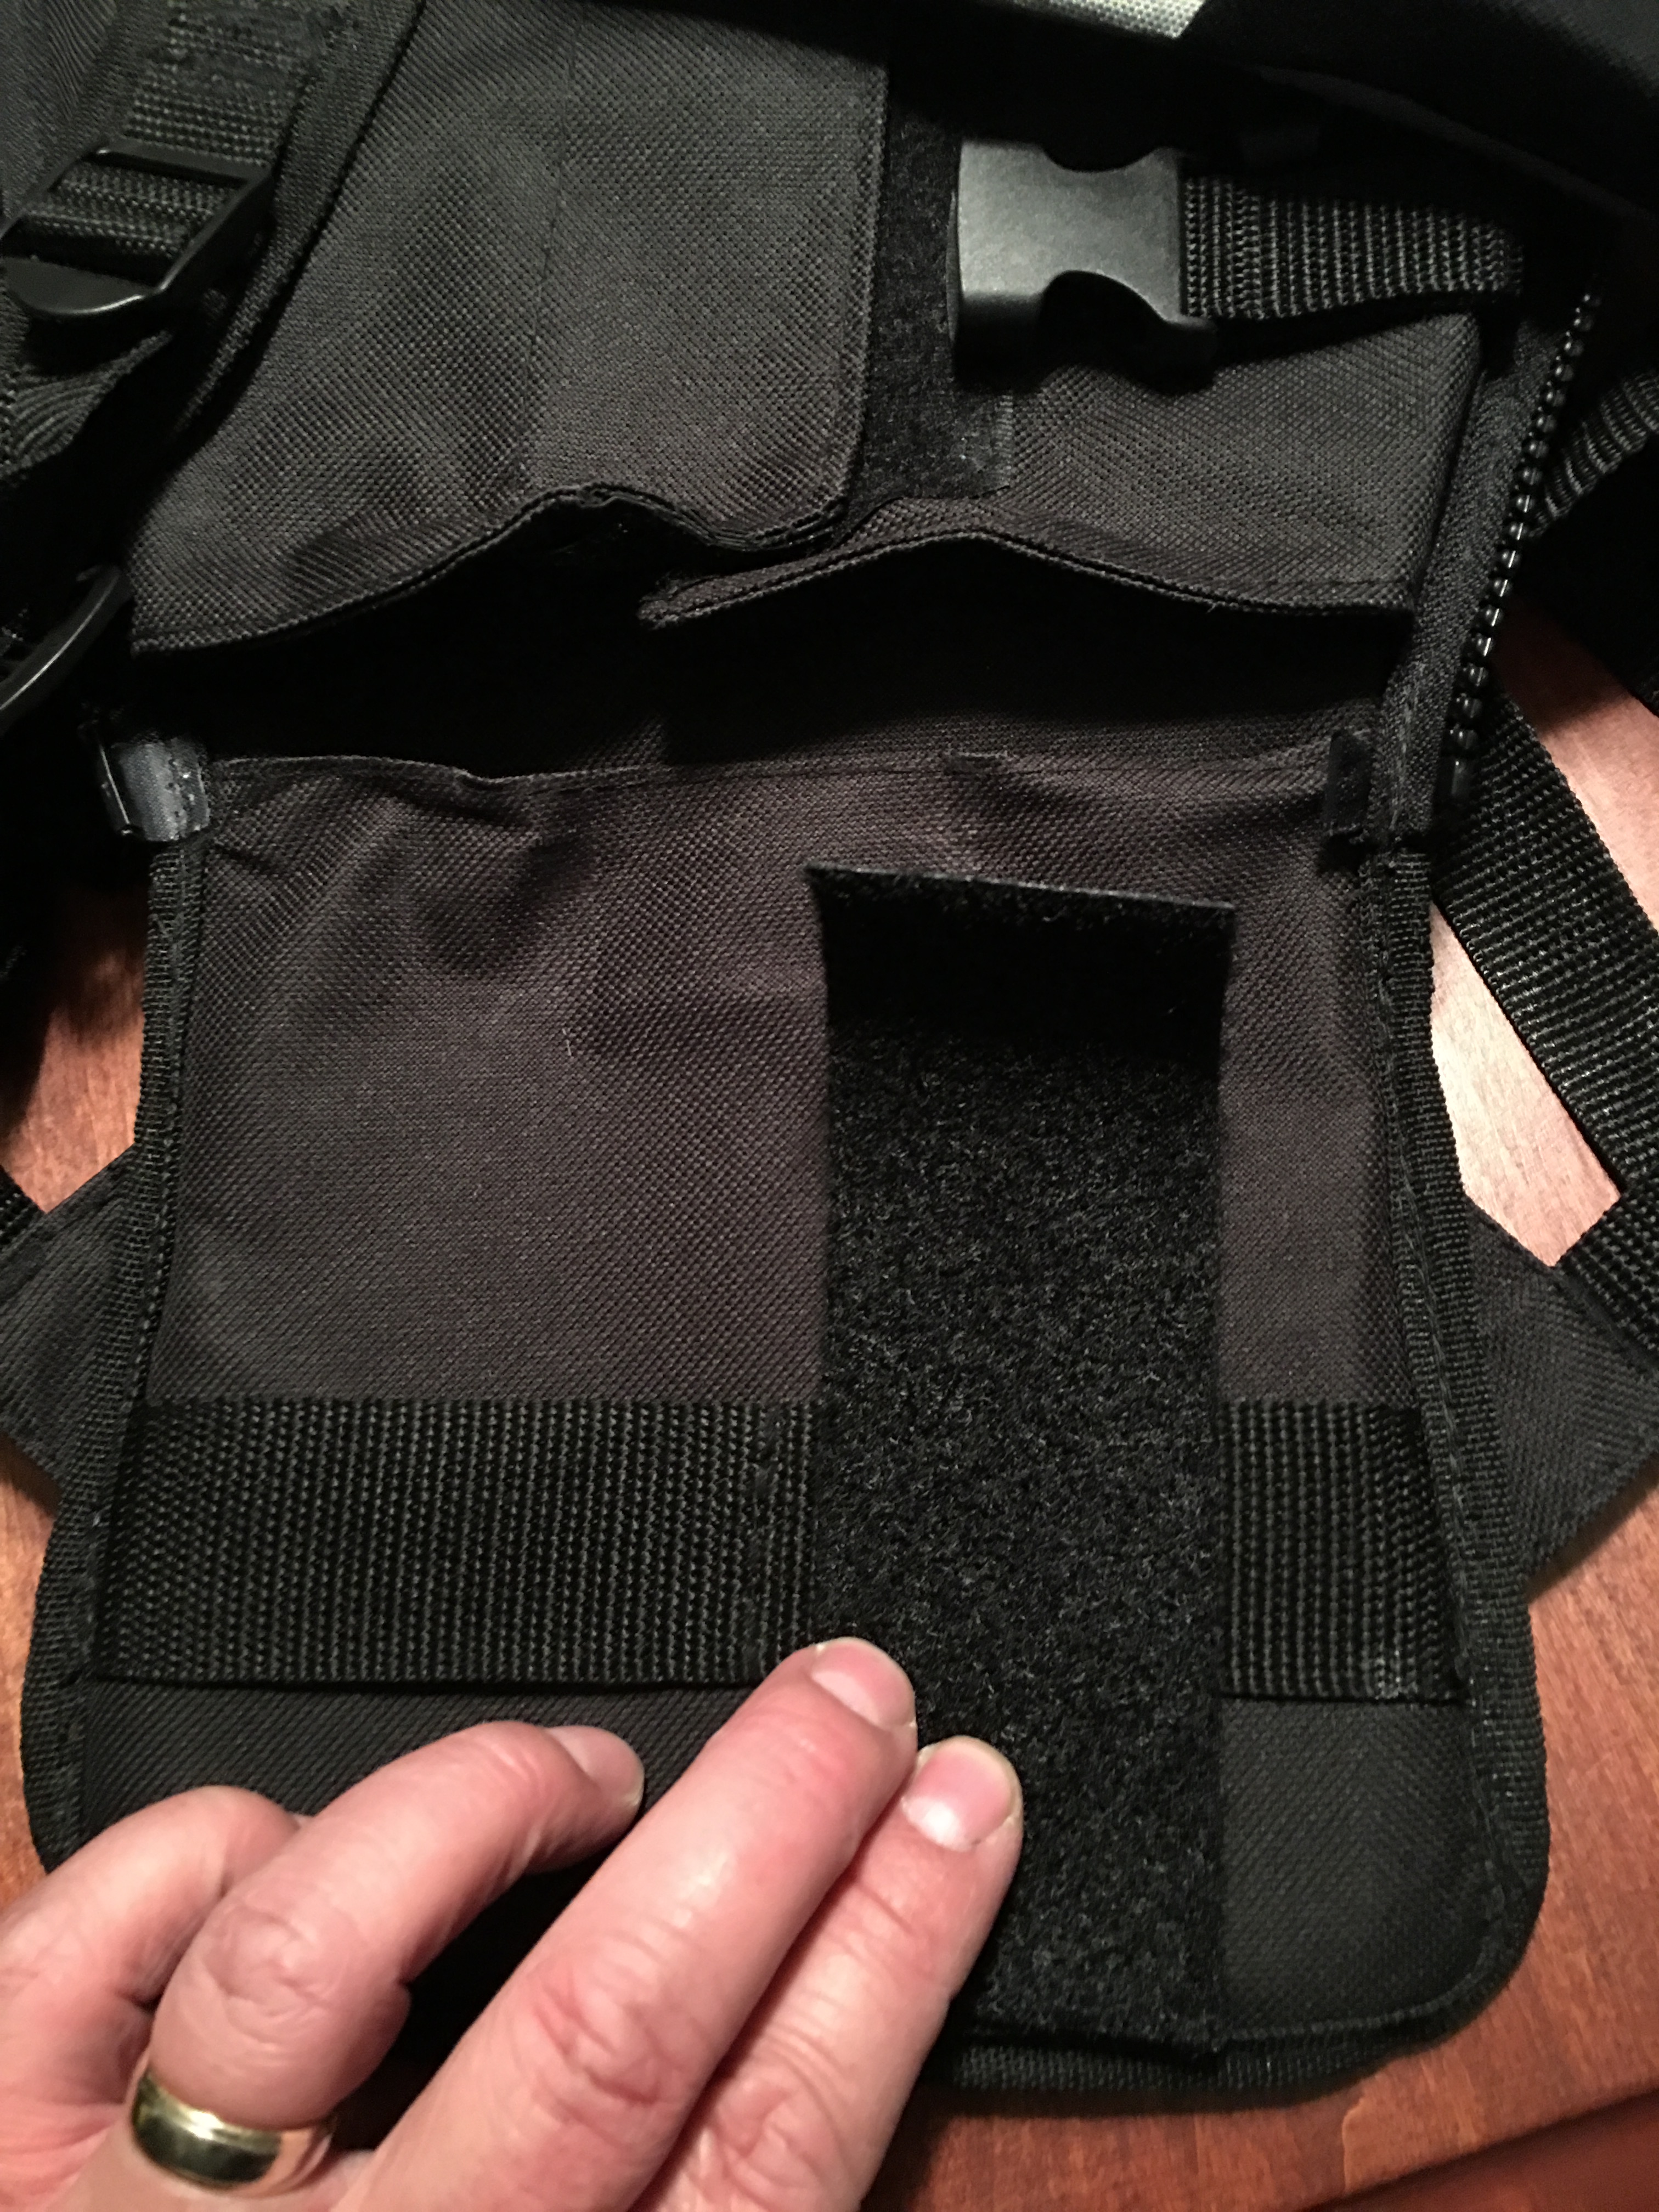
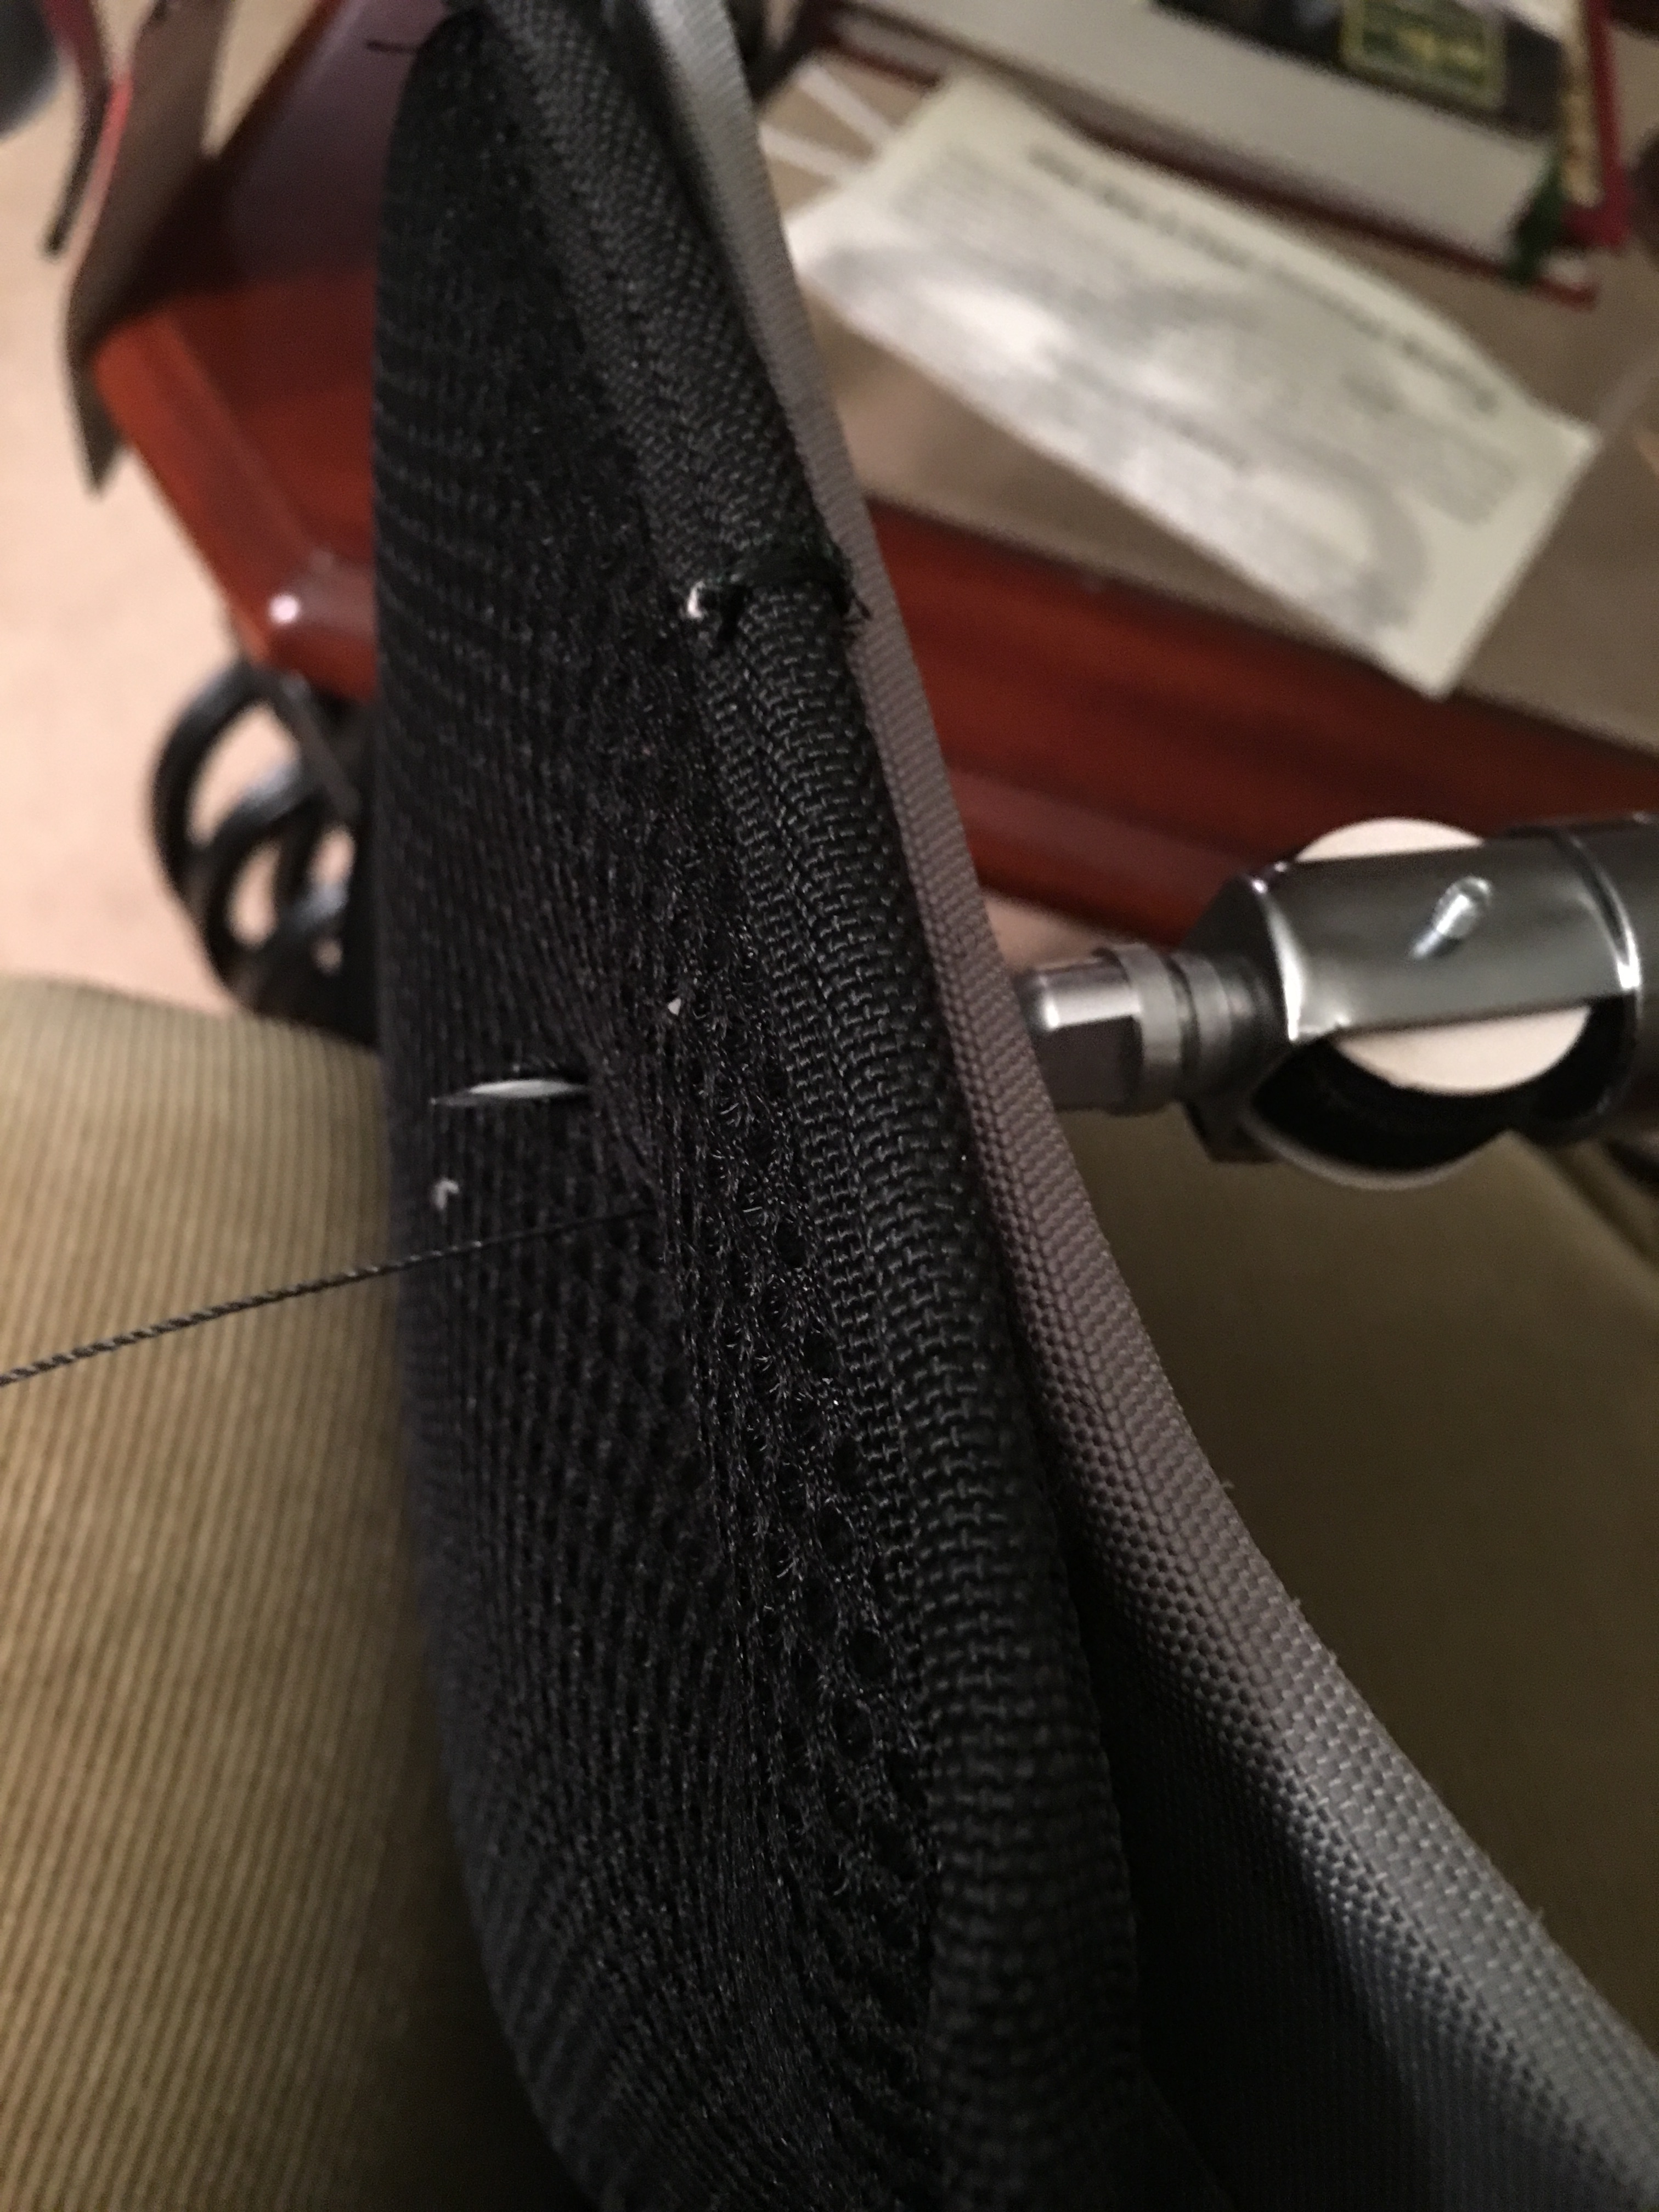
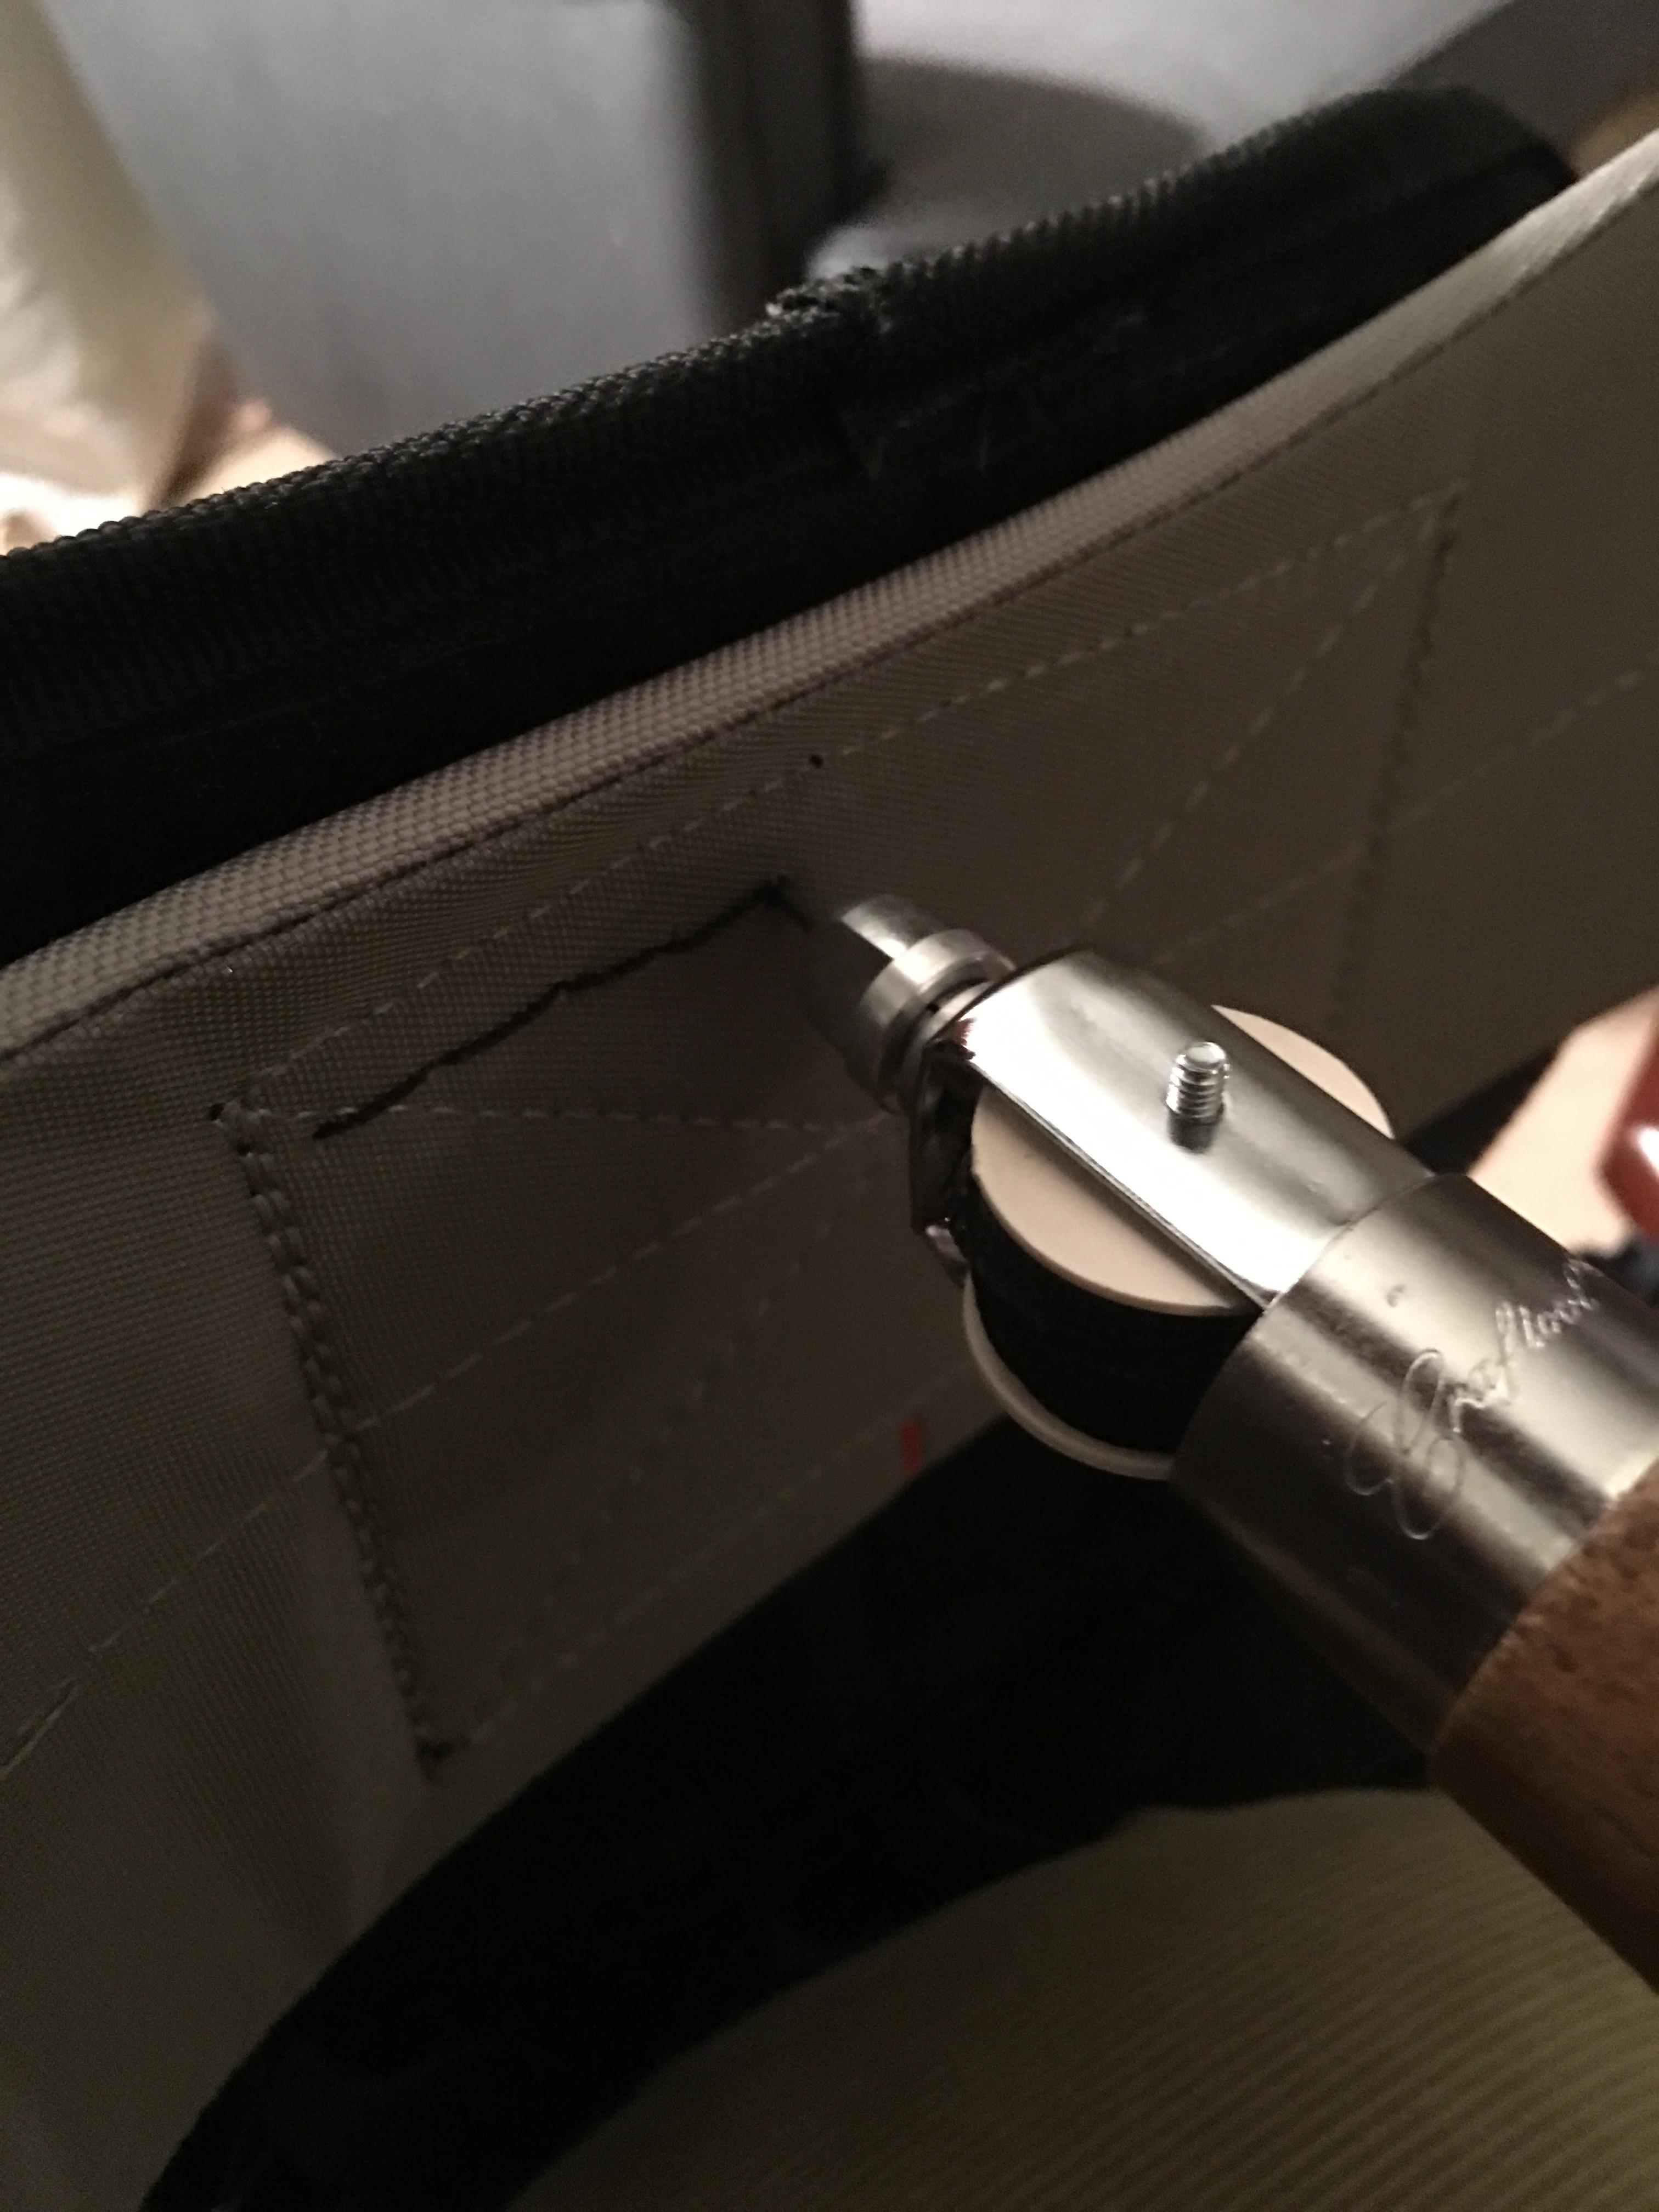
It became clear to me that I needed heavier and more robust attachment. I ordered a stitching awl from Amazon: http://amzn.to/1OyZLoj
There are cheaper versions that will probably work; but this thing worked perfectly. I used it to stitch on the hip-belt and the shoulder straps.
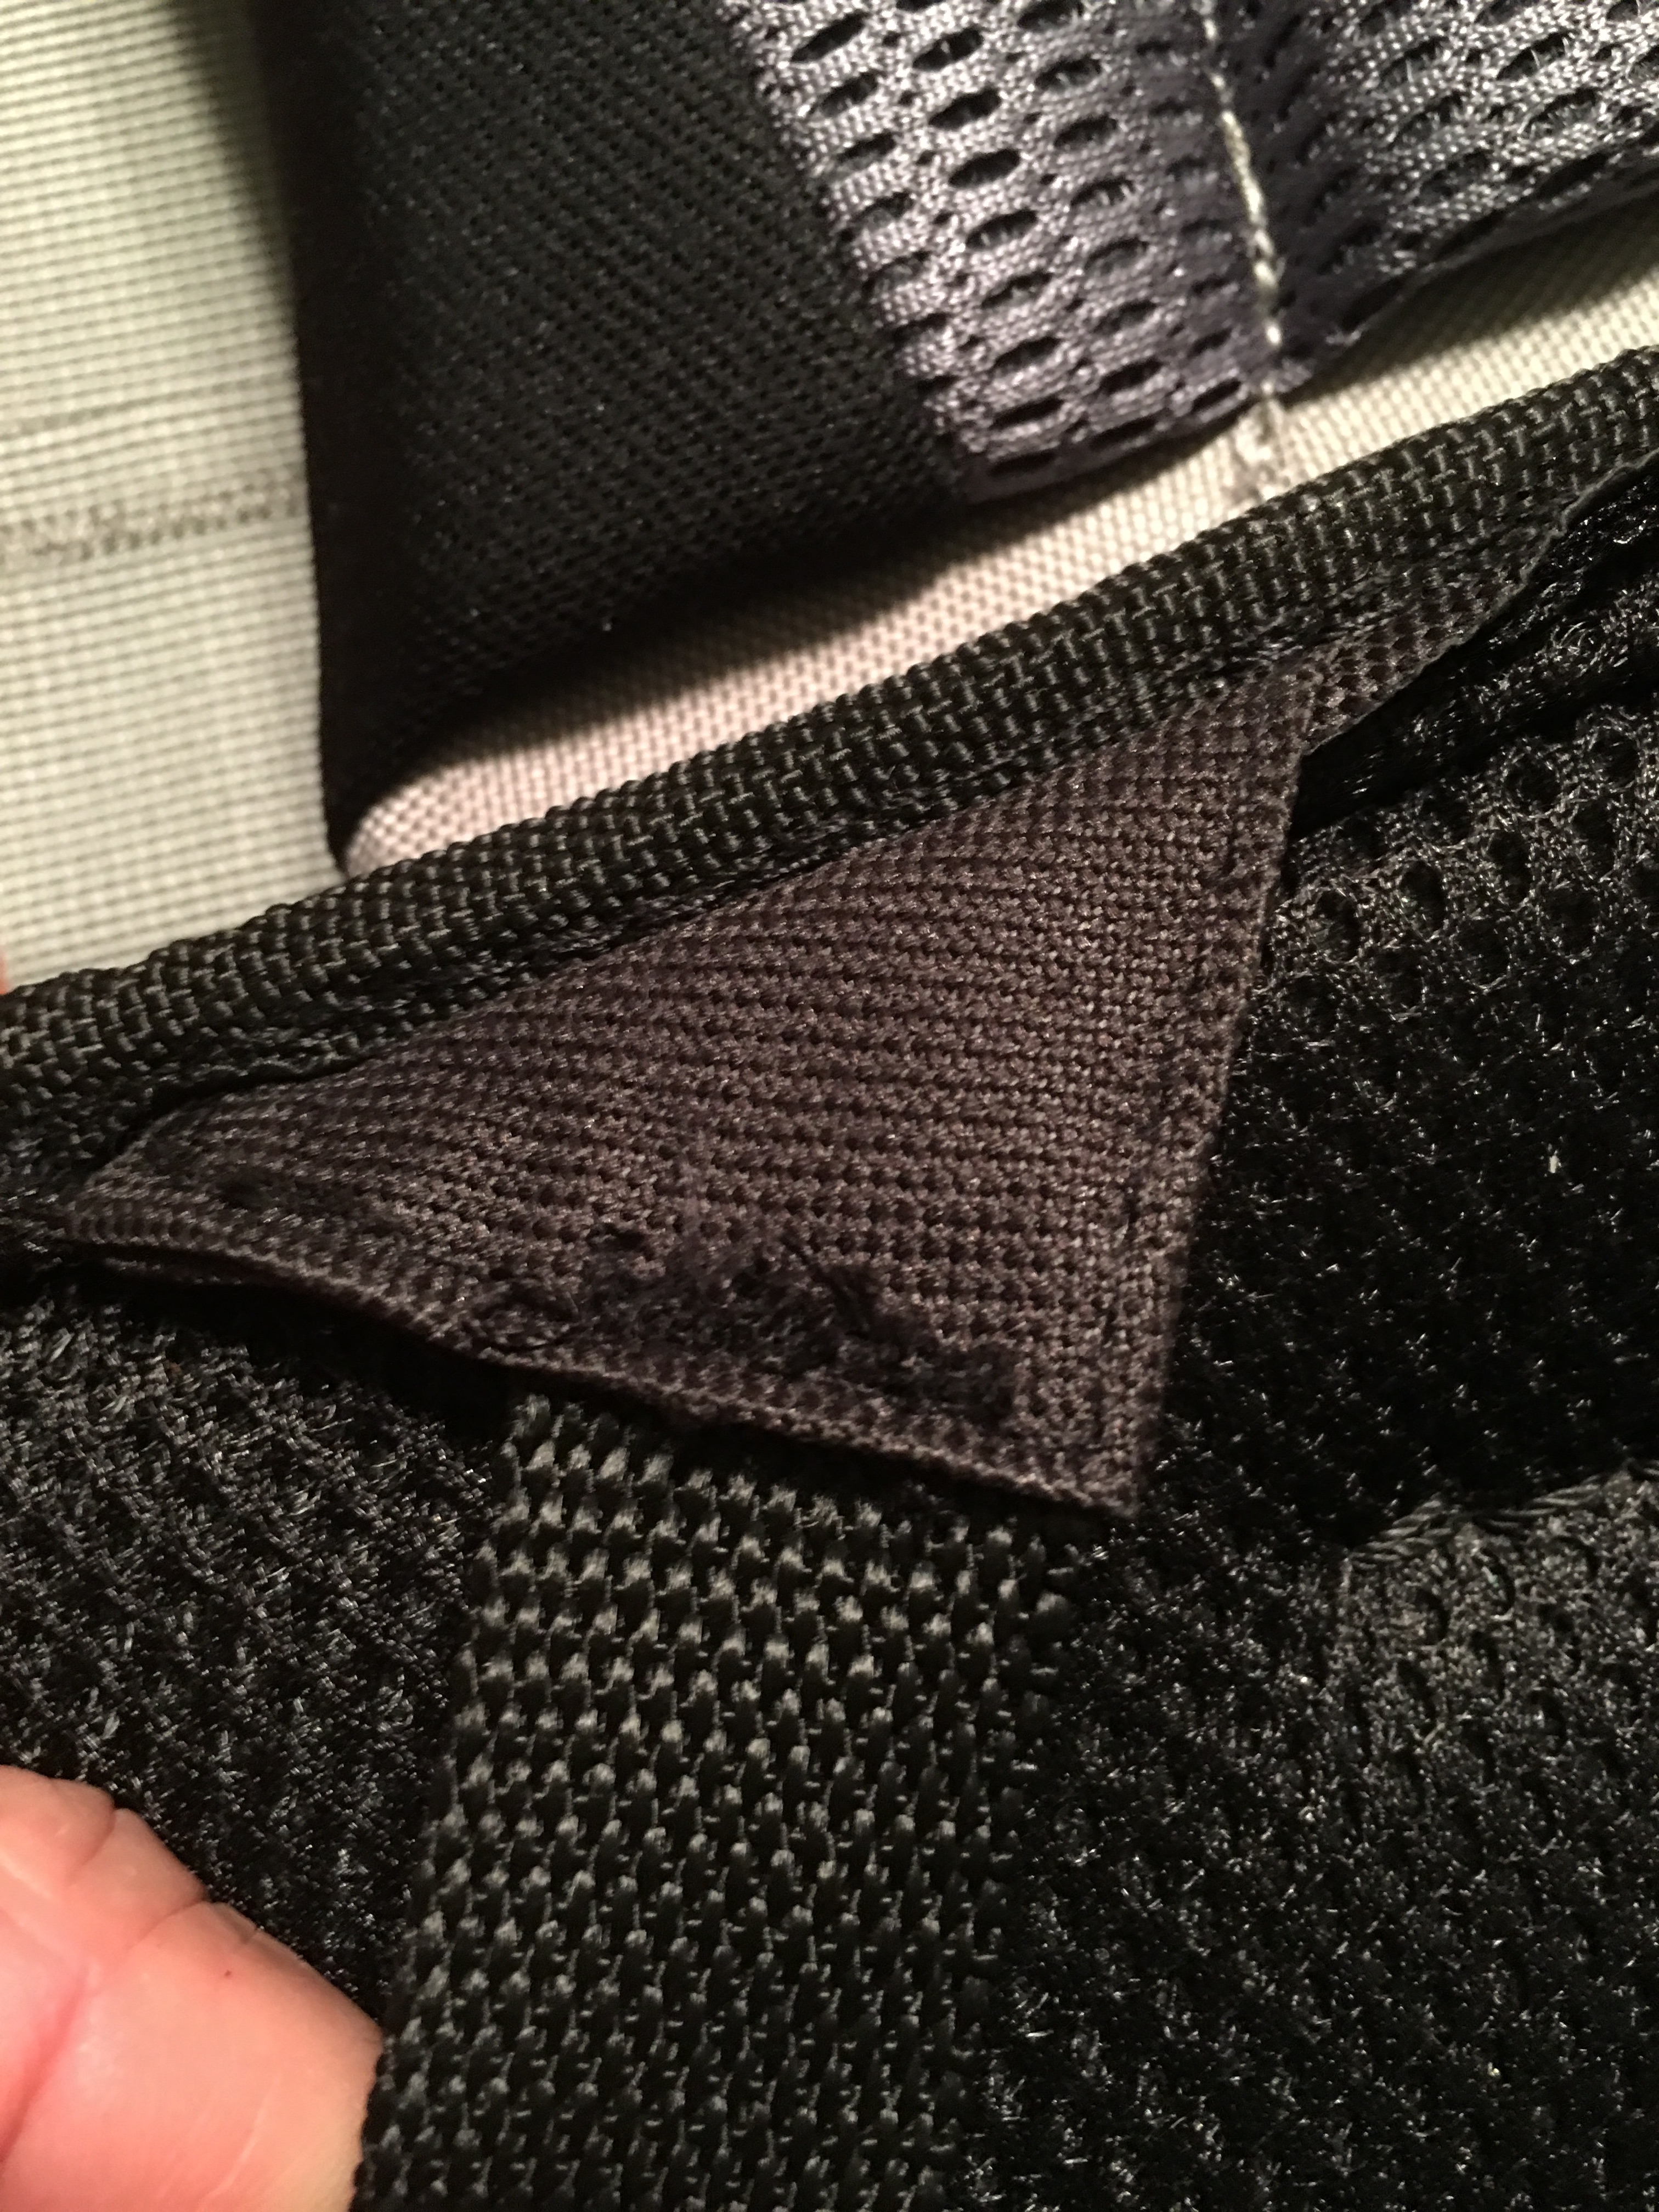
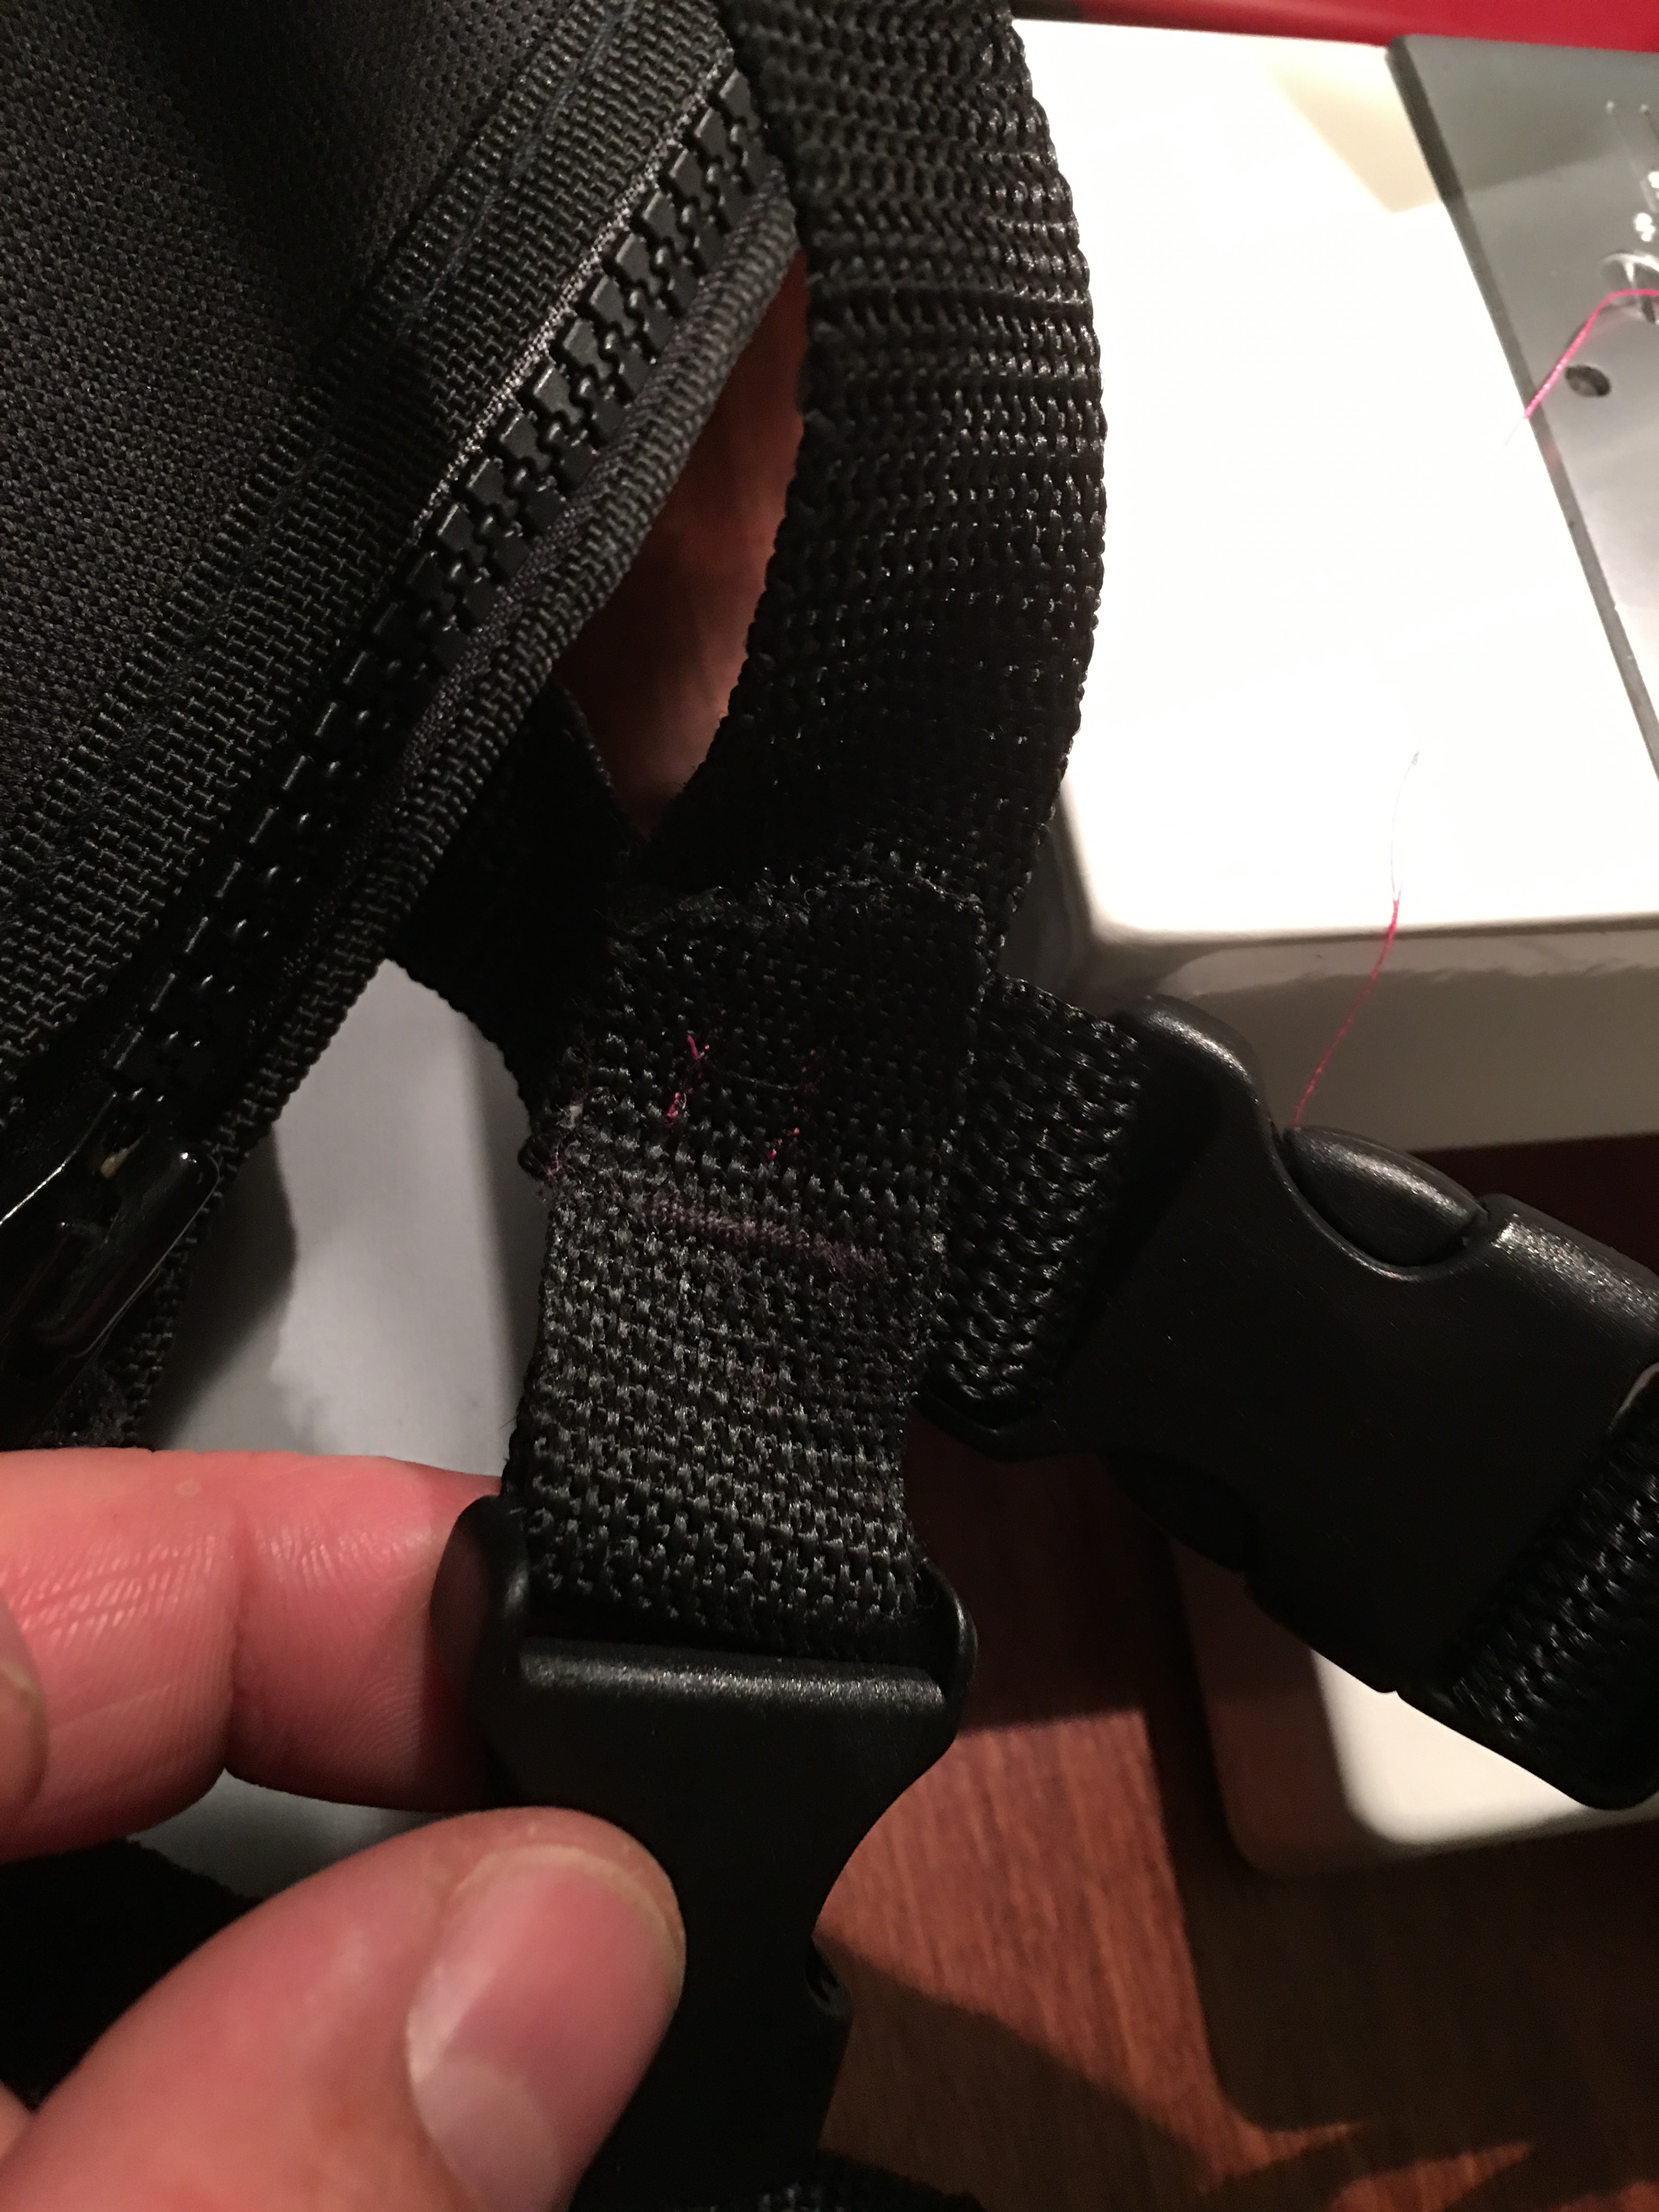

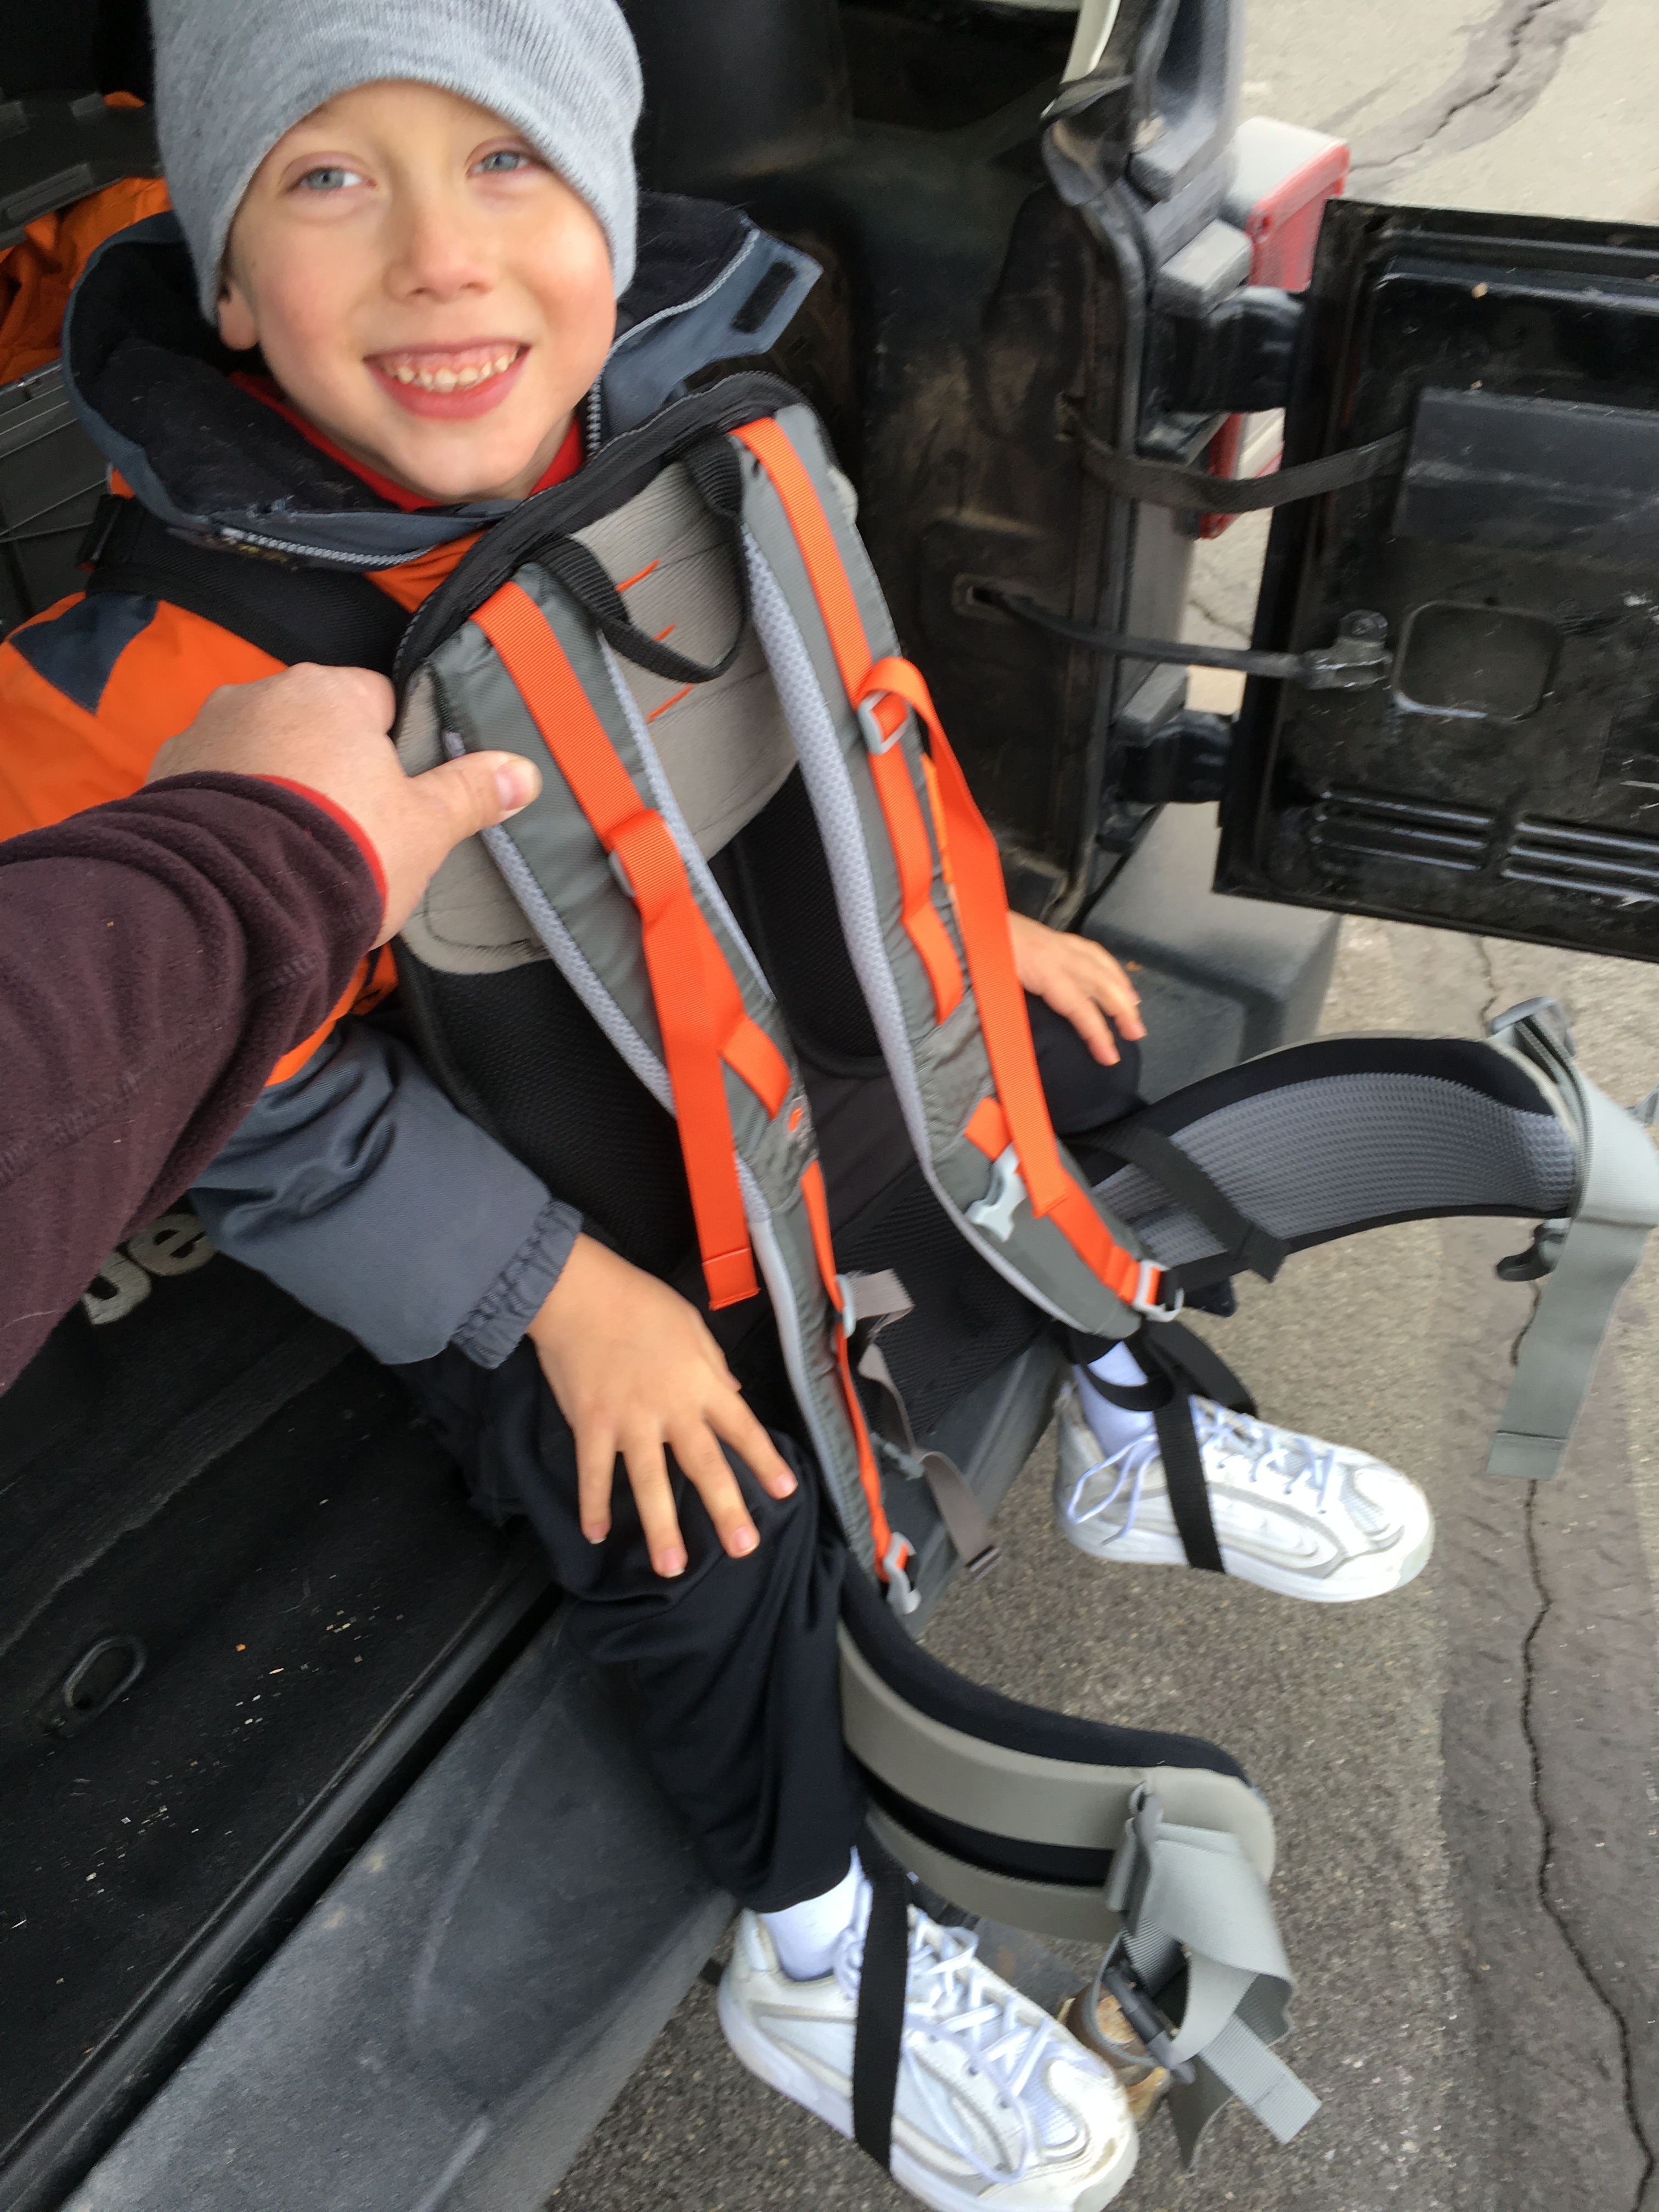
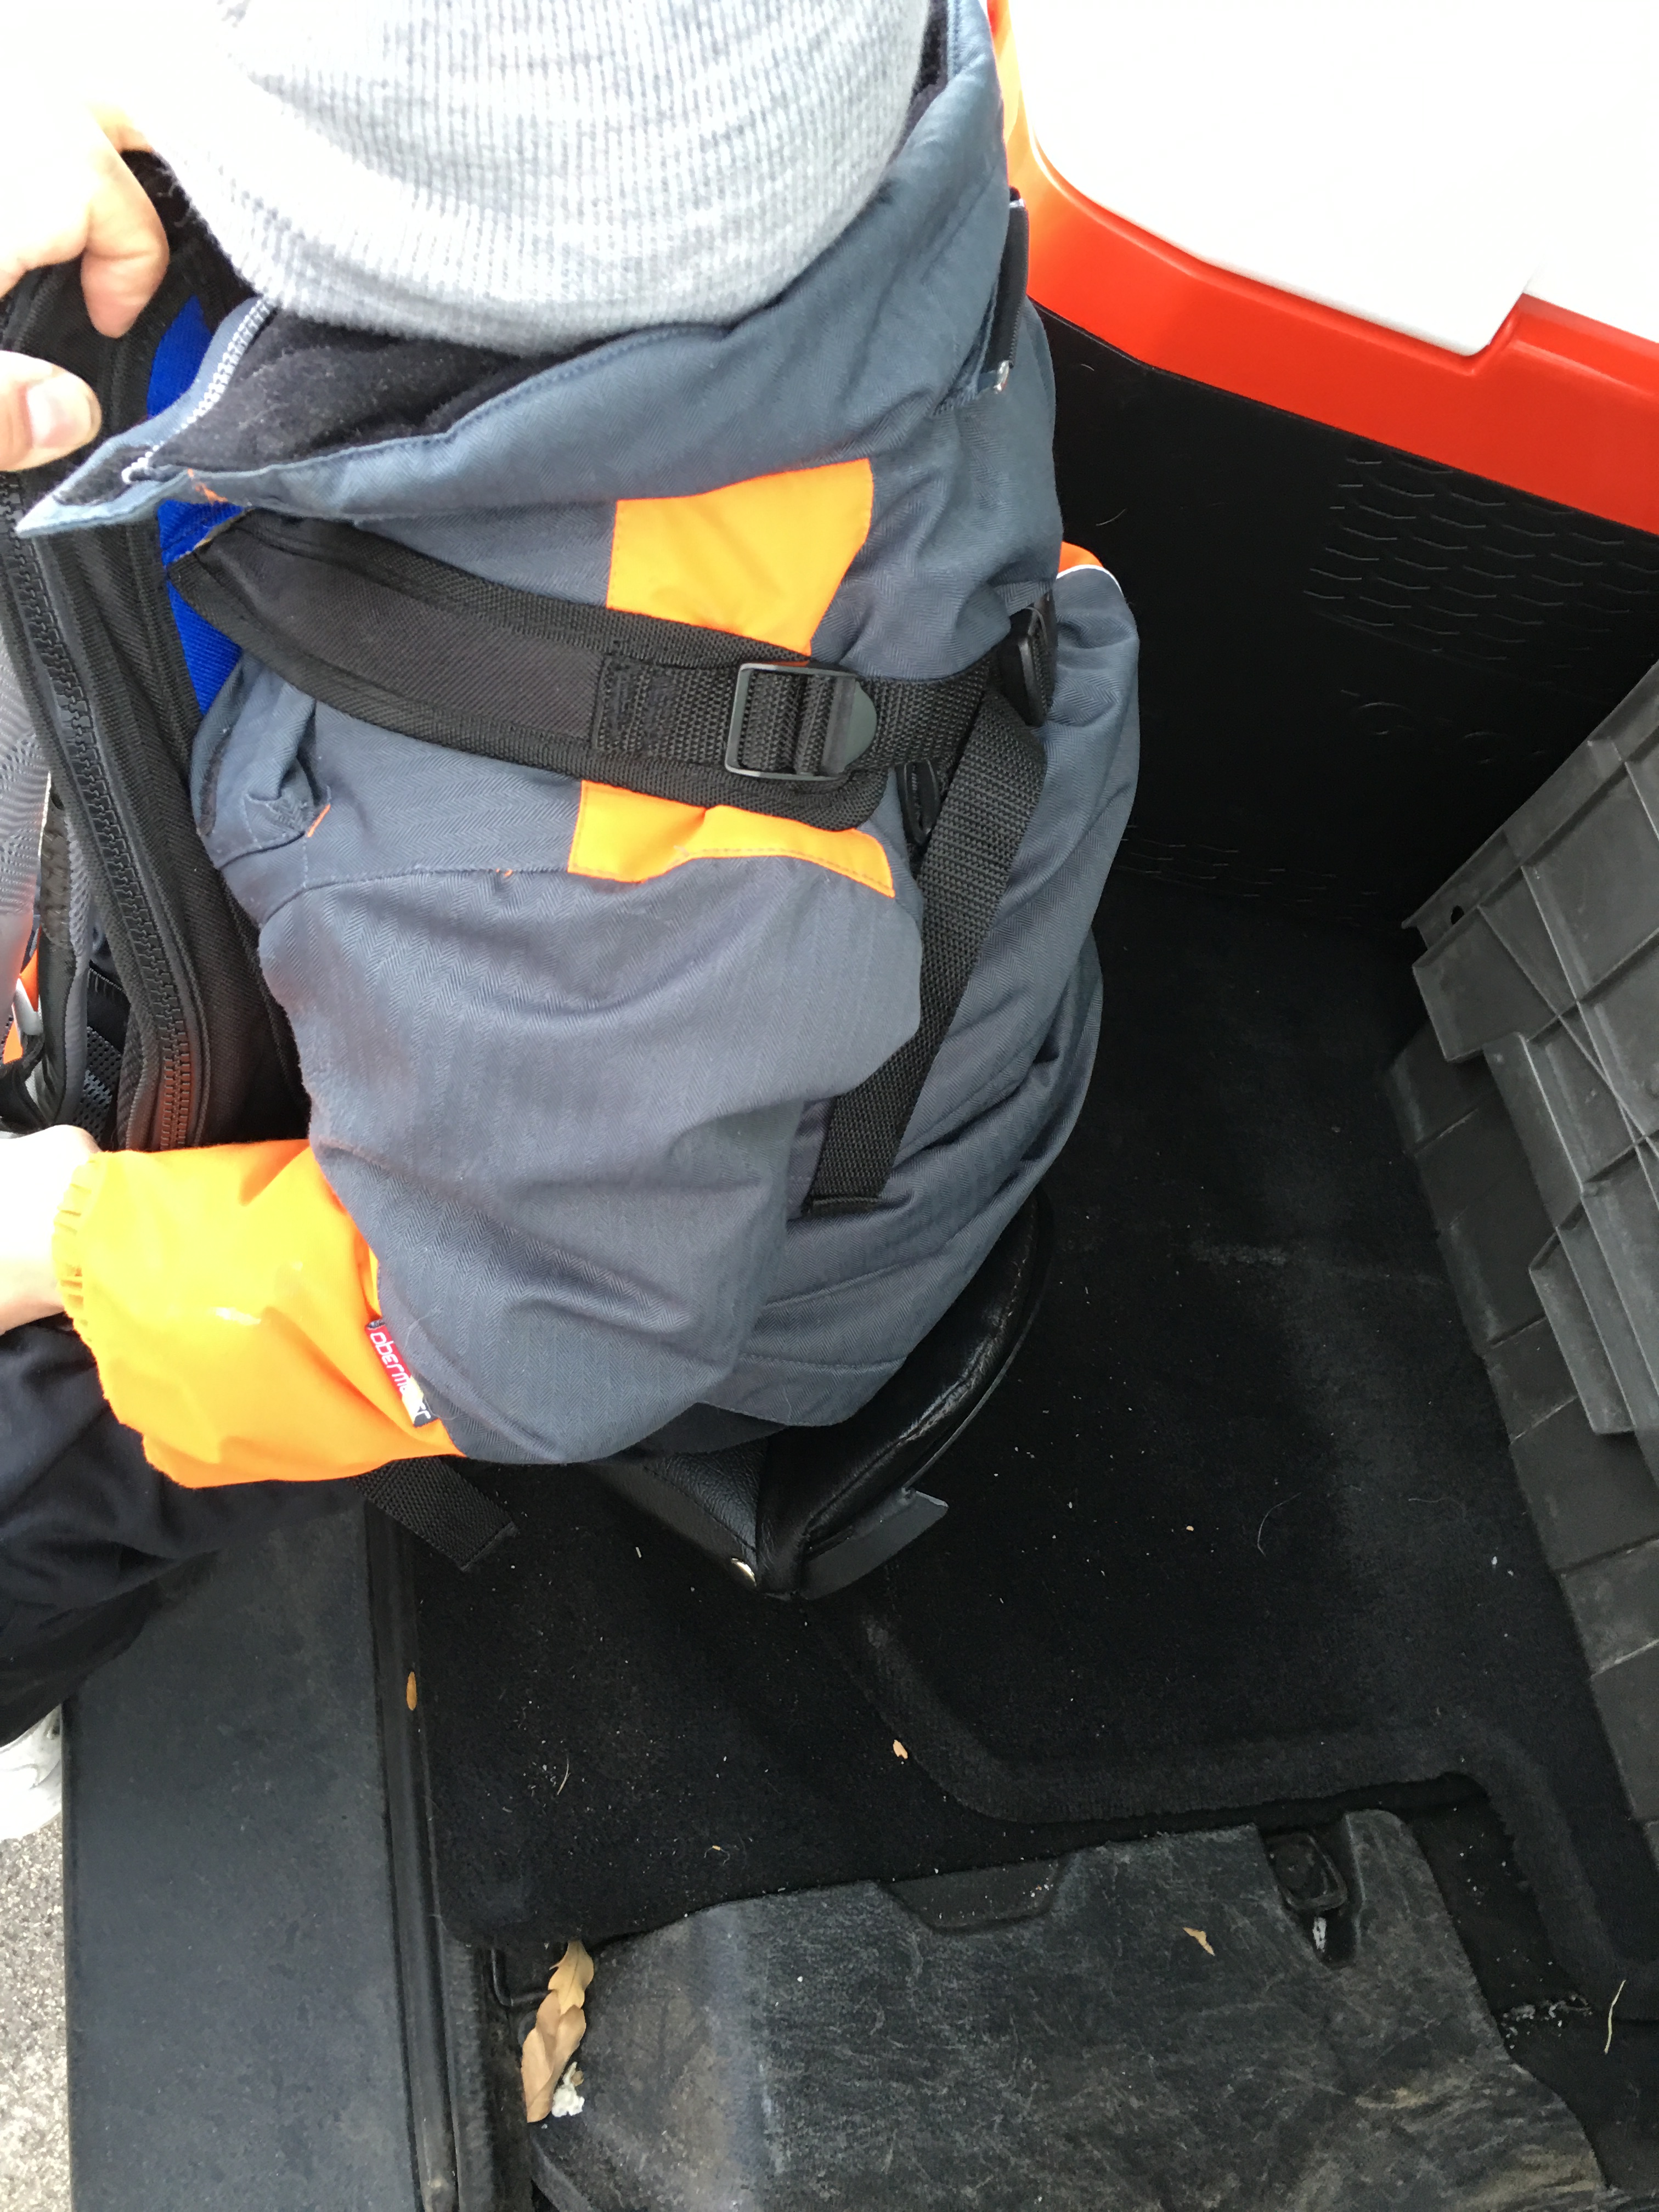
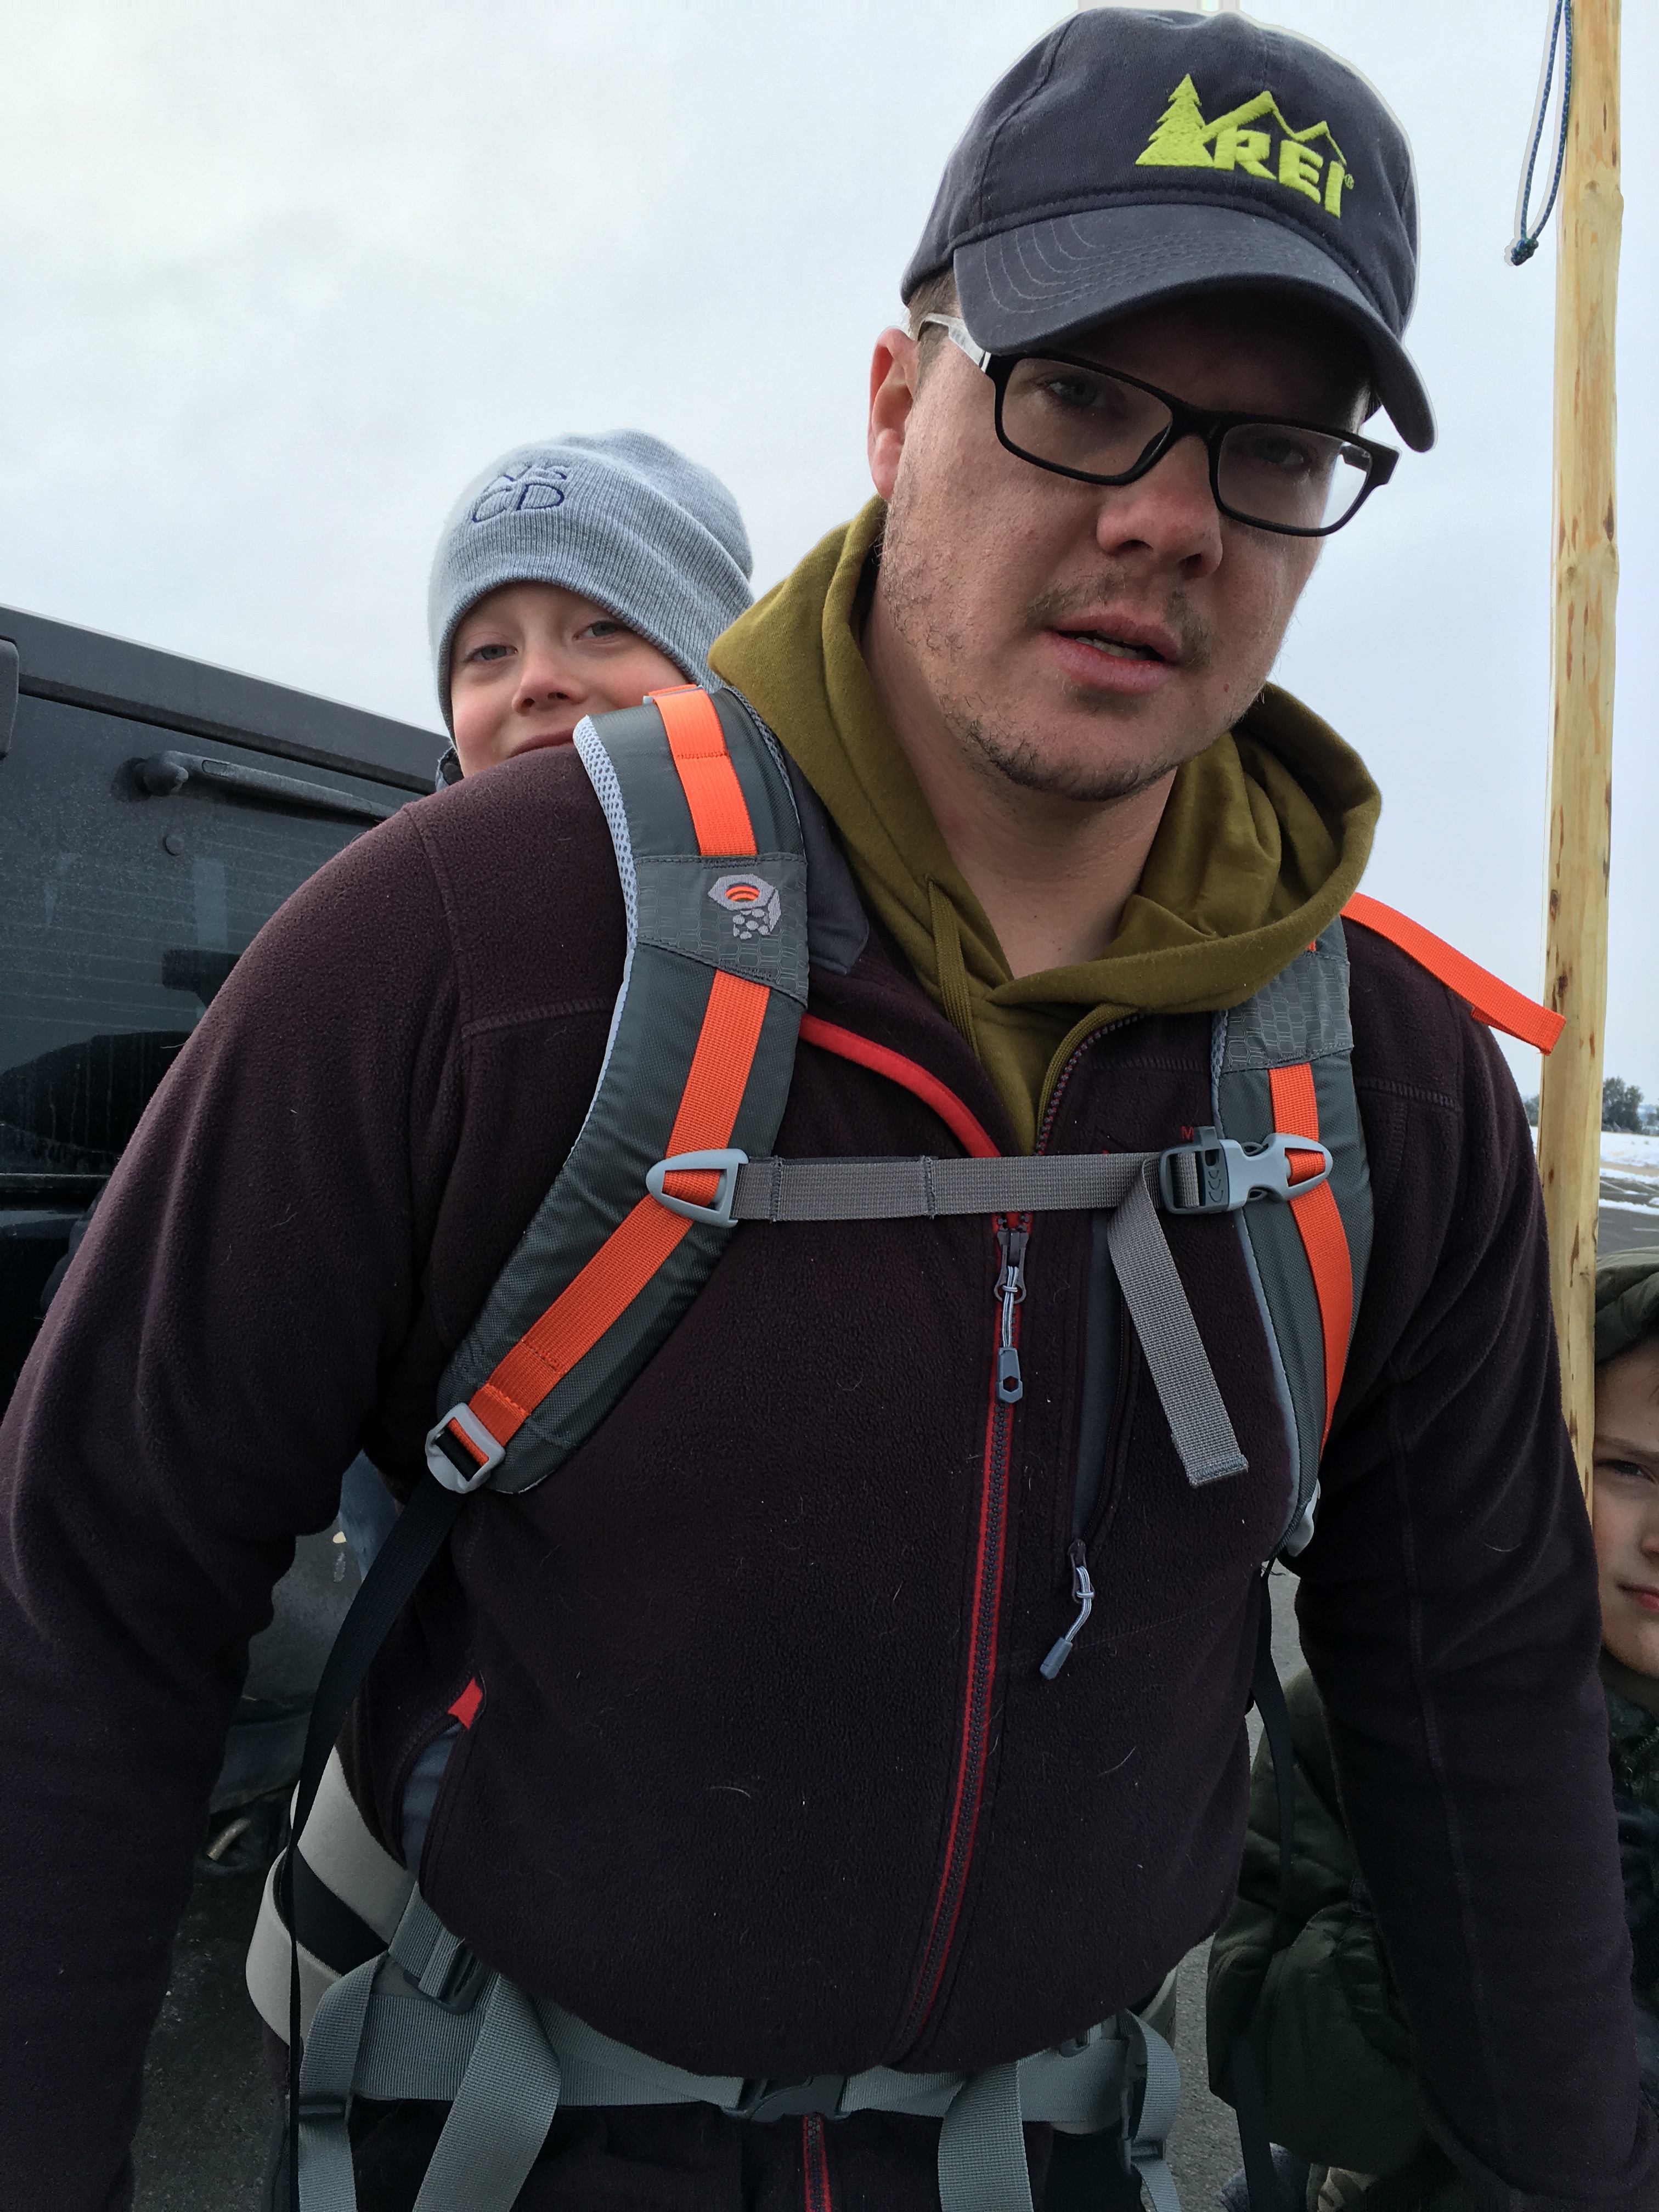

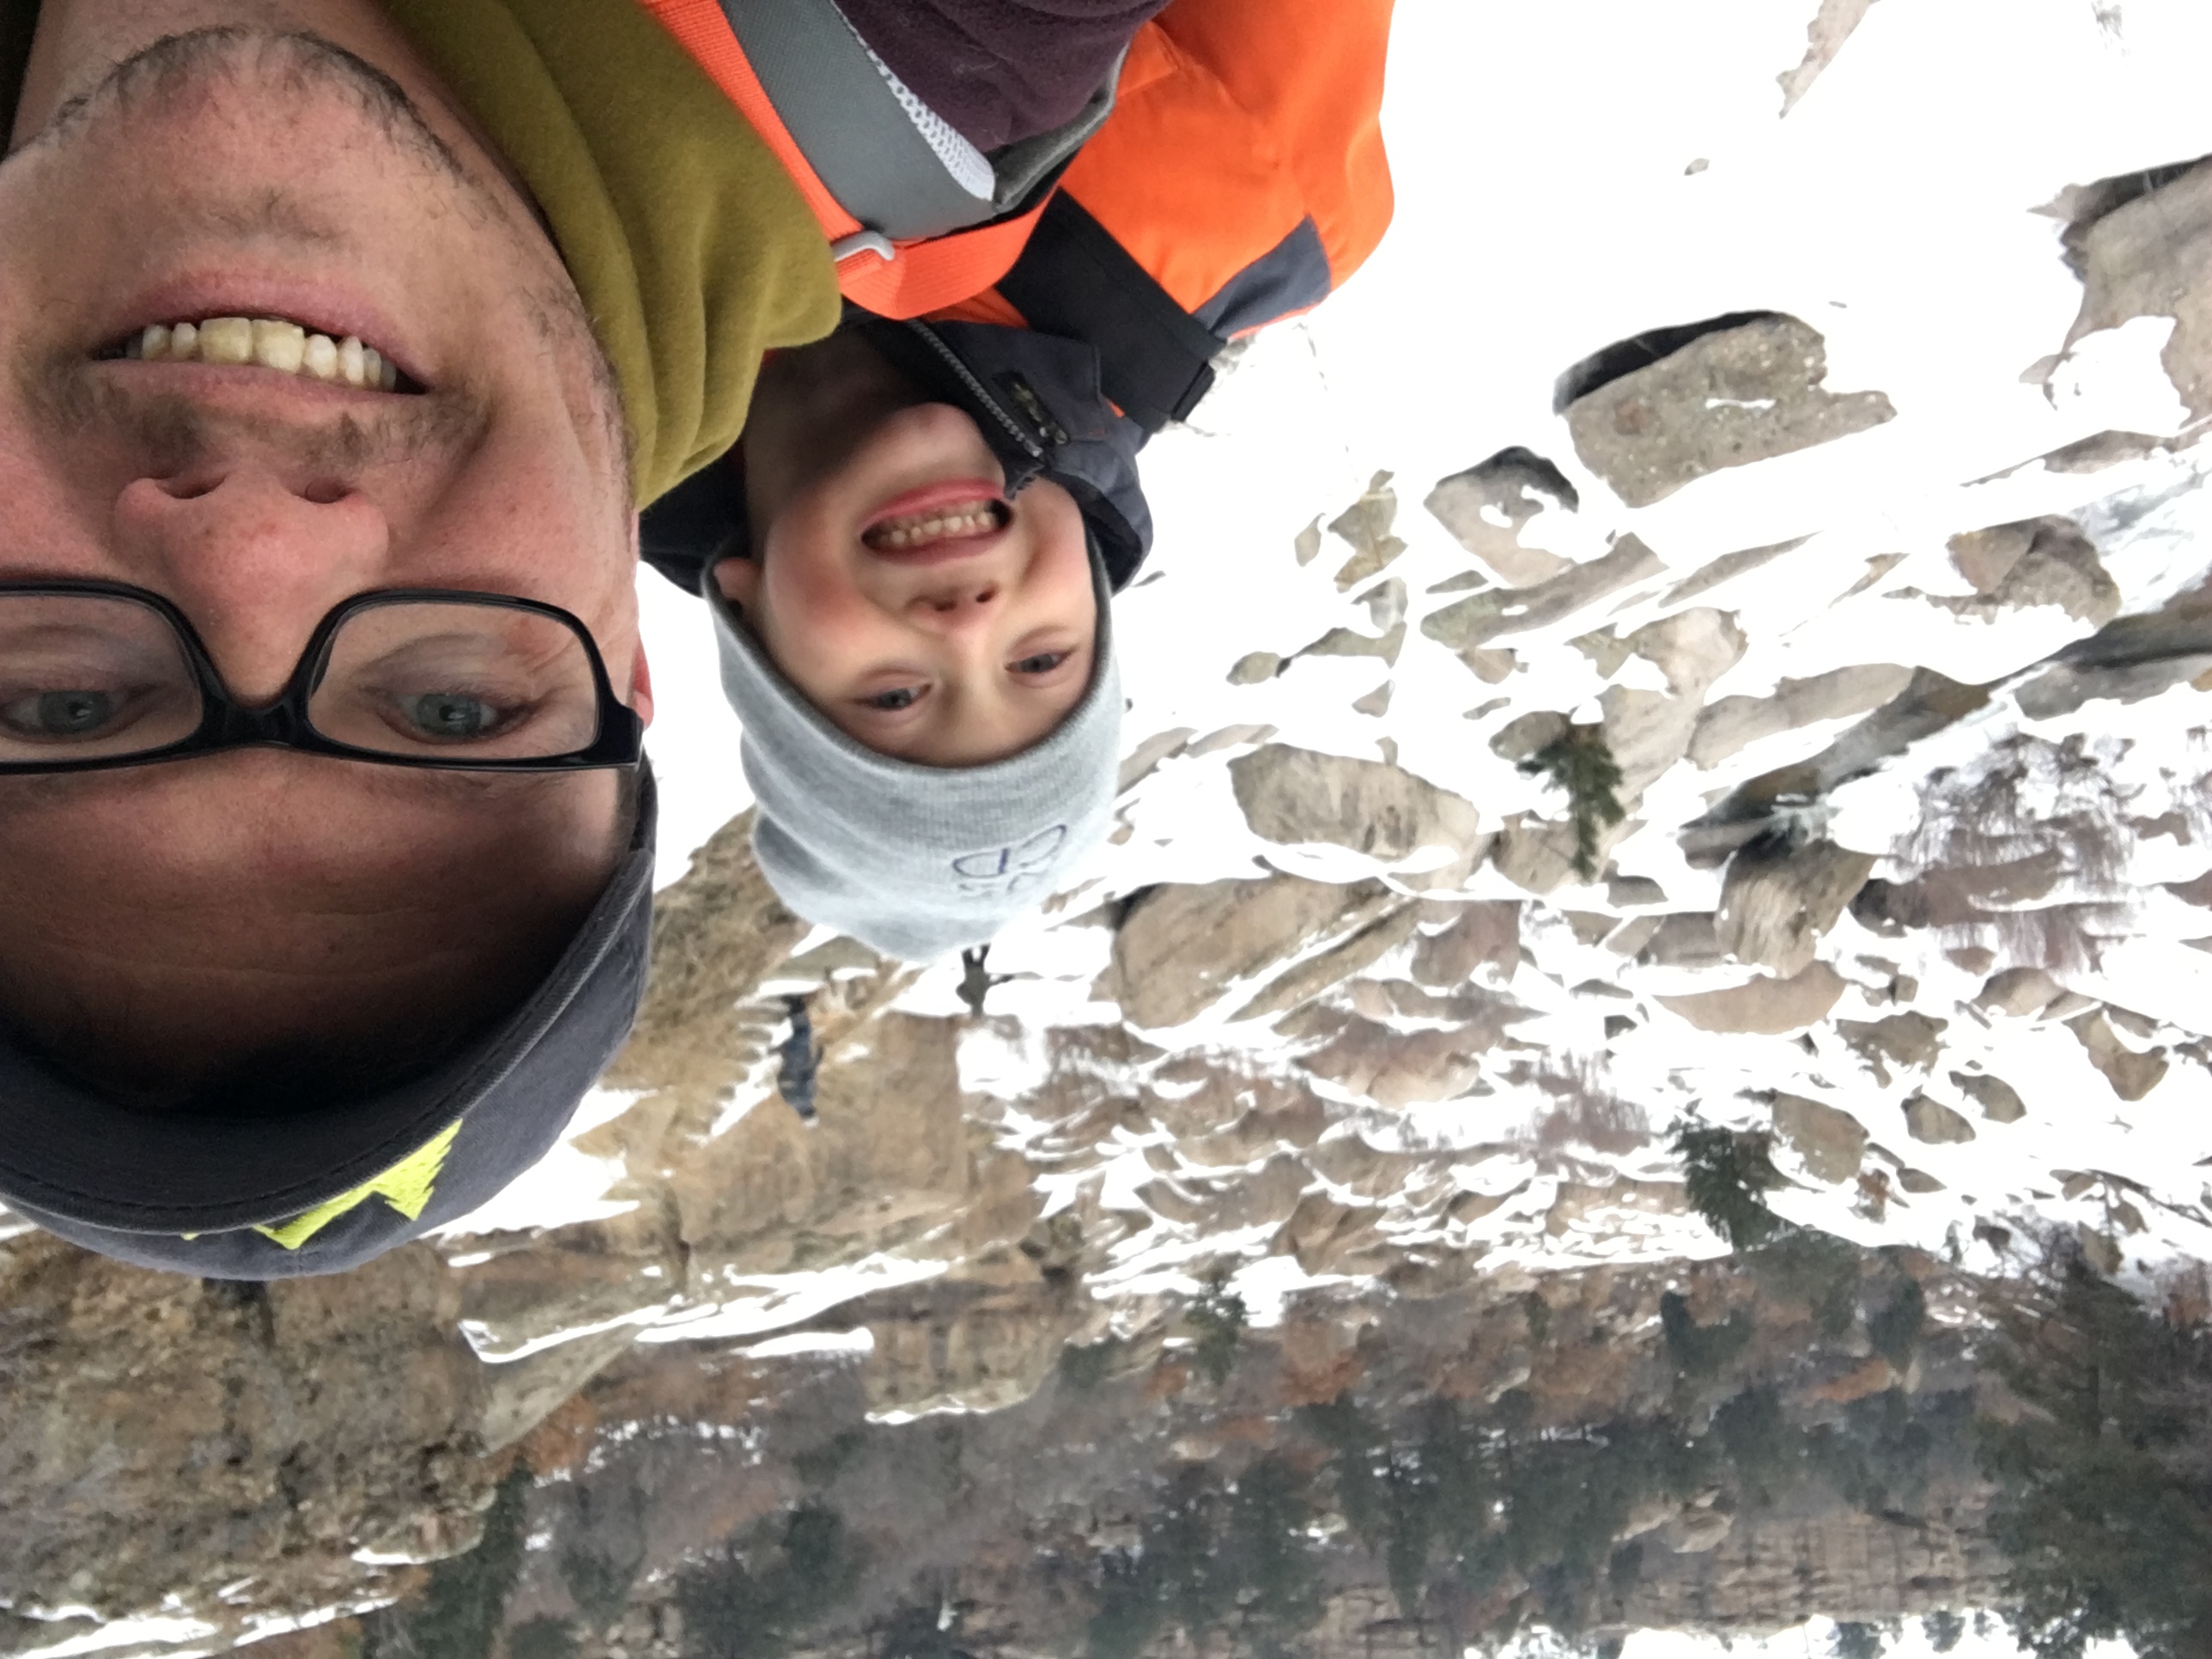
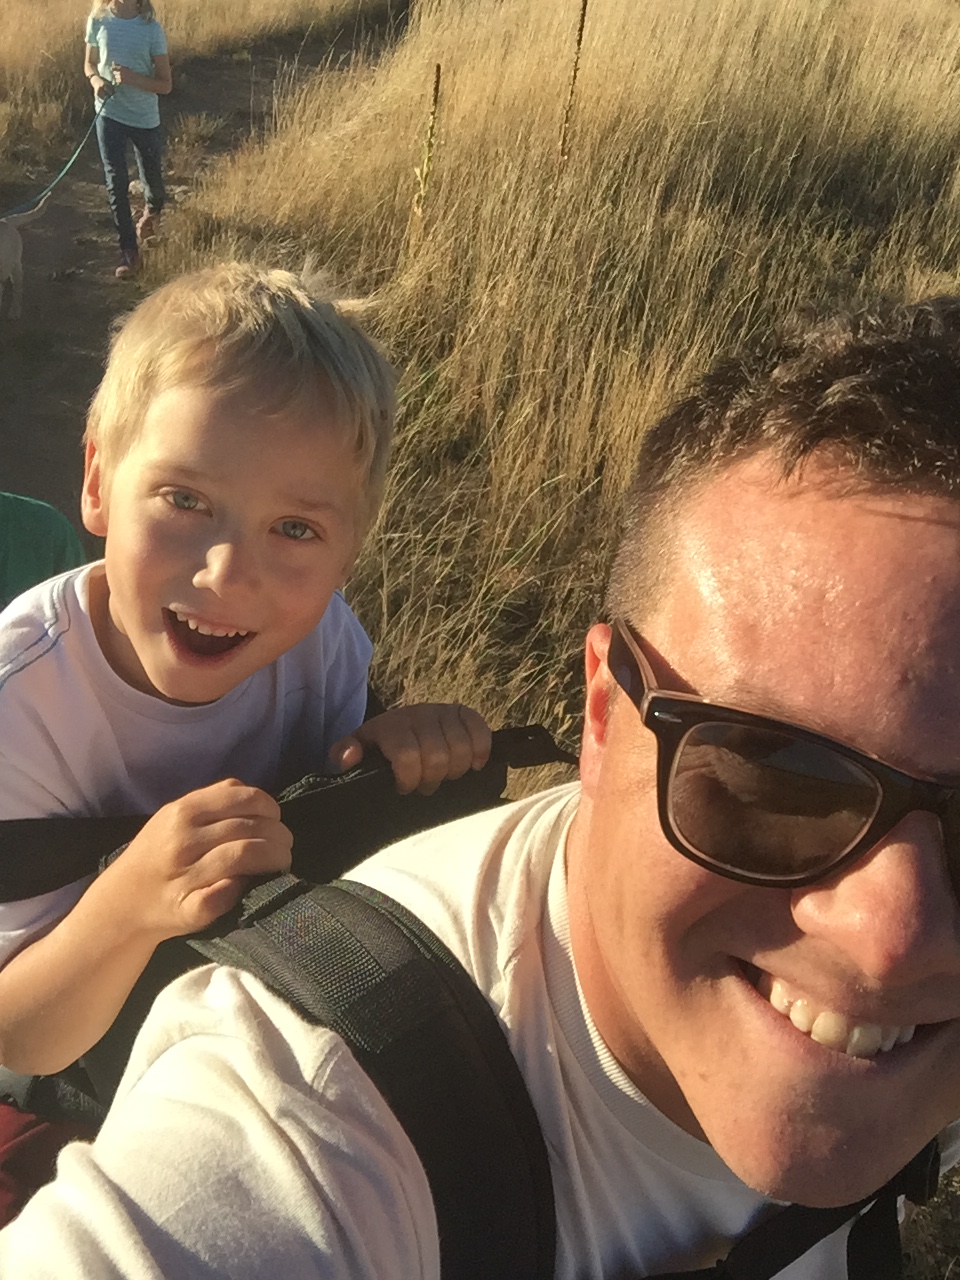
The improvement is incredible – its exactly what I had hoped the FreeLoader would be out of the box. I hiked Zeke several hours over the snow with zero stability issues, complete comfort and no strap slippage whatsoever. I’ll be checking my stitches and seams after each trip and reinforcing where needed – but this thing felt solid as a rock. It was more comfortable for me than I expected, and thanks to the fantastic seat and stirrup design from the guys at FreeLoader, the older boys wanted to come home long before Zeke and I were done.
If you’re looking for the same things I was – high quality backpack like comfort while carrying your larger heavier child around, this is the way to do it. I think I added another $50 or $60 in parts plus a couple of evening hours assembling, but the result is exactly what I wanted. Take FreeLoader’s skeleton and design, and put some good straps and a solid hip-belt on it. I’m looking forward to using this for at last three or four years.
Updated on January 12, 2021
Server 2012 R2 RRAS VPN Disconnected
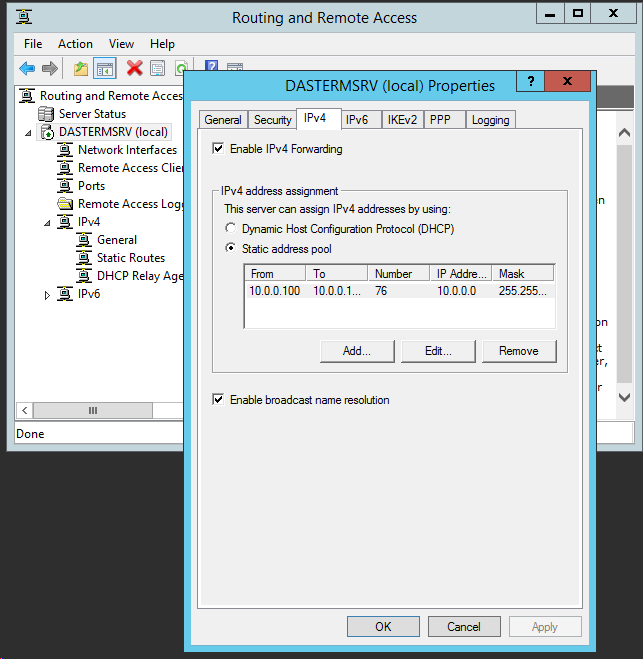
Trying to get Remote Access VPN configured on a cloud server and had some issues connecting. Here’s the error:
the user connected to port vpn has been disconnected because no network protocols were successfully negotiated
Turns out I neglected to define a DHCP scope for the server to hand out addresses from when the VPN client connected. On the Windows 2012 R2 server, run the Routing and Remote Access (rrasmgmt.msc). Right click on your server name and choose properties – then the IPV4 tab. Give yourself some IP addresses in that range (ideally that your main DHCP server isn’t planning to hand out. Consider a smaller VPN range outside of the main range) and move the IPv4 address assignment over to your new Static Address Pool.
Updated on January 12, 2021
Snow is in the air
Wife and I were at the LL Bean store today. Picked up some jeans, and a pair of Altai Hok ski/snowshoes. I’ve never run into these things before, but I’m incredibly excited to try them out. With the snow on the way (already one small storm to our name in November) I’ve been considering snow shoes for my daily dog walks. Historically, I hate snow shoes.
We’ve got a fair sized mesa behind the house, and while we were walking yesterday I looked at it and realized I needed to hike it and ski it the next time we had a good storm. These “Skoe” suckers might be exactly what I need. Skoe (as I’ve recently learned) isn’t a new type of chewing tobacco, but a hybrid ski/snowshoe. They’re light (5 pounds including the binding) and the universal bindings mean I can hike in my Merrel boots when I need to. YouTube seems to suggest that a telemark downhill approach is needed.
Which means I get to work on that – I have no telemark skills. But I’ve always been fascinated by those gnarley old-school guys with their unhinged heels. Never wanted to sink the money into a set up only to find out I hated it – these will be the perfect way to try it out without committing too much. After all, if I have no heel skills, I can always just use them as shoeskiis. I mean Skoes.
Forecast says perhaps snow in the next few days. Fingers crossed!
Updated on January 12, 2021
The Last Day
Lets be honest; I don’t need too many reasons to sit on my couch on a Saturday and drink whiskey. Likewise, I don’t usually have blog-worthy experiences… but here we go.
Let me start by saying, my Big Green Egg is old. Old enough that I don’t know exactly how old it is. Old enough that it predates me, by at least 10-15 years. When I was first bitten by the smoking bug, I was poor – poor enough that a $1200 new Big Green Egg was laughable. I can’t have a grill that’s worth more than my car.
So you can imagine my joy when I found this Egg on Craigslist for a couple hundred bones. The guy I was buying it from, Jim, had owned it for a couple decades and had finally upgraded to one of the new BGEs… it was sitting there on his back patio, shining in the sun like an emerald jewel capable of grilling, cooking, baking, smoking, well… anything. Sitting next to it like the old family dog on its last legs was my bride-to-be. Squat, ugly and clearly a predecessor from a bygone era, it held an eclectic hipster beauty all its own – it was *vintage*.
Jim spoke of it like it was an old friend. “We’re only upgrading because we can’t fit enough burgers on it at once… it’s really treated me well.” The wistful notes in his voice only stoked my own excitement – this battle-proven beast was soon to be all mine.
“Be careful though,” Jim told me. This Egg far predated the modern era of Space Shuttle Ceramics, and was made of lowly ceramics. It wasn’t capable of the intense heat that modern Eggs could withstand, and stood the risk of cracking when fired up into the kiln temperatures. This was fine with me, since I had little interest beyond hamburgers and steaks. My real interest was in the long, low and slow heats that it could provide for smoking.
I strapped the egg into the front seat of my Ford and seat belt bucked it in… carefully driving it the 100 mile trip back to its new home.
My Old Egg has been wonderful. We’ve cooked so much together… I only have a few regrets. We’ll never have the chance to cook a TurDuckEn, for example. But today, we’re trying to focus on the good times.
At about 1:30pm, almost 5 hours into two pork butts, I went to test the temperature and take a few photos to send out to my twitter folks. Twitter is strange; there are many people I’ve never met, that I’d never recognize on the street, who’s family story or personal struggles are completely unknown to me. And yet, we’re friends. Brothers who’s only real bond is the love of the grill, the smell of the fire, the connection to that primeval drive to take a raw chunk of meat, hold it over a fire and then eat it.
It’s completely absurd, but sharing a 12 hour long smoking session with people you’ve never met (and who are genuinely interested in what your brisket looks like) is like attending a BBQ contest, without the competition. So naturally, I’d been excited for the latest update; the smell of this pork alone has been driving my family crazy for the last few hours and I was ready to crack the Egg open and see how things were going.
I’m going to remind you about the nature of my Egg; its ceramic. Its like a huge flower pot for cooking meat. The bands and screws that hold this thing together have to be carefully tightened – not too much, not too little. In all honesty, if I was a real man who had his stuff together, I’d have a monthly maintenance schedule and a tiny torque wrench. I’d carefully record the changes in expansion and contraction and monitor the updates. Frankly I’m surprised that, as a tech guy, I haven’t come up with some kind of “internet of things” approach to monitoring my antique grill.
But that’s the past.
I slowly opened the Egg, pushed the hinge that locks the lid opened, and started in horror as the entire dome continued moving backwards in a slow, inevitable arc of death. It was truly a moment where time slowed and I was able to reflect on what has happening while it happened. The huge circular band that holds the lid on had worked its way loose, and when it stopped moving, the lid continued – directly off the Egg and onto the concrete below.
“It will just crack in half” I thought; something that I could attack with JB Weld. I’ve had Frankenstein grills in the past, no worries. As I slowly looked behind the body of the Egg, I saw that I would indeed need All The Kings Men.
I don’t have many pictures from this period, because I quickly realized that I was half way through a smoking session with no lid for my smoker. It was some time before I was able to turn my attention once again to the future. At once, all my energy went towards saving “The Meat”.

This is after I picked up the two big pieces and put them back on top… Suddenly I was in a Reverse-Eskimo situation. I had to rebuild a really hot dome in record time in order to finish my smoking session. A couple of the pieces were too small, and I managed to step on another in my frantic rush to get the thing covered as the flames started to grow.

I found myself searching for some way to patch the holes. I felt like Maverick, floating in the shark-repellant dye holding the lifeless body of Goose.
Even with all the cracks, I have it holding at 275 – hotter than I’d like, but I think I can pull it off… at least for this final smoke. It’s like that horrible moment in Signs when Mel Gibson’s character is talking to his wife who’s only alive because the car that cut her in half is holding the top of her together… I’m talking to my Egg like everything is fine and we’ll have many happy years of smoking in the future… but I know that as soon as i pull the lid off for the last time, it will be all over.
And so I drink. To the memories, to the good times. To the steaks we’ll never have.

Updated on January 12, 2021
Sharepoint and 2012R2 Explorer View
I fought this for quite a while – I had a client who needed a huge amount of documents uploaded to Sharepoint. The number of individual documents was too large to use the folder sync through OneDrive. Too many files to put on my laptop and chew through during my waking ours. Long story short, I threw them on my test 2012R2 server so they could chew overnight – until I hit this snag:
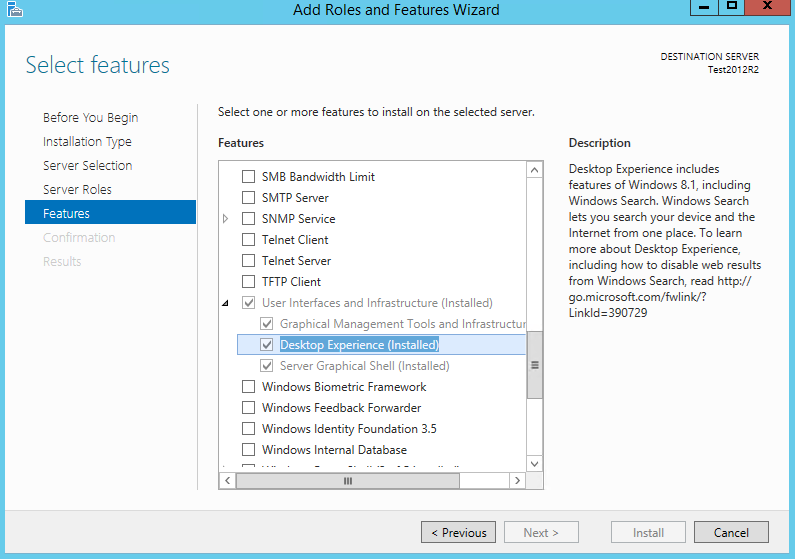
Clicking on the “Open with Explorer” button did nothing. No errors, no sounds, no action, nothing. Turns out the solution in Windows Server 2012 R2 is to install the Desktop Experience feature:

The browse with explorer relies on WebDAV components which aren’t installed on the 2012 R2 without the desktop experience infrastructure. Install it and you should be on your way to uploading to Sharepoint via Windows Server 2012 R2
Updated on July 22, 2020
Dell Opitplex 755 Low Voltage Issue
I put this short video together for an end user about a year ago, and since then several people have found it via YouTube… When the BIOS battery on the Dell Optiplex machines goes dead, the type of SATA operation goes back to default. This will likely break your machine, although strangely it will begin to boot windows before moving into a spiral of death. The BIOS reverts to AHCI and needs to be moved back to ATA… keep in mind that you’ll loose this setting every time you turn the machine off, until you’ve replaced the motherboard BIOS battery… but this will keep you up and going while you track one down.